No-Bake Peanut Butter Cup Pie 🥜🍫🥧
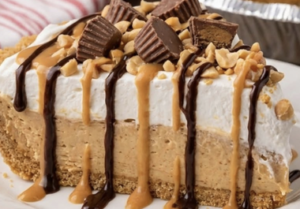
This No-Bake Peanut Butter Cup Pie is a rich, creamy dessert with a buttery graham cracker crust, fluffy peanut butter cream cheese filling, whipped topping, chopped peanut butter cups, crunchy peanuts, and generous drizzles of chocolate and peanut butter.
The dessert in your photo closely matches this style of no-bake peanut butter pie. Similar popular versions use cream cheese, creamy peanut butter, powdered sugar, whipped topping, a crumb crust, and chopped peanut butter cups.
It’s a great make-ahead dessert for summer parties, potlucks, Thanksgiving, Christmas, birthdays, or whenever you need an impressive dessert without turning on the oven.
Prep Time: 25 minutes
Chill Time: 4 hours
Total Time: 4 hours 25 minutes
Servings: 10–12 slices
Why You’ll Love This Recipe
- Completely no-bake
- Rich peanut butter flavor
- Creamy, mousse-like filling
- Buttery graham cracker crust
- Loaded with peanut butter cups
- Chocolate and peanut butter drizzle
- Easy to prepare ahead
- Freezer-friendly
- Perfect for parties and holidays
Ingredients
Graham Cracker Crust
- 2 cups graham cracker crumbs
- ¼ cup granulated sugar
- ½ cup unsalted butter, melted
- Pinch of salt
Peanut Butter Filling
- 8 ounces cream cheese, softened
- 1 cup creamy peanut butter
- 1 cup powdered sugar
- 1 teaspoon vanilla extract
- 1 cup heavy whipping cream, cold
- 2 tablespoons powdered sugar
OR for an easier filling:
Replace the heavy cream and 2 tablespoons powdered sugar with:
- 1 container (8 ounces) frozen whipped topping, thawed
Whipped Topping Layer
- 1½ cups heavy whipping cream
- ¼ cup powdered sugar
- 1 teaspoon vanilla extract
OR:
- 2 cups prepared whipped topping
For Decorating
- 1½ cups chopped peanut butter cups
- ½ cup roasted peanuts, roughly chopped
- ¼ cup creamy peanut butter
- ¼ cup chocolate sauce or hot fudge sauce
How to Make No-Bake Peanut Butter Cup Pie
Step 1: Make the Graham Cracker Crust
Add the graham cracker crumbs, sugar, melted butter, and salt to a mixing bowl.
Stir until all of the crumbs are evenly moistened.
The texture should resemble wet sand.
Step 2: Press the Crust
Transfer the mixture to a 9-inch deep-dish pie plate or springform pan.
Press the crumbs firmly across the bottom and slightly up the sides.
Use the bottom of a measuring cup or drinking glass to compact the crust.
Refrigerate for approximately 30 minutes while preparing the filling.
Make the Peanut Butter Filling
Step 3: Beat the Cream Cheese
Place the softened cream cheese in a large mixing bowl.
Beat with an electric mixer for approximately 1–2 minutes, until completely smooth.
Starting with properly softened cream cheese helps prevent lumps.
Step 4: Add the Peanut Butter
Add the creamy peanut butter.
Beat until smooth and fully incorporated.
For a consistently smooth no-bake filling, conventional no-stir peanut butter generally works better than natural peanut butter that separates.
Step 5: Add Sugar and Vanilla
Add the powdered sugar and vanilla.
Beat again until thick, creamy, and smooth.
Scrape down the sides of the bowl as necessary.
Make the Filling Light and Fluffy
Step 6: Whip the Cream
In a separate chilled bowl, combine:
- 1 cup heavy whipping cream
- 2 tablespoons powdered sugar
Beat until stiff peaks form.
Step 7: Fold It Together
Add approximately one-third of the whipped cream to the peanut butter mixture.
Gently fold it in with a rubber spatula.
Continue adding the remaining whipped cream in batches.
Fold gently rather than vigorously stirring.
This keeps the filling light and fluffy.
Prepared whipped topping is also commonly used in no-bake peanut butter pies because it provides a stable, fluffy filling.
Assemble the Pie
Step 8: Fill the Crust
Remove the chilled graham cracker crust from the refrigerator.
Spoon the peanut butter filling over the crust.
Spread it into a smooth, even layer.
Step 9: Chill
Cover the pie loosely.
Refrigerate for at least 4 hours, preferably overnight.
Giving the pie plenty of chilling time makes it significantly easier to cut into neat slices.
Make the Whipped Topping
Add the heavy whipping cream, powdered sugar, and vanilla to a chilled bowl.
Beat until stiff peaks form.
Spread or pipe the whipped cream generously over the chilled peanut butter layer.
For a look similar to your photo, make the whipped cream layer fairly thick.
Decorate the Pie
Now comes the fun part.
Scatter chopped peanut butter cups generously over the whipped topping.
Add chopped roasted peanuts.
Peanut Butter Drizzle
Place ¼ cup creamy peanut butter in a microwave-safe bowl.
Warm briefly until thin enough to drizzle.
Let it cool slightly before drizzling it generously over the pie.
Chocolate Drizzle
Warm chocolate sauce or hot fudge until pourable but not hot.
Drizzle it back and forth across the top.
For the appearance in your photo, allow some of both sauces to run slightly down the sides.
Finish with a few larger pieces of peanut butter cups in the center.
How to Get the Look in Your Photo
The presentation is all about distinct layers:
Bottom: thick golden graham cracker crust
Middle: tall creamy peanut butter filling
Top: thick white whipped cream
Garnish: chopped peanut butter cups + roasted peanuts
Finish: peanut butter and chocolate drizzles
Use a deep pie dish or springform pan if you want an especially tall dessert.
Tips for the Best Peanut Butter Pie
Soften the Cream Cheese
Cold cream cheese can leave small lumps throughout the filling.
Don’t Use Hot Peanut Butter
If you’re warming peanut butter for the drizzle, let it cool slightly before pouring it over the whipped cream.
Chill Long Enough
This is one dessert where patience makes a noticeable difference. The filling needs time to become firm enough for clean slices.
Use a Deep Pie Dish
There’s a generous amount of filling and topping, particularly if you’re recreating the tall version in the photo.
Add Candy Close to Serving
Adding some of the peanut butter cups shortly before serving keeps them looking fresh and attractive.
Chocolate Cookie Crust Variation
Chocolate and peanut butter are a natural combination.
Replace the graham cracker crust with:
- 24 chocolate sandwich cookies, finely crushed
- 5 tablespoons melted butter
Mix, press into the pan, and chill.
Chocolate-cookie and peanut-butter-cookie crusts are also common alternatives for peanut butter cup pies.
Peanut Butter Cookie Crust
For even more peanut butter flavor, make the crust with peanut butter sandwich cookies.
You’ll need approximately:
- 2½ cups crushed peanut butter sandwich cookies
- 5 tablespoons melted butter
Mix together and firmly press into your pie plate.
Refrigerate before filling.
Easy Shortcut Version
Short on time?
Use:
- 1 prepared 9-inch graham cracker crust
- 8 ounces softened cream cheese
- 1 cup creamy peanut butter
- 1 cup powdered sugar
- 8 ounces whipped topping
- Peanut butter cups
- Chocolate sauce
Beat the cream cheese, peanut butter, and powdered sugar until smooth.
Fold in the whipped topping.
Transfer to the prepared crust.
Chill until firm.
Top with additional whipped topping, peanut butter cups, peanuts, and chocolate sauce.
Peanut Butter Cup Explosion Version
Want even more candy inside?
Chop approximately 1 cup peanut butter cups.
After preparing the peanut butter filling, gently fold the chopped candy into it before transferring the filling to the crust.
Then use additional peanut butter cups for decorating.
Popular versions of peanut butter cup pie use chopped candies both in the filling and on top.
Salted Peanut Butter Pie
Sprinkle a very small amount of flaky salt over the chocolate and peanut butter drizzle immediately before serving.
The salty finish helps balance the sweetness of the filling and candy.
Chocolate Peanut Butter Pie
Add a thin chocolate ganache layer between the crust and peanut butter filling.
Quick Ganache
- ¾ cup semi-sweet chocolate chips
- ½ cup heavy cream
Heat the cream until steaming.
Pour it over the chocolate.
Wait 2 minutes, then stir until completely smooth.
Cool slightly and spread over the crust.
Chill until set before adding the peanut butter filling.
Mini Peanut Butter Cup Pies
This recipe can also be transformed into individual desserts.
Press graham cracker crust into muffin liners.
Add peanut butter filling.
Chill until firm.
Top each mini pie with whipped cream, a mini peanut butter cup, chopped peanuts, and chocolate drizzle.
They’re especially convenient for parties because there’s no slicing required.
What to Serve with Peanut Butter Cup Pie
Because this dessert is rich, simple accompaniments work best:
- Fresh strawberries
- Raspberries
- Cold milk
- Coffee
- Vanilla ice cream
- Chocolate ice cream
- Fresh whipped cream
A little fresh fruit provides a nice contrast to the creamy peanut butter filling.
Make-Ahead Instructions
This is an excellent make-ahead dessert.
Prepare the crust and peanut butter filling the day before serving.
Cover and refrigerate overnight.
Add the final whipped topping, candy, peanuts, and drizzles several hours before serving or shortly before presenting the pie.
How to Get Clean Slices
For neat bakery-style slices, refrigerate the pie overnight or briefly freeze it before slicing.
Dip a sharp knife into hot water.
Dry it completely.
Make one cut.
Wipe the knife clean and repeat for every slice.
This keeps the layers looking distinct.
Storage
Cover the pie and refrigerate it.
For the best quality, enjoy within approximately 3–4 days.
Keep it refrigerated whenever you’re not serving it.
Can You Freeze Peanut Butter Pie?
Yes.
No-bake peanut butter pies are particularly freezer-friendly, and several established versions specifically recommend freezing to firm the filling.
Freeze the pie in a well-covered freezer-safe container.
For the best quality, use within approximately 1 month.
Allow it to soften briefly before slicing and serving.
Frequently Asked Questions
Is this pie baked?
No. The entire recipe can be prepared without turning on the oven.
What kind of peanut butter should I use?
Regular creamy, no-stir peanut butter provides the most predictable texture. Natural peanut butter can separate and potentially make the filling looser.
Can I use crunchy peanut butter?
Yes. It will create a filling with more texture.
Can I use a store-bought crust?
Absolutely. A prepared graham cracker crust makes this dessert extremely quick.
Can I use an Oreo crust?
Yes. Chocolate cookie crust is delicious with peanut butter filling.
Can I make the pie the night before?
Yes. In fact, overnight chilling helps the filling become firm and makes slicing easier.
Why is my peanut butter filling too soft?
The pie may need additional chilling time. The cream cheese and whipped component also need to be incorporated correctly so the filling maintains its structure.
Can I use homemade whipped cream?
Yes. Freshly whipped heavy cream makes a rich, light filling. Prepared whipped topping provides another convenient and stable option.
Can I add peanut butter cups inside?
Definitely. Fold chopped candies into the filling before adding it to the crust.
Can I leave off the chocolate?
Yes. Use only peanut butter drizzle and chopped peanuts for an all-peanut-butter version.
Why is my crust crumbling?
It may need additional melted butter or more pressure when being packed into the pan.
How long should the pie chill?
Give it at least 4 hours for this tall version. Overnight is even better for very clean slices.
Can I serve it frozen?
Yes. Let it sit at room temperature briefly so it’s easier to slice.
Can I make individual portions?
Yes. Use muffin tins, small jars, or dessert cups to make mini peanut butter pies.
Pro Tips
- Use room-temperature cream cheese.
- Choose conventional creamy peanut butter for the smoothest filling.
- Pack the graham cracker crust firmly.
- Chill the crust before adding the filling.
- Fold whipped cream gently to keep the filling airy.
- Use a deep pie plate for tall, dramatic layers.
- Chill overnight whenever possible.
- Add plenty of chopped peanut butter cups for texture.
- Toast the peanuts for stronger nutty flavor.
- Warm the peanut butter only enough to make it pourable.
- Let sauces cool before drizzling them over whipped cream.
- Use a hot, clean knife for picture-perfect slices.
- Keep the dessert cold until shortly before serving.
- Add extra chocolate sauce to individual slices rather than making the whole pie overly sweet.
- Save a few larger peanut butter cup pieces for decorating the center.
Final Thoughts
This No-Bake Peanut Butter Cup Pie is made for serious peanut butter and chocolate fans. A buttery graham cracker crust supports a thick layer of creamy peanut butter filling, followed by fluffy whipped cream, crunchy peanuts, chopped peanut butter cups, and decadent chocolate and peanut butter drizzles.
Despite its impressive layered appearance, there’s no complicated baking involved. Prepare it ahead, let the refrigerator do the work, then decorate before serving for a dessert that looks just as special as it tastes.