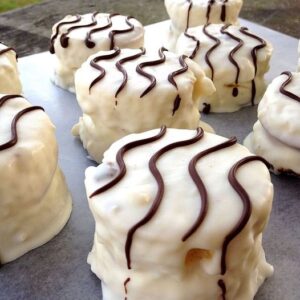
Zebra Cake Recipe


Ingredients:

For the Yellow Cake:

  • 15.25 oz yellow cake mix (avoid using instructions on the box, go for Betty Crocker “Super Moist”)
  • ½ cup unsalted butter, melted
  • ¾ cup milk
  • 1 teaspoon vanilla extract
  • 3 large eggs + 1 egg yolk (totaling 3 whole eggs + 1 extra egg yolk)

For the Creme Filling:

  • ½ cup unsalted butter, softened
  • ¼ teaspoon salt
  • 1 tablespoon vanilla extract (opt for clear vanilla for a bright white buttercream)
  • 3 cups powdered sugar
  • 2-3 teaspoons milk (add more as needed)

For the Coating:

  • 24 ounces white melting wafers OR almond bark (with a spoonful of vegetable shortening)
  • ¼ cup milk or semi-sweet chocolate chips, melted (for creating stripes)

Instructions:

  1. Preheat your oven to the temperature recommended on the cake mix package. Prepare two 9-inch round cake pans by greasing and flouring them.
  2. In a large mixing bowl, combine the yellow cake mix, melted butter, milk, vanilla extract, eggs, and egg yolk. Mix until smooth and well combined.
  3. Divide the cake batter evenly between the prepared cake pans. Smooth the tops with a spatula to ensure even baking.
  4. Bake the cakes in the preheated oven according to the package instructions or until a toothpick inserted into the center comes out clean. Allow the cakes to cool completely in the pans before removing them.
  5. While the cakes are cooling, prepare the creme filling. In a mixing bowl, beat together the softened butter, salt, vanilla extract, and powdered sugar until smooth and creamy. If needed, add milk, one teaspoon at a time, until the desired consistency is reached.
  6. Once the cakes have cooled, carefully remove them from the pans. Place one cake layer on a serving plate or cake stand.
  7. Spread a thick layer of the creme filling evenly over the top of the first cake layer. Place the second cake layer on top of the filling.
  8. Prepare the white coating by melting the white melting wafers or almond bark according to the package instructions. Once melted, pour the coating over the assembled cake, using a spatula to smooth it evenly over the top and sides. Allow the coating to set slightly.
  9. While the white coating is still tacky, drizzle melted milk or semi-sweet chocolate chips over the top of the cake in a zigzag pattern to create the zebra stripes.
  10. Allow the cake to set completely before slicing and serving. Enjoy your homemade zebra cake!

Here are some tips to elevate your Zebra Cake recipe:

  1. Quality Ingredients: Ensure you’re using high-quality ingredients, especially for the cake mix and vanilla extract. These can significantly impact the flavor and texture of your cake.
  2. Room Temperature Ingredients: Allow your butter, eggs, and milk to come to room temperature before using them in the recipe. Room temperature ingredients mix more easily and evenly, resulting in a smoother batter and better texture.
  3. Proper Mixing Technique: When mixing the cake batter, avoid overmixing, as this can lead to a dense or tough cake. Mix just until the ingredients are combined and smooth.
  4. Even Cake Layers: To ensure your cake layers bake evenly, measure the batter for each pan using a kitchen scale. This helps ensure that both layers are the same size and thickness.
  5. Leveling Cake Layers: If your cake layers have domed tops, use a serrated knife or a cake leveler to carefully trim off the domes, ensuring that your layers are flat and even for easier assembly.
  6. Generous Filling: Be generous with the creme filling between the cake layers. A thick layer of filling adds moisture and flavor to each bite of the cake.
  7. Chill Before Coating: For a cleaner and smoother coating, chill the assembled cake in the refrigerator for about 30 minutes before applying the white coating. This helps the filling firm up and creates a solid base for the coating.
  8. Smooth Coating: When applying the white coating, work quickly but carefully to ensure it covers the cake evenly. Use an offset spatula to spread the coating smoothly over the top and sides of the cake.
  9. Create Perfect Stripes: To create clean and defined zebra stripes, use a piping bag or a small spoon to drizzle the melted chocolate over the white coating in a zigzag pattern. Work swiftly but steadily for even stripes.
  10. Allow Time to Set: After decorating the cake with the chocolate stripes, allow it to set completely before slicing and serving. This ensures that the coating and filling have time to firm up for clean slices.

By following these tips, you can take your Zebra Cake to the next level and delight your taste buds even more!

Achieving the perfect Zebra Cake involves attention to detail and a few secrets:

  1. Temperature Control: Ensure all your ingredients are at the right temperature. Room temperature ingredients blend together more easily, resulting in a smoother batter and better texture.
  2. Precise Measurements: Use a kitchen scale to measure ingredients accurately, especially when dividing the batter between cake pans. This ensures even cake layers and consistent results.
  3. Proper Layering Technique: When layering the cake batter in the pans, alternate between spoonfuls of yellow and chocolate batter to create the zebra stripes. Use the back of a spoon to spread the batter evenly and create distinct layers.
  4. Consistent Thickness: Aim for consistent thickness in each layer of batter. This helps the cake bake evenly and ensures uniformity in the zebra stripes.
  5. Time Management: Be mindful of baking times and temperatures. Check the cakes for doneness a few minutes before the recommended baking time to avoid overbaking, which can result in a dry cake.
  6. Smooth Filling Application: When spreading the creme filling between the cake layers, use a spatula or offset spatula to achieve an even layer. This ensures each bite of the cake has a balanced ratio of cake to filling.
  7. Chilling for Stability: Refrigerate the assembled cake before applying the white coating. Chilling helps firm up the layers and prevents the cake from shifting or sliding during the coating process.
  8. Even Coating Distribution: When applying the white coating, start with the top of the cake and work your way down the sides, using a spatula to spread the coating evenly. Pay attention to any uneven areas and smooth them out for a flawless finish.
  9. Precision with Chocolate Drizzle: Use a steady hand to drizzle the melted chocolate over the white coating in a zigzag pattern. Work quickly but carefully to create clean and defined zebra stripes.
  10. Patience and Practice: Achieving the perfect Zebra Cake may take some practice. Be patient with yourself and don’t be afraid to experiment with different techniques and variations until you find what works best for you.

With these secrets in mind, you’ll be well on your way to mastering the art of the perfect Zebra Cake!

Here are some popular questions and their answers related to Zebra Cake recipe:

  1. Can I use a different cake mix for this recipe? Yes, you can use a different yellow cake mix if you prefer. However, results may vary depending on the brand and type of cake mix used.
  2. Can I make this cake ahead of time? Yes, you can prepare the cake layers and creme filling in advance. Store the cooled cake layers wrapped tightly in plastic wrap at room temperature and the creme filling in an airtight container in the refrigerator. Assemble and coat the cake just before serving for the best results.
  3. Can I use homemade cake batter instead of a cake mix? Yes, you can use homemade yellow cake batter instead of a cake mix. Just ensure that the batter is smooth and pourable for creating the zebra stripes.
  4. How do I store leftover Zebra Cake? Store leftover Zebra Cake in an airtight container in the refrigerator for up to 3-4 days. Allow the cake to come to room temperature before serving for the best taste and texture.
  5. Can I freeze Zebra Cake? Yes, you can freeze Zebra Cake for up to 2-3 months. Wrap the cake tightly in plastic wrap and then aluminum foil before freezing. Thaw the cake overnight in the refrigerator before serving.
  6. Can I use a different type of coating instead of white chocolate? Yes, you can use dark or milk chocolate for the coating instead of white chocolate if you prefer. Just melt the chocolate according to the package instructions and use it to coat the cake.
  7. Can I skip the creme filling? While the creme filling adds moisture and flavor to the cake, you can skip it if desired. However, the cake may be slightly less moist without the filling.
  8. How can I ensure my cake layers are evenly baked? Use an oven thermometer to ensure that your oven is properly calibrated and baking at the correct temperature. Rotate the cake pans halfway through baking to ensure even baking.
  9. Can I use food coloring to make the zebra stripes more vibrant? Yes, you can add a few drops of food coloring to the cake batter to make the zebra stripes more vibrant. Just be mindful of the intensity of the colors, as too much food coloring can affect the taste of the cake.
  10. Can I use different flavors for the cake and filling? Yes, you can experiment with different flavors for the cake and filling to customize the recipe to your taste preferences. Consider using chocolate cake mix with a raspberry filling for a delicious variation.