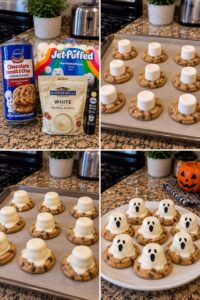
These Marshmallow Ghost Cookies are an easy Halloween treat made with soft chocolate chip cookies, jumbo marshmallows, smooth white candy coating, and spooky black icing faces. Each cookie becomes a sweet little ghost with a chewy marshmallow center and a flowing white chocolate “sheet.”
Using refrigerated cookie dough keeps the recipe quick and simple, making these cookies perfect for Halloween parties, school celebrations, fall bake sales, movie nights, or a fun family decorating activity.
Prep Time: 20 minutes
Bake Time: 10–12 minutes
Decorating Time: 25 minutes
Total Time: Approximately 1 hour
Servings: 12 cookies
Why You’ll Love This Recipe
- Fun Halloween appearance
- Easy to make
- Uses refrigerated cookie dough
- Soft cookie and marshmallow center
- Smooth white chocolate coating
- Simple ingredients
- Perfect for decorating with children
- Easy to prepare ahead
- Great for parties and dessert tables
Ingredients
Cookie Bases
- 1 package refrigerated chocolate chip cookie dough, enough for 12 large cookies
- 12 jumbo marshmallows
Ghost Coating
- 12 ounces white candy melts or white melting wafers
- 1–2 teaspoons refined coconut oil or vegetable shortening, if needed
Ghost Faces
- Black decorating icing
- Melted dark chocolate, optional
- Mini chocolate chips, optional
How to Make Marshmallow Ghost Cookies
Step 1: Preheat the Oven
Preheat the oven according to the directions on the cookie dough package, usually 350°F.
Line a large baking sheet with parchment paper.
Parchment prevents sticking and makes it easier to remove any hardened candy coating.
Step 2: Portion the Cookie Dough
Divide the cookie dough into 12 equal portions.
Roll each portion into a ball and arrange the balls on the prepared baking sheet, leaving approximately two inches between them.
If using pre-portioned dough, place one or two pieces together, depending on the size of cookie you want.
Step 3: Bake the Cookies
Bake the cookies according to the package directions, usually for approximately 10–12 minutes.
The edges should be lightly golden, while the centers remain slightly soft.
Avoid overbaking because the cookies will continue to set as they cool.
Step 4: Add the Marshmallows
Remove the baking sheet from the oven.
Immediately place one jumbo marshmallow upright in the center of each warm cookie.
Press very gently so the bottom of the marshmallow attaches without flattening the cookie.
Step 5: Secure the Marshmallows
Return the cookies to the oven for approximately 1 minute.
The marshmallows should soften slightly but should not expand, brown, or melt completely.
Remove the tray from the oven and allow the cookies to cool on the baking sheet for five minutes.
Step 6: Cool Completely
Transfer the cookies carefully to a wire rack.
Allow them to cool completely before adding the white coating.
If the cookies or marshmallows are warm, the coating may slide off or remain soft.
Step 7: Melt the White Candy Coating
Place the white candy melts in a microwave-safe bowl.
Microwave in 20-second intervals, stirring thoroughly after each interval, until completely smooth.
Do not overheat the coating.
Step 8: Adjust the Consistency
If the coating is too thick to flow from a spoon, add refined coconut oil or vegetable shortening, ½ teaspoon at a time.
The coating should be thick enough to cover the marshmallow but fluid enough to drip naturally onto the cookie.
Do not add water or milk because they can cause candy melts to seize.
Step 9: Cover the Marshmallows
Place the cooled cookies on a parchment-lined tray.
Spoon the melted white coating over each marshmallow, allowing it to run down the sides and pool slightly on the cookie.
The uneven drips create the flowing shape of a ghost’s sheet.
Step 10: Let the Coating Set
Leave the decorated cookies at room temperature for approximately 15–20 minutes, or refrigerate them for five minutes.
The white coating should be completely firm before you add the faces.
Step 11: Draw the Ghost Faces
Use black decorating icing to make two small oval eyes and one larger open mouth on each ghost.
You can make each expression slightly different for a playful group of ghosts.
Allow the black icing to set before moving or stacking the cookies.
Step 12: Serve
Arrange the marshmallow ghost cookies on a large platter.
Serve them at room temperature for the best combination of soft cookie, chewy marshmallow, and crisp candy coating.
Can I Use Homemade Cookie Dough?
Yes. Homemade chocolate chip cookie dough works perfectly.
Use approximately two tablespoons of dough for each cookie and bake until the edges are set but the centers remain soft.
You can also use:
- Sugar cookie dough
- Double chocolate cookie dough
- Peanut butter cookie dough
- Oatmeal chocolate chip dough
- Brownie cookie dough
Chocolate chip cookies create a warm, classic base that contrasts nicely with the white ghosts.
The Best Marshmallows to Use
Jumbo marshmallows work best because they create tall, recognizable ghost shapes.
Standard large marshmallows can also be used, but the ghosts will be smaller.
Avoid mini marshmallows because they are too short to create the same effect.
Choose fresh, soft marshmallows. Older marshmallows can be dry and difficult to attach to the cookies.
Can I Use White Chocolate?
Yes. White baking chocolate can replace candy melts.
Melt the chocolate slowly and stir in a small amount of refined coconut oil if needed.
White chocolate is more sensitive to heat than candy melts, so microwave it in short intervals and stir frequently.
Candy melts usually create a firmer coating that is easier to handle at a party.
How to Melt Candy Wafers Correctly
Place the wafers in a completely dry microwave-safe bowl.
Heat for 20 seconds, stir, and repeat until almost melted. Continue stirring until the remaining pieces dissolve.
Do not wait for the wafers to look fully melted before stirring. They hold their shape even when warm and can burn if overheated.
Why Is My Candy Coating Too Thick?
Candy melts naturally vary in thickness.
Add refined coconut oil or vegetable shortening ½ teaspoon at a time until the coating flows smoothly.
Too much oil will make the coating thin and slow to set, so add only what is needed.
Why Is My Coating Lumpy?
The candy melts may have been overheated or exposed to moisture.
Use a clean, completely dry bowl and spoon. Melt the wafers slowly and stir after every short heating interval.
If the coating is only slightly thick, a small amount of coconut oil may smooth it.
How to Keep the Marshmallows Upright
Place each marshmallow on the cookie immediately after baking, while the cookie is still warm.
Press gently, then return the cookies to the oven for only one minute.
The softened marshmallow base will adhere as it cools. Avoid heating it too long because the marshmallow may spread or collapse.
Decorating Ideas
Classic Ghost Cookies
Use white candy coating and simple black oval faces.
Make some ghosts look surprised, happy, sleepy, or frightened.
Bloody Ghost Cookies
Drizzle a small amount of red candy coating over the white ghosts.
Add black faces after both coatings have hardened.
Mummy Cookies
Drizzle thin lines of white coating back and forth over the marshmallows.
Add candy eyes before the coating sets.
Monster Marshmallow Cookies
Use green, purple, or orange candy melts.
Add candy eyes and draw crooked mouths with black icing.
Chocolate Ghost Cookies
Use double chocolate cookie dough for a darker base.
The deep chocolate color creates a dramatic contrast with the white ghost coating.
Peanut Butter Ghost Cookies
Use peanut butter cookie dough and add mini chocolate chips around the base.
Peanut butter pairs especially well with marshmallow and white chocolate.
Can I Use Candy Eyes?
Yes. Press candy eyes onto the coating while it is still wet.
Use black icing to add the mouth after the white coating hardens.
Candy eyes create a cute appearance, while piped black eyes produce the classic spooky ghost look shown in the photo.
Can I Make These Without Black Icing?
Yes. Melt a small amount of dark chocolate and transfer it to a piping bag or zip-top bag.
Cut a very small opening in the corner and pipe the eyes and mouth.
Mini chocolate chips can also be attached with a small dot of melted chocolate.
Can I Make Them Ahead?
Yes. Bake and decorate the cookies up to 2 days before serving.
Store them in a single layer inside an airtight container at cool room temperature.
If your kitchen is warm, refrigerate them and allow them to return to room temperature before serving.
Storage
Store the cookies in an airtight container for up to 3 days.
Place parchment paper between the layers if stacking is necessary, but a single layer is best for protecting the ghost faces.
Avoid humid storage areas because moisture may soften the candy coating.
Can You Freeze Marshmallow Ghost Cookies?
The plain baked cookies can be frozen for up to 2 months.
Thaw them completely before attaching the marshmallows and decorating.
Freezing fully decorated cookies is not recommended because condensation can create spots on the coating and cause the black icing to run.
How to Transport the Cookies
Place the cookies in a large, shallow container in a single layer.
Use small pieces of crumpled parchment between them to prevent movement.
Do not stack the cookies unless the coating and faces are completely set.
Keep them away from heat and direct sunlight during transportation.
What to Serve with Ghost Cookies
These cookies are perfect for a Halloween dessert table with:
- Oreo cake pops
- Brownie bites
- Candy corn popcorn
- Chocolate-covered pretzels
- Halloween cupcakes
- Caramel apples
- Pumpkin cookies
- Hot chocolate
- Apple cider
- Chocolate milk
Arrange them on a black or orange platter for a simple seasonal presentation.
Frequently Asked Questions
Should I bake the marshmallows with the cookies?
Bake the cookies first. Add the marshmallows afterward and return them to the oven for only one minute.
Can I use store-bought baked cookies?
Yes. Attach the marshmallows with a small amount of melted candy coating instead of warming the cookies.
Why did my marshmallows melt?
They were left in the oven too long. They only need enough heat to soften the bottoms slightly.
Why is the white coating sliding off?
The cookies or marshmallows may still be warm. Allow them to cool completely before decorating.
How long does the coating take to set?
Candy coating usually hardens within approximately 15–20 minutes at room temperature.
Can children help make these?
Yes. Children can place the marshmallows and decorate the faces with adult supervision.
Can I use frosting instead of candy melts?
Yes, but frosting will remain soft and will not create the same firm shell.
Can I make smaller cookies?
Yes. Use standard marshmallows and smaller portions of cookie dough.
Do these cookies need refrigeration?
They can remain at cool room temperature for a day or two. Refrigerate them if your kitchen is warm.
How many cookies does the recipe make?
The recipe makes approximately 12 large ghost cookies.
Pro Tips
Bake the cookies until the centers are still slightly soft. This creates a chewy base after they cool.
Attach the marshmallows while the cookies are warm, but allow everything to cool completely before adding the candy coating.
Use a spoon to pour the coating over the marshmallows rather than dipping them. This creates natural ghost-like drips over the cookie.
Allow the white coating to harden before drawing the faces so the black icing stays neat.
Make different expressions on each ghost to give the finished platter more personality.
Final Thoughts
These Marshmallow Ghost Cookies turn simple chocolate chip cookies and jumbo marshmallows into a fun Halloween dessert. The soft cookie base, chewy marshmallow, white candy shell, and spooky faces make them as delicious as they are festive.
Prepare them for Halloween parties, school events, dessert tables, bake sales, or a family decorating night. They’re easy to make, simple to customize, and guaranteed to add a playful ghostly touch to any celebration.