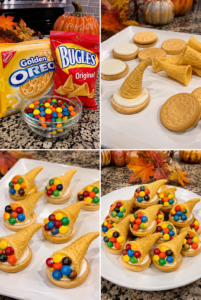
Mini Cornucopia
These Mini Cornucopias are a sweet, crunchy no-bake treat made with Golden Oreos, Bugles, and colorful candy-coated chocolates. Each cookie becomes a little platter, while a Bugle forms the cornucopia horn. They’re simple to assemble, fun for kids to help decorate, and right at home on a Thanksgiving dessert table.
Prep Time: 25 minutes
Chill Time: 15 minutes
Total Time: About 40 minutes
Servings: 12 mini cornucopias
Why You’ll Love This Recipe
- No oven or complicated equipment required
- Uses a few easy-to-find ingredients
- Makes a festive Thanksgiving snack or dessert-table decoration
- Easy for children to help assemble and fill
- Simple to adapt with different cookies, candies, and colors
- Can be prepared ahead so party-day assembly is quick
Ingredients
- 12 Golden Oreo cookies
- 12 whole Bugles corn snacks, plus a few extra in case any break
- ½ cup vanilla frosting, or the cream filling from the cookies
- ¾ cup small candy-coated chocolates, such as mini M&M’s
How to Make Mini Cornucopias
Step 1: Set Up the Work Area
Line a tray or baking sheet with parchment paper, or set out a large serving platter. Arrange the cookies, Bugles, frosting, and candies nearby so each piece is easy to reach.
Choose Bugles with an intact pointed tip and a wide opening. The wide opening makes it easier to add the candies, and the pointed end helps create the classic cornucopia shape.
Step 2: Separate the Cookies
Carefully twist each Golden Oreo apart. Keep the half with the cream filling for the base. If some cookies break or the filling comes off unevenly, save the pieces and use a little frosting to make a stable base.
Place the cookie halves cream-side up on the prepared tray. Leave enough room between them to attach the Bugles without bumping the neighboring cookies.
Step 3: Attach the Bugles
Add a small mound of frosting to the center of each cream-topped cookie. Set a Bugle on the frosting, positioning the wide opening toward the edge of the cookie and the pointed tip angled slightly upward.
Press gently to secure it. The frosting should hold the Bugle in place without squeezing out around the edges. If you’re using the Oreo filling as the adhesive, press a small portion of it into the center first; add a touch of frosting if it needs more hold.
Step 4: Chill the Bases
Place the tray in the refrigerator for 10–15 minutes, until the frosting firms up. This quick chill helps the Bugles stay attached while you move and fill the treats.
If you’re short on refrigerator space, let the bases sit at a cool room temperature until the frosting feels set. Keep them on a level surface so the Bugles don’t slide.
Step 5: Fill the Cornucopias
Once the frosting is firm, carefully spoon or place a few candy-coated chocolates into the open end of each Bugle. Add just enough for some candies to show at the opening and spill slightly over the edge.
For an abundant look, arrange a few extra candies on the cookie base in front of the opening. Handle the Bugles gently while filling; they can crack if squeezed.
Step 6: Arrange and Serve
Move the finished cornucopias to a serving platter, using a small spatula if needed to lift any that have stuck to the parchment. Arrange them with the pointed ends facing different directions for a casual fall-harvest display.
Serve the treats at room temperature. If making them ahead, chill the bases and wait to add the candies until closer to serving.
Tips for the Best Mini Cornucopias
- Pick sturdy Bugles: Check them before assembly and set aside any that are cracked or crushed.
- Use a modest amount of frosting: Too much can ooze out and make the cookies harder to handle.
- Keep the Bugle opening accessible: Point the wide end outward so you can fill it after the frosting sets.
- Chill before adding candy: A short chill makes the cookie-and-Bugle pieces easier to move.
- Fill them gently: A small spoon or careful fingers work well; avoid pushing candies deep into the cone.
- Make a few extras: Bugles and cookies can break during assembly, so prepare a couple of spare pieces.
- Keep the platter level: The treats are lightweight, and a tilted tray can cause the candies to spill.
Easy Variations
Use Different Cookies
Golden Oreos match the warm color of the cornucopias, but chocolate sandwich cookies, vanilla sandwich cookies, or sturdy round shortbread cookies can also work. Choose a cookie with a flat surface that can support the Bugle.
Try Different Candy Colors
Use orange, yellow, red, and brown candies for an autumn look. For a bright, playful platter, use the full mix of candy colors shown in the photo.
Add a Chocolate Drizzle
Drizzle a small amount of melted white or milk chocolate over the cookie base after assembly. Let it set before moving the treats. Keep the drizzle light so it doesn’t cover the Bugle opening.
Use Candy Melts to Secure the Bugles
Melted candy melts or white chocolate can be used instead of frosting as the adhesive. Add a small dab to the cookie, attach the Bugle, and let it firm completely before filling.
Make a Larger Dessert Display
Arrange the mini cornucopias around a bowl of extra candies or place them beside cookies and fall cupcakes. For easy serving, keep them in a single layer and point the Bugles outward.
Make-Ahead and Storage
For the best texture, make the cookie-and-Bugle bases up to one day ahead. Store them in a single layer in an airtight container in a cool place. If you stack them, the Bugles can crack or the frosting can smear.
Add the candies shortly before serving so they stay crisp and don’t spill while the treats are being stored. If your kitchen is warm, refrigerate the assembled bases and let them sit out briefly before serving.
Store finished mini cornucopias in an airtight container at room temperature for up to 2 days. Keep them away from heat and moisture, which can soften the cookies and Bugles.
Frequently Asked Questions
Do I need to remove the cream filling from the Golden Oreos?
No. The filling can stay on one cookie half and help form a base. Add a small amount of frosting if you need extra adhesive to secure the Bugle.
What if the cookie breaks when I separate it?
Use a fresh cookie half for the base if possible. You can also place broken pieces together with frosting, but a whole half will give you a sturdier base.
How do I keep the Bugle attached?
Use a small mound of frosting or melted candy coating, press the Bugle gently into it, and chill the assembled bases until the adhesive firms. Avoid handling them by the Bugle while moving them.
Can I make these without frosting?
Yes. The Oreo filling may hold the Bugle in place on its own. If it feels too soft or there isn’t enough filling, use melted white chocolate or candy melts instead.
Can I use regular-size M&M’s?
Regular-size candy-coated chocolates can fit, but smaller candies are easier to place inside the Bugles and are less likely to crack them. Use a few mini candies per cornucopia for the easiest assembly.
Can children help make these?
Yes. Children can add the candies and help arrange the finished treats. An adult can separate the cookies and handle melted chocolate if you use it.
How far ahead can I prepare them?
Prepare the cookie-and-Bugle bases up to a day ahead. Add the candy shortly before serving for the freshest, neatest presentation.
Final Thoughts
These Mini Cornucopias bring a little harvest-season fun to the table with crisp Bugles, sweet Golden Oreos, and colorful candy. Assemble them for a Thanksgiving party, let kids help fill the cones, or arrange them on a platter alongside other fall treats.