Homemade Reese’s Peanut Butter Cups
These Homemade Reese’s Peanut Butter Cups have a smooth chocolate shell and a sweet, creamy peanut butter center. They’re easy to make with a handful of everyday ingredients and no oven required.
Make a batch for holidays, parties, lunchbox treats, or a quick homemade dessert. You can use mini muffin liners for bite-size cups or standard cupcake liners for larger peanut butter cups.
Prep Time: 20 minutes
Chill Time: 1 hour
Total Time: Approximately 1 hour 20 minutes
Servings: 12 regular-size cups
Why You’ll Love This Recipe
- No baking required
- A rich chocolate shell with a soft peanut butter center
- Made with simple ingredients
- Easy to prepare ahead
- Simple to make in mini or regular sizes
- Easy to customize with different chocolate and toppings
- Great for sharing, gifting, or keeping in the refrigerator
Ingredients
Chocolate Shell
- 2 cups semi-sweet chocolate chips
- 1 tablespoon coconut oil or unsalted butter
Peanut Butter Filling
- 1 cup creamy peanut butter
- ½ cup powdered sugar
- ¼ cup graham-cracker crumbs, optional
- ½ teaspoon vanilla extract
- Pinch of salt, optional
Optional Toppings
- Flaky sea salt
- Chopped peanuts
- Mini chocolate chips
- Melted white chocolate for drizzling
How to Make Homemade Reese’s Peanut Butter Cups
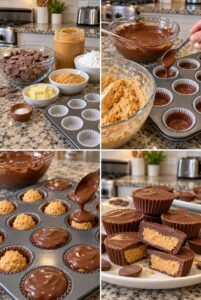
Step 1: Prepare the Pan
Line a standard 12-cup muffin pan with paper liners. For smaller candy portions, use a mini muffin pan and mini liners.
Step 2: Melt the Chocolate
Add the chocolate chips and coconut oil to a microwave-safe bowl. Microwave in 20-second intervals, stirring between each one, until the chocolate is smooth.
You can also melt the chocolate in a heatproof bowl set over a saucepan of gently simmering water. Keep the bowl from touching the water and stir until smooth.
Step 3: Make the Peanut Butter Filling
In a medium bowl, mix the peanut butter, powdered sugar, graham-cracker crumbs, vanilla, and salt until thick and smooth.
If the filling feels too soft to shape, refrigerate it for 10–15 minutes. If it seems crumbly, mix in another teaspoon of peanut butter.
Step 4: Add the First Chocolate Layer
Spoon about 1½ teaspoons of melted chocolate into each regular muffin liner. Tilt or gently tap the pan so the chocolate spreads across the bottom.
For mini cups, use about ½ teaspoon per liner.
Step 5: Chill the Bottom Layer
Place the pan in the refrigerator for 10–15 minutes, until the chocolate is mostly firm. This creates a solid base for the filling.
Step 6: Shape the Peanut Butter Centers
Divide the peanut butter mixture into 12 portions. Shape each portion into a small flat disc, slightly smaller than the inside of the muffin liner.
Press one disc gently onto each chilled chocolate base. Leave a narrow border around the edges so the top layer can seal the filling inside.
Step 7: Cover with Chocolate
Spoon the remaining melted chocolate over the peanut butter centers. Spread it gently so the filling is covered and the chocolate reaches the edges of each liner.
If the chocolate has started to thicken, warm it briefly in the microwave and stir until smooth.
Step 8: Add Toppings
Before the chocolate sets, sprinkle the cups with flaky sea salt, chopped peanuts, or mini chocolate chips, if desired.
Step 9: Chill Until Firm
Refrigerate the cups for 45–60 minutes, or until the chocolate shell is completely firm.
Step 10: Serve
Peel away the paper liners and serve the cups chilled or at cool room temperature.
Tips for the Best Peanut Butter Cups
- Use regular creamy peanut butter: Natural peanut butter can separate and make the filling oily or too soft.
- Don’t overheat the chocolate: Melt it in short intervals and stir often to keep it smooth.
- Keep the filling centered: Leave a small edge of chocolate visible around each peanut butter disc so the top layer can seal.
- Adjust the filling texture: Add a little powdered sugar if it’s too soft, or a small spoonful of peanut butter if it’s too dry.
- Let the bottom layer set: A firm base makes it easier to add the peanut butter filling without mixing the layers.
- Use liners: They help the cups release neatly and keep the chocolate from sticking to the pan.
- Chill before removing the liners: The cups peel more cleanly once the chocolate is fully firm.
Choosing Chocolate
Semi-sweet chocolate chips make a balanced, not-too-sweet shell. Milk chocolate gives the cups a sweeter candy-bar flavor, while dark chocolate makes them richer and less sweet.
If using chopped chocolate bars, choose chocolate made for melting or add a little coconut oil to help create a smooth shell.
Delicious Variations
Dark Chocolate Peanut Butter Cups
Use dark chocolate chips or chopped dark chocolate for a deeper, less sweet flavor.
Crunchy Peanut Butter Cups
Replace the creamy peanut butter with crunchy peanut butter, or stir 2 tablespoons of chopped peanuts into the filling.
Honey Peanut Butter Cups
Add 1 tablespoon honey to the filling. If the mixture becomes too soft, add a little more powdered sugar.
Pretzel Peanut Butter Cups
Place a few finely crushed pretzels in the chocolate base or stir them into the peanut butter filling for a salty crunch.
White Chocolate Drizzle
Melt ¼ cup white chocolate and drizzle it over the firm cups. Let the drizzle set before storing.
Mini Peanut Butter Cups
Use a mini muffin pan and reduce the filling and chocolate portions. Begin checking them after about 30 minutes of chilling; smaller cups may set faster.
Can I Make Them Ahead?
Yes. These peanut butter cups are ideal for making ahead. Prepare them up to one week before serving and keep them in an airtight container in the refrigerator.
For gift boxes or party platters, keep them chilled until close to serving so the chocolate stays firm.
Storage
Store the cups in an airtight container in the refrigerator for up to 2 weeks. If stacking them, place parchment paper between the layers.
They can be served straight from the refrigerator or left at room temperature for a few minutes to soften slightly.
Can You Freeze Homemade Peanut Butter Cups?
Yes. Place the firm cups in a freezer-safe container, separating the layers with parchment paper. Freeze for up to 2 months.
Thaw them in the refrigerator or let them sit at room temperature for about 10–15 minutes before serving.
Frequently Asked Questions
Do I need to temper the chocolate?
No. These cups are chilled in the refrigerator, so tempering isn’t necessary. The chocolate may soften if left somewhere warm for a long time.
Why is my peanut butter filling too soft?
Some peanut butters are thinner or oilier than others. Mix in additional powdered sugar or chill the filling briefly before shaping it.
Can I make these without graham-cracker crumbs?
Yes. The crumbs are optional. They add a little structure and a texture similar to a traditional peanut butter cup. You can leave them out or use finely crushed vanilla wafers instead.
Can I use a different nut butter?
Almond butter can work, though the filling may be softer. Stir it well and add powdered sugar gradually until it holds its shape. Check that the chocolate and other ingredients suit anyone with allergies.
Why did my chocolate become thick or grainy?
Chocolate can seize if it overheats or comes into contact with water. Melt it gently in short intervals, and make sure the bowl and utensils are completely dry.
Can I use a silicone mold instead of paper liners?
Yes. Silicone candy or muffin molds work well. Let the cups chill completely, then gently flex the mold to release them.
Pro Tips
Use a creamy peanut butter that holds its shape, melt the chocolate slowly, and chill the bottom layer before adding the filling. Keep the peanut butter discs smaller than the liners so the chocolate top can seal around them. Once firm, store the cups in a cool place for the neatest finish.
Final Thoughts
These Homemade Reese’s Peanut Butter Cups are a simple no-bake treat with a smooth chocolate shell and a sweet, creamy peanut butter center. They’re easy to prepare in advance, easy to customize, and just the right size for sharing.
Keep a batch in the refrigerator for an anytime dessert, or package a few in a small gift box for a homemade candy treat.