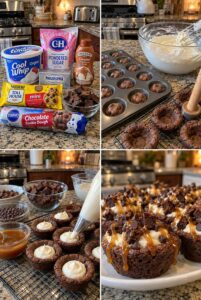
Caramel Brownie Cookie Cups
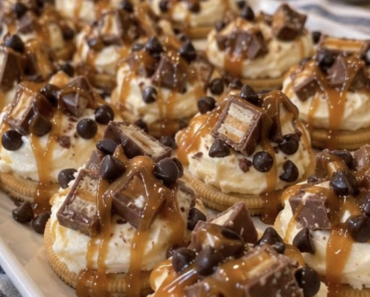
These Caramel Brownie Cookie Cups combine rich chocolate cookie shells, fluffy cheesecake filling, fudgy brownie pieces, mini chocolate chips, and a generous caramel drizzle. Each cup is soft and chewy around the edges, creamy in the center, and loaded with chocolate and caramel flavor.
Using refrigerated cookie dough and prepared brownies makes this impressive-looking dessert surprisingly easy. Serve the cups for parties, potlucks, birthdays, holiday dessert tables, game day, or whenever you need a rich individual chocolate treat.
Prep Time: 25 minutes
Bake Time: 12–15 minutes
Cooling and Decorating Time: 45 minutes
Total Time: Approximately 1 hour 25 minutes
Servings: 12 cookie cups
Why You’ll Love This Recipe
- Rich chocolate cookie shells
- Creamy cheesecake filling
- Fudgy brownie topping
- Gooey caramel drizzle
- Easy individual servings
- Uses convenient prepared ingredients
- Beautiful dessert-table presentation
- Easy to prepare ahead
- Simple to customize
- Perfect for chocolate lovers
Ingredients
Chocolate Cookie Cups
- 1 package (16–18 ounces) refrigerated chocolate cookie dough
- Nonstick cooking spray
Cheesecake Filling
- 8 ounces cream cheese, softened
- ¾ cup powdered sugar
- 1 teaspoon vanilla extract
- 1½ cups frozen whipped topping, thawed
- Pinch of salt
Toppings
- 1½ cups prepared brownies, cut into small cubes
- ½ cup caramel sauce
- ½ cup mini chocolate chips
- Flaky sea salt, optional
- Chopped pecans or walnuts, optional
How to Make Caramel Brownie Cookie Cups
Step 1: Preheat the Oven
Preheat the oven to 350°F.
Lightly coat a standard 12-cup muffin pan with nonstick cooking spray.
Pay special attention to the sides and bottom of each cavity so the cookie cups release easily.
Step 2: Portion the Cookie Dough
Divide the refrigerated chocolate cookie dough into 12 equal portions.
Roll each portion into a ball and place one in every muffin cup.
If you are using pre-portioned dough, combine enough pieces to create approximately two tablespoons of dough per cup.
Step 3: Shape the Dough
Gently press each ball of dough across the bottom of the muffin cavity.
You do not need to push the dough all the way up the sides before baking. The centers will be shaped while the cookies are still warm.
Step 4: Bake the Cookie Cups
Bake for approximately 12–15 minutes, or until the edges appear set.
The centers may still look slightly soft, but they will continue to cook from the heat of the pan.
Avoid overbaking because the cups should remain soft and chewy.
Step 5: Form the Centers
Remove the pan from the oven.
Immediately press the center of each warm cookie with the rounded handle of a wooden spoon, a small measuring spoon, or a tart shaper.
Create a deep cavity without pressing through the bottom.
The edges may rise again slightly, so repeat the pressing process after two or three minutes if necessary.
Step 6: Cool in the Pan
Allow the cookie cups to cool inside the muffin pan for approximately 15 minutes.
Run a thin knife gently around the edges, then carefully remove the cups and transfer them to a wire rack.
Let them cool completely before adding the filling.
Step 7: Beat the Cream Cheese
Place the softened cream cheese in a large mixing bowl.
Beat with an electric mixer for approximately 1–2 minutes, or until completely smooth.
Room-temperature cream cheese produces the smoothest filling.
Step 8: Add the Sugar and Vanilla
Add the powdered sugar, vanilla extract, and a small pinch of salt.
Beat until smooth, creamy, and evenly combined.
Scrape down the sides of the bowl as needed.
Step 9: Add the Whipped Topping
Gently fold the thawed whipped topping into the cream cheese mixture.
Continue folding until no white streaks remain.
Avoid mixing too aggressively because the whipped topping gives the filling its light texture.
Step 10: Fill the Cookie Cups
Transfer the cheesecake mixture to a piping bag fitted with a large tip.
Pipe the filling into each completely cooled chocolate cookie cup.
You can also use a spoon if you do not have a piping bag.
Step 11: Add the Brownie Pieces
Cut the prepared brownies into small cubes or crumble them into bite-sized pieces.
Arrange several brownie pieces over the cheesecake filling in each cup.
Press them down very lightly so they stay in place.
Step 12: Add the Chocolate Chips
Sprinkle mini chocolate chips over the brownie pieces and filling.
Mini chips work especially well because they distribute evenly without overwhelming the small desserts.
Step 13: Drizzle with Caramel
Drizzle caramel sauce over every cookie cup.
If the caramel is too thick, warm it for a few seconds until pourable. Allow it to cool slightly before adding it to the cheesecake filling.
Step 14: Add the Finishing Touches
Finish the cups with a small amount of flaky sea salt or chopped nuts, if desired.
The salt balances the sweetness and strengthens the caramel and chocolate flavors.
Step 15: Chill and Serve
Refrigerate the finished cups for approximately 20–30 minutes to help the cheesecake filling firm.
Serve chilled or allow them to sit at room temperature for approximately 10 minutes before serving.
The Best Cookie Dough to Use
Refrigerated chocolate cookie dough is the easiest option and creates a rich shell that complements the brownies.
You can also use:
- Chocolate chip cookie dough
- Double chocolate cookie dough
- Brownie cookie dough
- Peanut butter cookie dough
- Sugar cookie dough
- Salted caramel cookie dough
Chocolate or double chocolate dough creates the deepest brownie-style flavor.
Can I Use Homemade Cookie Dough?
Yes. Homemade chocolate cookie dough works well.
Use approximately two tablespoons of dough for each muffin cavity. Choose a dough that holds its shape rather than one that spreads excessively.
Chilling homemade dough for at least 30 minutes before baking can help the cups form more evenly.
What Brownies Should I Use?
You can use:
- Homemade brownies
- Box-mix brownies
- Store-bought brownies
- Brownie bites
- Fudge brownies
- Chocolate chip brownies
Fudgy brownies work best because they stay soft and provide a rich contrast to the creamy filling.
Cool homemade brownies completely before cutting them into small pieces.
Can I Use Brownie Batter for the Cups?
Yes, but the method will be different.
Prepare brownie batter and divide it among greased muffin cups, filling each about halfway. Bake until set, then press the centers while warm.
Brownie cups are softer and more delicate than cookie cups, so allow them to cool completely before removing them from the pan.
How to Prevent the Cups from Sticking
For easy removal:
- Grease the muffin pan thoroughly
- Use a good-quality nonstick pan
- Allow the cups to cool for 15 minutes
- Run a thin knife around each edge
- Twist each cup gently before lifting
- Avoid removing them while extremely hot
Do not allow the cookie cups to cool completely inside the pan, as they may become more difficult to release.
How to Keep the Filling Smooth
For smooth cheesecake filling:
- Use block-style cream cheese
- Soften the cream cheese completely
- Beat the cream cheese before adding sugar
- Sift lumpy powdered sugar
- Scrape the bowl frequently
- Fold in the whipped topping gently
- Fill only completely cooled cookie cups
Adding the filling to warm cups can cause it to melt.
Can I Use Homemade Whipped Cream?
Yes. Replace the frozen whipped topping with stabilized whipped cream.
Beat together:
- 1 cup cold heavy whipping cream
- ¼ cup powdered sugar
- ½ teaspoon vanilla extract
- 2 tablespoons instant vanilla pudding mix, optional
Beat until stiff peaks form, then fold it gently into the cream cheese mixture.
Recipe Variations
Salted Caramel Brownie Cups
Add flaky sea salt over the caramel drizzle.
Use salted caramel sauce for an even stronger sweet-and-salty flavor.
Turtle Brownie Cookie Cups
Add chopped toasted pecans over the cheesecake filling.
Finish with caramel sauce and melted chocolate.
Peanut Butter Brownie Cups
Add ⅓ cup creamy peanut butter to the cheesecake filling.
Top with chopped peanut butter cups, brownies, chocolate chips, and caramel.
Oreo Brownie Cups
Add crushed Oreos to the cheesecake filling.
Top the cups with brownie pieces, Oreo crumbs, and chocolate sauce.
S’mores Brownie Cups
Replace the cheesecake filling with marshmallow cream.
Top with brownie pieces, graham cracker crumbs, mini marshmallows, and melted chocolate.
Mocha Brownie Cups
Add one teaspoon instant espresso powder to the cheesecake filling.
Finish with brownie pieces, chocolate-covered espresso beans, and caramel sauce.
Halloween Brownie Cups
Add orange and black sprinkles.
Top with candy eyes, crushed Halloween Oreos, or small pieces of seasonal candy.
Can I Use Chocolate Ganache?
Yes. Chocolate ganache makes these cups even richer.
Heat ½ cup heavy cream until steaming, then pour it over one cup of chocolate chips. Let it stand for two minutes and stir until smooth.
Drizzle the ganache over the brownie pieces with the caramel sauce.
Can I Make Mini Cookie Cups?
Yes. Use a mini muffin pan and approximately one teaspoon of dough per cavity.
Bake for approximately 8–10 minutes and press the centers immediately after baking.
Mini cups are ideal for party trays and should produce approximately 24–30 servings.
Can I Make Them Ahead?
Yes. Bake the cookie cups up to 2 days in advance.
Store the empty cups in an airtight container at room temperature.
Prepare the cheesecake filling one day in advance and refrigerate it separately. Fill and decorate the cups several hours before serving.
For the freshest presentation, add the brownie pieces and caramel close to serving time.
Storage
Place the finished cookie cups in a single layer inside an airtight container.
Refrigerate for up to 3–4 days because the filling contains cream cheese.
Allow them to sit at room temperature for approximately 10 minutes before serving if you prefer a softer cookie shell.
Can You Freeze Caramel Brownie Cookie Cups?
The unfilled cookie cups can be frozen for up to 2 months.
Place them in a freezer-safe container with parchment paper between the layers.
Thaw at room temperature before adding the cheesecake filling and toppings.
Freezing fully decorated cups is not recommended because the filling and caramel may change texture.
How to Transport the Cups
Arrange the cookie cups in a shallow container in a single layer.
Keep them refrigerated until shortly before transportation.
Use a container with a secure lid and place it inside a cooler if traveling in warm weather.
Frequently Asked Questions
Do I need a special cookie-cup pan?
No. A standard muffin pan works perfectly.
When should I press the centers?
Press them immediately after removing the pan from the oven, while the cookies are still warm and soft.
Why did my cookie cups crack?
The cups may have cooled too much before the centers were pressed, or the dough may have been overbaked.
Can I use frosting instead of cheesecake filling?
Yes. Chocolate, vanilla, caramel, or cream cheese frosting can all be used.
Can I use caramel candies?
Yes. Melt caramel candies with a small amount of heavy cream until smooth and pourable.
Can I use store-bought brownies?
Absolutely. Store-bought brownies make the recipe faster and easier.
Do the finished cups need refrigeration?
Yes. Refrigerate them because the filling contains cream cheese and whipped topping.
Can I use regular chocolate chips?
Yes. Regular chips work, but mini chocolate chips fit the cups more neatly.
How many cups does this recipe make?
The recipe makes approximately 12 standard-size cookie cups.
Can I omit the brownie topping?
Yes. Top the cups with chocolate chips, caramel, nuts, candy pieces, or crushed cookies instead.
Pro Tips
Grease the muffin pan thoroughly and shape the centers while the cookies are still warm.
Allow the cups to cool completely before piping in the cheesecake filling.
Cut the brownies into small pieces so they stay securely on top of the cups.
Warm the caramel only until it becomes pourable, then let it cool slightly before drizzling.
Add flaky sea salt for a balanced flavor that keeps the dessert from tasting overly sweet.
Final Thoughts
These Caramel Brownie Cookie Cups bring together chewy chocolate cookies, fluffy cheesecake filling, fudgy brownie pieces, chocolate chips, and gooey caramel in one rich individual dessert.
Prepare them for parties, birthdays, holiday gatherings, potlucks, or a special chocolate treat. Customize them with peanut butter cups, Oreos, pecans, marshmallows, or seasonal decorations to create a dessert everyone will enjoy.