Halloween Brownies
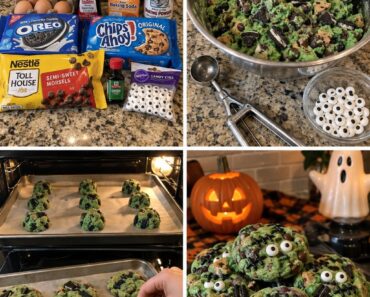
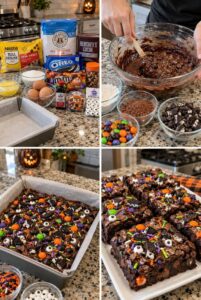
These Halloween Brownies are thick, fudgy, and loaded with crushed Oreo cookies, colorful candy-coated chocolates, chocolate chips, spooky sprinkles, and candy eyeballs. They’re easy to decorate and make an eye-catching dessert for any Halloween celebration.
Serve them at Halloween parties, school events, fall gatherings, movie nights, bake sales, or trick-or-treat celebrations.
Prep Time: 20 minutes
Bake Time: 30–35 minutes
Cooling Time: 1 hour
Total Time: Approximately 2 hours
Servings: 16 brownies
Why You’ll Love This Recipe
- Rich and fudgy chocolate center
- Crispy Oreo pieces
- Colorful Halloween candy
- Easy to decorate
- Made in one mixing bowl
- Perfect for parties
- Simple to customize
- Great use for leftover Halloween candy
- Fun for children to help decorate
Ingredients
Brownie Batter
- 1 cup unsalted butter, melted
- 1 cup granulated sugar
- 1 cup packed light brown sugar
- 4 large eggs
- 2 teaspoons vanilla extract
- 1 cup all-purpose flour
- 1 cup unsweetened cocoa powder
- ½ teaspoon salt
- ½ teaspoon baking powder
- 1 cup semisweet chocolate chips
- 10 Oreo cookies, roughly crushed
Halloween Topping
- ½ cup orange, purple, green, and black candy-coated chocolates
- 6 Oreo cookies, roughly broken
- ¼ cup semisweet chocolate chips
- Halloween sprinkles
- Candy eyeballs
How to Make Halloween Brownies
Step 1: Preheat the Oven
Preheat your oven to 350°F.
Line a 9×13-inch baking pan with parchment paper, leaving extra paper over the sides to create handles.
Lightly spray the parchment with nonstick cooking spray.
Step 2: Melt the Butter
Place the butter in a large microwave-safe bowl.
Heat it in short intervals until melted, then allow it to cool for approximately five minutes.
The butter should remain liquid but not be extremely hot when the eggs are added.
Step 3: Add the Sugars
Add the granulated sugar and brown sugar to the melted butter.
Whisk until the mixture is smooth and glossy.
Brown sugar adds moisture and helps create a chewy, fudgy texture.
Step 4: Add the Eggs and Vanilla
Add the eggs one at a time, whisking well after each addition.
Stir in the vanilla extract.
Whisk for another minute until the mixture becomes slightly thick and shiny.
Step 5: Combine the Dry Ingredients
In a separate bowl, whisk together the flour, cocoa powder, salt, and baking powder.
Break apart any large lumps of cocoa powder before adding the mixture to the wet ingredients.
Step 6: Make the Brownie Batter
Add the dry ingredients to the butter mixture.
Fold gently with a spatula until only a few streaks of flour remain.
Avoid overmixing because it can make the brownies dense and tough.
Step 7: Add Chocolate and Oreos
Fold the chocolate chips and crushed Oreo cookies into the batter.
Reserve some of the larger Oreo pieces and chocolate chips for the topping.
Step 8: Fill the Pan
Transfer the batter to the prepared baking pan.
Spread it evenly into all four corners with a spatula.
The batter will be thick, so smooth the surface gently.
Step 9: Add the Halloween Decorations
Scatter the candy-coated chocolates, reserved Oreo pieces, chocolate chips, and Halloween sprinkles over the batter.
Press them lightly into the surface so they remain attached during baking.
Reserve the candy eyeballs until later to prevent them from melting or discoloring.
Step 10: Bake
Bake for approximately 30–35 minutes.
The edges should appear set, while the center remains slightly soft. A toothpick inserted near the center should come out with moist crumbs rather than wet batter.
Avoid overbaking if you want a fudgy texture.
Step 11: Add the Candy Eyes
Remove the brownies from the oven.
Immediately press the candy eyeballs gently into the warm surface. Add extra sprinkles or chocolate pieces if desired.
Step 12: Cool Completely
Allow the brownies to cool inside the pan for at least 1 hour.
For especially neat slices, refrigerate the cooled brownies for approximately 30 minutes before cutting.
Step 13: Slice and Serve
Use the parchment handles to lift the brownies from the pan.
Cut them into 16 squares with a large, sharp knife. Wipe the blade clean between cuts for neater edges.
How to Make Fudgy Brownies
Measure the flour carefully and avoid packing it into the measuring cup.
Don’t overmix the batter after adding the dry ingredients.
Bake only until the edges are set and the center produces moist crumbs when tested. The brownies will continue setting as they cool.
Can I Use Boxed Brownie Mix?
Yes.
Prepare one family-size brownie mix according to the package directions.
Fold crushed Oreos and chocolate chips into the batter, then add the Halloween candy and sprinkles on top.
Bake according to the package instructions and add the candy eyeballs after baking.
The Best Halloween Candy to Use
Candy-coated chocolates hold their shape particularly well during baking.
Other suitable options include:
- Chopped peanut butter cups
- Chocolate-covered caramels
- Toffee pieces
- Mini chocolate bars
- Candy corn added after baking
- Gummy worms added after cooling
- Orange and black chocolate chips
Avoid baking gummy candy because it may melt into a sticky mess.
How to Keep Candy Eyes from Melting
Add candy eyeballs immediately after removing the brownies from the oven.
The warm surface will help them stick without exposing them to prolonged oven heat.
If the brownies have already cooled, attach the eyes with melted chocolate or a small amount of frosting.
Halloween Decorating Ideas
Monster Brownies
Add several candy eyes to each brownie and pipe colorful frosting around them to create monster faces.
Graveyard Brownies
Use cookie halves as tombstones and decorate them with melted white chocolate.
Spiderweb Brownies
Pipe circles of white frosting onto the cooled brownies, then drag a toothpick outward to create webs.
Mummy Brownies
Drizzle white chocolate back and forth over each brownie and finish with two candy eyes.
Candy Explosion Brownies
Cover the surface with chopped Halloween chocolate bars, candy-coated chocolates, cookies, and sprinkles.
Recipe Variations
Peanut Butter Halloween Brownies
Swirl ½ cup of creamy peanut butter through the batter before adding the decorations.
Cheesecake Halloween Brownies
Swirl sweetened cream cheese filling into the brownie batter.
Tint part of the cheesecake mixture orange, purple, or green.
Mint Monster Brownies
Add mint chocolate pieces and green candy-coated chocolates.
Triple-Chocolate Brownies
Use a combination of semisweet, milk, and white chocolate chips.
Halloween Brookies
Spread chocolate chip cookie dough over part of the brownie batter before adding the spooky decorations.
Can I Prepare Them Ahead?
Yes.
Bake the brownies one or two days before serving.
Cool them completely and store them in an airtight container. For the freshest appearance, add delicate decorations or extra candy shortly before serving.
Storage
Store the brownies in an airtight container at room temperature for up to 4 days.
Place parchment paper between layers to protect the decorations.
For longer storage, refrigerate them for up to one week, but allow them to return to room temperature before serving for the best texture.
Can You Freeze Halloween Brownies?
Yes.
Wrap individual brownies in plastic wrap and place them inside a freezer-safe container.
Freeze for up to 3 months.
Thaw them at room temperature. Some candy decorations may lose a little color after freezing, so you can add fresh sprinkles before serving.
Frequently Asked Questions
Why are my brownies dry?
They were probably overbaked or made with too much flour. Remove them when a toothpick shows moist crumbs.
Can I use different Oreo flavors?
Yes. Halloween Oreos, chocolate-filled Oreos, or peanut butter Oreos all work well.
When should I add the sprinkles?
Use bake-safe sprinkles before baking. Add delicate sugar decorations after the brownies come out of the oven.
Can children help decorate them?
Yes. Children can scatter cookies, candy, sprinkles, and candy eyes over the brownies with adult supervision.
Can I bake them in a smaller pan?
Yes. A smaller pan will produce thicker brownies and require additional baking time.
Should I refrigerate the brownies before cutting?
It isn’t required, but chilling them briefly makes thick, fudgy brownies easier to slice neatly.
Can I leave out the candy?
Absolutely. Decorate the brownies with Oreos, chocolate chips, sprinkles, and candy eyes instead.
Pro Tips
Use parchment paper so the brownies can be lifted easily from the pan.
Break the Oreos into uneven pieces for a more dramatic topping.
Add the candy eyes after baking so they remain white and clearly visible.
Allow the brownies to cool completely before cutting, and use a clean knife for every slice.
Final Thoughts
These Halloween Brownies combine rich chocolate, crunchy Oreos, colorful candy, spooky sprinkles, and silly candy eyes in one easy dessert.
They’re simple to prepare, fun to decorate, and easy to adapt with whatever Halloween candy you have available. Serve them at your next spooky celebration for a festive treat that both children and adults will enjoy.