Halloween Eggs
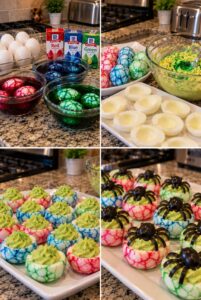
These Halloween Eggs are marbled deviled eggs with spooky, web-like patterns in red, blue, and green, filled with creamy, monster-green yolk filling and topped with black olive spiders. They look wonderfully creepy, but they taste like classic, creamy deviled eggs.
They’re perfect for Halloween parties, school celebrations, potlucks, trick-or-treat gatherings, spooky dinners, or any fall appetizer table.
Prep Time: 30 minutes
Cook Time: 12 minutes
Dye Time: 2 hours (or overnight)
Total Time: Approximately 3 hours
Servings: 24 egg halves
Why You’ll Love This Recipe
- Eye-catching marbled shells
- Creamy, tangy filling
- Fun spooky olive spiders
- Simple pantry ingredients
- Easy for kids to help with
- Perfect for Halloween parties
- Great make-ahead appetizer
- Colorful on a dessert or snack table
- Easy to customize
- A guaranteed conversation starter
Ingredients
Marbled Eggs
- 12 large eggs
- Red, blue, and green food coloring
- 3 cups hot water, divided
- 3 teaspoons white vinegar, divided
Monster-Green Filling
- 12 egg yolks (from the hard-boiled eggs)
- ½ cup mayonnaise
- 2 teaspoons Dijon mustard
- 1 teaspoon white vinegar or pickle juice
- ¼ teaspoon salt
- ⅛ teaspoon black pepper
- Green food coloring, a few drops
Olive Spiders
- 1 can (6 ounces) large pitted black olives
- 1 can (3.8 ounces) sliced black olives, optional
Optional Garnishes
- Paprika
- Chopped chives
- Candy eyes
- Fresh parsley
- Extra olive slices
How to Make Halloween Eggs
Step 1: Boil the Eggs
Place the eggs in a single layer in a large pot and cover them with cold water by about an inch.
Bring to a boil, then turn off the heat, cover the pot, and let the eggs sit for 12 minutes.
Step 2: Cool the Eggs
Transfer the eggs to a bowl of ice water and let them cool completely, about 10 minutes.
Cool eggs are easier to handle and help the shells stay in place.
Marble the Shells
Step 3: Crack the Shells
Gently tap each egg all over with the back of a spoon until the shell is covered with fine cracks.
Keep the shell attached. The cracks are what create the web-like marbled pattern.
Step 4: Mix the Dye Baths
Pour 1 cup of hot water into each of three bowls and add 1 teaspoon of vinegar to each.
Add about 20 drops of red food coloring to the first bowl, blue to the second, and green to the third.
Step 5: Soak the Eggs
Place four eggs in each bowl, making sure they are mostly covered by the dye.
Refrigerate for at least 2 hours, or overnight for the deepest color.
Step 6: Peel and Slice
Remove the eggs from the dye and pat them dry.
Gently peel away the shells to reveal the marbled whites. Slice each egg in half lengthwise and scoop the yolks into a bowl.
Make the Filling
Step 7: Mash the Yolks
Mash the yolks with a fork until fine and crumbly.
For the smoothest filling, press them through a fine-mesh sieve.
Step 8: Add the Flavor
Stir in the mayonnaise, Dijon mustard, vinegar, salt, and pepper until creamy.
Taste and adjust the seasoning if needed.
Step 9: Color the Filling
Add green food coloring a drop at a time, stirring until you reach a bright monster-green color.
The color will deepen slightly as the filling rests.
Assemble and Decorate
Step 10: Fill the Eggs
Spoon the filling into a piping bag fitted with a large star tip, or use a zip-top bag with the corner snipped off.
Pipe a generous swirl into each egg white half.
Step 11: Make the Spider Bodies
Cut a few large olives in half. Place one half on top of each egg, cut side down, to form the spider’s body.
Step 12: Make the Spider Legs
Slice the remaining olives lengthwise into thin strips, or cut sliced olives into thin pieces.
Place four legs on each side of the body so each spider has eight legs.
Step 13: Chill and Serve
Refrigerate the eggs until ready to serve.
Arrange them on a platter and serve cold.
The Best Food Coloring for Marbled Eggs
Choose coloring that produces deep, vibrant shades.
Good options include:
- Liquid food coloring
- Gel food coloring mixed with hot water
- Neon food coloring
- Natural food coloring for softer shades
- Black food coloring for a spooky look
- Purple, made by mixing red and blue
The more coloring you use, the more dramatic the marbling will be.
How to Get Perfect Marbled Eggs
- Use hard-boiled eggs that are fully chilled
- Crack the shells evenly without breaking them apart
- Use hot water and vinegar for stronger color
- Soak the eggs for at least two hours
- Keep the eggs mostly submerged
- Pat them dry before peeling
- Peel gently under cool running water
The longer the eggs soak, the deeper the dye will seep into the cracks.
Can I Use Store-Bought Hard-Boiled Eggs?
Yes. Peeled hard-boiled eggs will not marble, but you can still dye the whites or simply fill them with green filling.
For marbled shells, use unpeeled eggs and crack the shells yourself.
Can I Make the Filling a Different Color?
Yes. Use orange, purple, or yellow food coloring for the filling.
For a natural green filling, mash in a little ripe avocado, though it should be served the same day because avocado browns quickly.
Delicious Variations
Classic Spider Deviled Eggs
Skip the dye, fill white eggs with classic filling, and sprinkle with paprika before adding the olive spiders.
Monster Eyeball Eggs
Top the filling with a slice of olive or candy eyes for a creepy eyeball look.
Pumpkin Deviled Eggs
Color the filling orange and top with a small piece of chive for a stem.
Bacon Deviled Eggs
Stir crumbled bacon into the filling for a smoky, savory twist.
Spicy Deviled Eggs
Add a splash of hot sauce or a pinch of cayenne to the filling.
Can I Make Them Ahead?
Yes. Dye and peel the eggs up to one day in advance, and refrigerate the whites in an airtight container.
Prepare the filling separately and store it in a covered piping bag.
Fill the eggs and add the spiders shortly before serving for the best appearance.
Storage
Store the eggs in an airtight container in the refrigerator.
Refrigerate for up to two days.
Do not leave them at room temperature for more than two hours, and keep them on ice if serving outdoors.
Can You Freeze Halloween Eggs?
No. Hard-boiled egg whites become rubbery and watery after freezing, so these eggs are best made fresh.
You can prepare the components ahead of time and assemble them the day of the party.
Frequently Asked Questions
Will the dye affect the taste?
No. The dye stays in the shell cracks and on the surface, so the eggs taste like regular deviled eggs.
Is the dye safe to eat?
Yes, as long as you use food-safe coloring.
Why isn’t my pattern very bold?
The shells may not have been cracked enough, or the eggs may not have soaked long enough. Crack more finely and soak longer.
Why is my filling lumpy?
The yolks may not have been mashed finely enough. Press them through a sieve for a smoother texture.
Can I use a different topping for the spiders?
Yes. Use thin strips of black licorice for the legs, or pipe melted dark chocolate in a spider shape.
How many eggs do I need?
One dozen eggs makes 24 deviled egg halves, which usually serves about 12 people.
Can I skip the vinegar?
It helps the dye color the shell more evenly, but you can skip it if needed.
Pro Tips
Crack the shells gently but thoroughly for the best web pattern.
Use a piping bag for a neat, bakery-style swirl.
Build the spiders right before serving so the olives stay dry and glossy.
Keep the eggs cold on the platter, especially at outdoor parties.
Final Thoughts
These Halloween Eggs turn a classic party favorite into a spooky showstopper with marbled shells, green monster filling, and tiny olive spiders.
They’re easy to prepare, fun to decorate, and perfect for Halloween parties, school events, potlucks, or any festive gathering.