
Easy & Simple Creamy Pickle Bombs
If you’re looking for a bold, creamy, crunchy, and totally addictive snack, these Creamy Pickle Bombs are exactly what you need.
They combine everything people love in one bite — the sharp tang of dill pickles, the rich creaminess of cheese, the smoky saltiness of bacon, and a hint of fresh herbs. The contrast between the cold, crisp pickle and the smooth, savory filling makes them incredibly satisfying.
They’re simple to make, require minimal prep, and deliver BIG flavor with very little effort. Whether you’re making a party tray, snack board, or just something fun to enjoy at home, these always stand out.
Perfect for gatherings, game days, appetizers, or even a quick low-carb snack.
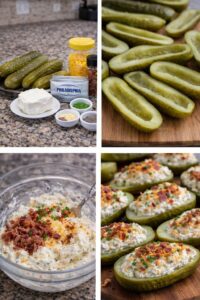
🛒 Ingredients You’ll Need
- 6–8 large dill pickles (whole, not thin spears)
- 8 oz cream cheese, softened (very important for smooth texture)
- 1/2 cup shredded cheddar cheese
- 1/4 cup cooked bacon, finely chopped
- 1 tbsp chopped chives or green onions
- 1/2 tsp garlic powder
- 1/4 tsp black pepper
- Red pepper flakes (optional, for a little heat)
Optional Add-Ins (for extra flavor 👇)
- 1 tbsp ranch seasoning
- 2 tbsp finely diced jalapeños
- 1 tbsp sour cream (for extra creaminess)
- A sprinkle of smoked paprika
👩🍳 How to Make Creamy Pickle Bombs
⭐ Step 1: Choose & Prep the Pickles
Start with large, firm dill pickles — this is important because softer pickles won’t hold the filling well.
Slice each pickle in half lengthwise. Using a spoon, carefully scoop out a small portion of the center to create a little “boat” for the filling.
💡 Tip: Don’t scoop too deep — leave enough structure so the pickle stays sturdy.
⭐ Step 2: Dry the Pickles (Important Step!)
Use paper towels to lightly pat the inside of the pickles dry.
This step helps:
- The filling stick better
- Prevents watery texture
- Keeps the final result creamy instead of soggy
⭐ Step 3: Make the Creamy Filling
In a mixing bowl, combine:
- Softened cream cheese
- Shredded cheddar
- Chopped bacon
- Chives or green onions
- Garlic powder
- Black pepper
- Red pepper flakes (optional)
Mix everything until smooth, creamy, and evenly combined.
💡 Tip: Taste the mixture before filling — adjust seasoning if needed.
⭐ Step 4: Fill the Pickles
Spoon or pipe the filling into each pickle half.
You can:
- Smooth it flat for a clean look
- Or pile it slightly for a “loaded” style
Using a piping bag (or zip bag with the corner cut) makes them look more professional.
⭐ Step 5: Chill for Best Texture
Place the filled pickles in the refrigerator for at least 20–30 minutes.
This helps:
- The filling firm up
- The flavors blend together
- The texture become more satisfying
⭐ Step 6: Slice (Optional for Serving)
For parties, you can slice each filled pickle into smaller bite-sized pieces.
This makes them:
- Easier to grab
- Perfect for appetizer trays
- More visually appealing
⭐ Step 7: Serve & Enjoy
Serve cold for the best flavor and texture.
You’ll get that perfect balance:
Crunchy + creamy + salty + tangy in every bite.
✨ Make It Even Better
- Sprinkle crispy bacon bits on top
- Add a drizzle of ranch dressing
- Use spicy pickles for extra kick
- Add hot sauce to the filling
- Mix in crushed crackers for texture
- Top with extra shredded cheese
- Add a small cube of cheese inside for surprise center
❤️ Why You’ll Love This Recipe
- No baking or cooking required
- Ready in under 20 minutes
- Perfect balance of creamy and crunchy
- Low-carb and keto-friendly
- Budget-friendly ingredients
- Super customizable
- Great for parties and snack boards
- Always a crowd favorite
- Looks impressive but super easy
- Big flavor with minimal effort
These are one of those snacks people try once… and immediately ask for the recipe.
❓ Frequently Asked Questions
1. Can I make these ahead of time?
Yes, they’re even better after chilling for a few hours.
2. How long do they last?
2–3 days in the fridge.
3. Can I freeze them?
Not recommended — texture changes.
4. Can I use turkey bacon?
Yes, works great.
5. Can I use different cheese?
Yes — pepper jack, mozzarella, or a blend.
6. Can I make them spicy?
Add jalapeños, hot sauce, or chili flakes.
7. What if my filling is too soft?
Chill it before stuffing.
8. Can I use pickle spears?
Yes, for mini versions.
9. Why are mine watery?
Pickles weren’t dried enough.
10. Can I use flavored cream cheese?
Yes, like garlic or herb.
💡 Pro Tips
⭐ Always use softened cream cheese
⭐ Dry pickles well before filling
⭐ Use thick, firm pickles
⭐ Chill before serving
⭐ Don’t overfill or they’ll spill
⭐ Use piping for clean presentation
⭐ Add bacon last if you want it crisp
⭐ Taste before filling
⭐ Keep refrigerated until serving
⭐ Serve cold for best results
🧊 Storage Tips
- Store in airtight container
- Keep refrigerated at all times
- Best eaten within 2–3 days
- Do not freeze
- Keep covered to prevent drying
- Add toppings fresh before serving
- Avoid stacking to keep shape intact
- Serve straight from fridge
- Keep cool for parties
- Great for meal prep snacks
🔐 Why This Recipe Works
- Dill pickles bring bold tang and crunch
- Cream cheese creates a rich, smooth base
- Cheddar adds sharp cheesy flavor
- Bacon adds salty, smoky depth
- Chives balance with freshness
- Garlic enhances overall flavor
- Chilling improves texture and structure
- No cooking keeps it fast and simple
- Strong contrast of textures makes it addictive
- Easy method = consistent results every time
These Creamy Pickle Bombs are tangy, cheesy, crunchy, and packed with flavor — a super easy, no-fuss snack that’s guaranteed to stand out on any table.


