
Easy & Simple Red White & Blue Jell-O Cheesecake Bars
If you’re looking for a creamy, colorful, chilled dessert that looks beautiful on a summer dessert table, these Red White & Blue Jell-O Cheesecake Bars are perfect.
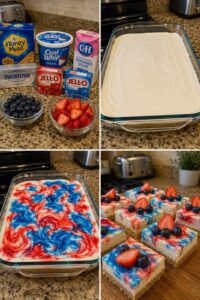
They’re made with a sweet graham cracker crust, a smooth no-bake cheesecake layer, swirls of red and blue gelatin, and fresh berries on top. Every bite is cool, creamy, fruity, and lightly sweet with that classic cheesecake flavor and fun patriotic color.
Perfect for 4th of July, Memorial Day, BBQs, cookouts, summer parties, potlucks, picnic trays, or any red, white, and blue celebration.
🛒 Ingredients You’ll Need
- Graham cracker crust
- Cream cheese
- Powdered sugar
- Cool Whip
- Red gelatin
- Blue gelatin
- Fresh berries
Optional Add-Ins
- Fresh strawberries
- Fresh blueberries
- Whipped cream
- White chocolate drizzle
- Patriotic sprinkles
- Extra graham crumbs
- Vanilla extract
- Lemon zest
👩🍳 How to Make Red White & Blue Jell-O Cheesecake Bars
⭐ Step 1: Prepare the Crust
Prepare the graham cracker crust in a baking dish. Press it firmly into the bottom so it creates an even base for the cheesecake layer.
⭐ Step 2: Make the Cheesecake Filling
In a bowl, mix softened cream cheese, powdered sugar, and Cool Whip until smooth, creamy, and fluffy.
⭐ Step 3: Spread Over the Crust
Spread the cheesecake mixture evenly over the graham cracker crust. Smooth the top with a spatula.
⭐ Step 4: Prepare the Gelatin
Make the red gelatin and blue gelatin separately according to the package directions.
⭐ Step 5: Cool the Gelatin
Let both gelatin mixtures cool until slightly thickened. Don’t pour them on hot, or they can melt the cheesecake layer.
⭐ Step 6: Add the Colors
Spoon small amounts of red gelatin and blue gelatin over the cheesecake layer.
⭐ Step 7: Swirl Gently
Use a toothpick or butter knife to gently swirl the colors through the top. Don’t overmix, or the colors may blend too much.
⭐ Step 8: Chill Until Firm
Place the dish in the refrigerator and chill until fully firm and set.
⭐ Step 9: Cut into Bars
Once set, slice into neat bars or squares.
⭐ Step 10: Top with Berries
Add fresh strawberries, blueberries, or mixed berries on top before serving.
✨ Make It Even Better
- Add vanilla extract to the cheesecake filling
- Add lemon zest for brightness
- Use fresh strawberries and blueberries on top
- Drizzle with white chocolate
- Add whipped cream before serving
- Sprinkle with patriotic sprinkles
- Use star-shaped berries or fruit pieces
- Chill overnight for cleaner slices
- Add extra graham crumbs on top
- Serve in cupcake liners for parties
❤️ Why You’ll Love This Recipe
- No-bake style dessert
- Creamy and colorful
- Perfect for patriotic parties
- Great for Memorial Day and 4th of July
- Cool and refreshing
- Pretty red, white, and blue look
- Great make-ahead dessert
- Easy to slice and serve
- Kid-friendly
- Perfect for summer dessert trays
❓ Frequently Asked Questions
1. Can I make these ahead of time?
Yes, these bars are perfect made the night before.
2. Can I use a store-bought crust?
Yes, a premade graham crust works great.
3. Can I use homemade whipped cream instead of Cool Whip?
Yes, but Cool Whip holds up better.
4. Can I use different gelatin flavors?
Yes, any red and blue flavors work.
5. Why should the gelatin cool first?
Hot gelatin can melt the cheesecake layer and make it runny.
6. Can I freeze these bars?
Freezing is not recommended because gelatin and cheesecake textures can change.
7. How do I get clean slices?
Chill fully and wipe the knife between cuts.
8. Can I add berries inside?
Yes, but keep them dry so the filling doesn’t get watery.
9. Can I make this in cups instead?
Yes, layer the crust, cheesecake, and gelatin in small cups.
10. How long should they chill?
Chill for several hours, or overnight for best results.
💡 15 Detailed Pro Tips
⭐ Use softened cream cheese
Soft cream cheese blends smoother and prevents lumps in the filling.
⭐ Press the crust firmly
A firm crust helps the bars hold together when sliced.
⭐ Use Cool Whip for structure
Cool Whip helps the cheesecake layer stay light but stable.
⭐ Don’t add hot gelatin
Let gelatin cool first so it doesn’t melt the cheesecake layer.
⭐ Let gelatin thicken slightly
Slightly thickened gelatin swirls better and doesn’t run everywhere.
⭐ Use small spoonfuls of gelatin
Small amounts give a prettier swirl and better color control.
⭐ Swirl gently
Too much swirling can muddy the red and blue colors.
⭐ Keep the cheesecake layer smooth
A smooth top makes the gelatin swirl look prettier.
⭐ Chill until fully firm
The bars need enough time to set properly before slicing.
⭐ Use parchment paper
Lining the dish helps lift the bars out more easily.
⭐ Dry fresh berries first
Wet berries can make the top watery.
⭐ Add berries before serving
Fresh berries look best when added close to serving time.
⭐ Wipe the knife between cuts
This keeps the bars neat and clean.
⭐ Serve cold
These bars taste best chilled and creamy.
⭐ Keep refrigerated outdoors
For BBQs or cookouts, keep them chilled until serving.
🧊 Storage Tips
Store the cheesecake bars covered in the refrigerator.
They are best enjoyed within 2–3 days. Keep chilled until serving so the cheesecake layer stays firm and creamy.
For the prettiest presentation, add fresh berries and any sprinkles shortly before serving.
Do not leave them out too long in warm weather.
🔐 Why This Recipe Works
The graham cracker crust gives a sweet crunchy base, the cream cheese filling creates a creamy cheesecake layer, the Cool Whip keeps it light and fluffy, and the red and blue gelatin adds bright color and fruity flavor.
Fresh berries on top make the bars look festive and add a fresh summer finish.
These Red White & Blue Jell-O Cheesecake Bars are creamy, colorful, cool, and easy — the perfect patriotic dessert for summer parties, BBQs, Memorial Day, and 4th of July.


