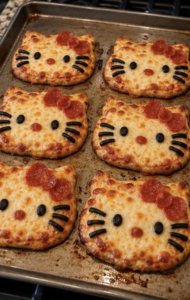
These Hello Kitty-Shaped Mini Pizzas turn simple pizza dough, sauce, mozzarella, pepperoni, and olives into an adorable meal or party snack. Each mini pizza is shaped like a cat face and decorated with olive eyes, a yellow pepper nose, thin olive whiskers, and a tiny pepperoni bow.
They’re perfect for children’s parties, themed celebrations, lunch boxes, sleepovers, family pizza nights, or a fun cooking activity with kids.
Prep Time: 30 minutes
Bake Time: 10–13 minutes
Total Time: Approximately 45 minutes
Servings: 8 mini pizzas
Why You’ll Love This Recipe
- Cute cat-shaped design
- Easy to make with refrigerated dough
- Fun for children to decorate
- Uses familiar pizza ingredients
- Perfect for themed parties
- Individually portioned
- Easy to customize
- Can be prepared ahead
- Works in the oven or air fryer
- Delicious served warm or at room temperature
Ingredients
Mini Pizzas
- 1 pound refrigerated pizza dough
- ½ cup pizza sauce
- 2 cups finely shredded low-moisture mozzarella cheese
- 1 tablespoon olive oil
- ½ teaspoon garlic powder
- ½ teaspoon Italian seasoning
- 2 tablespoons all-purpose flour for shaping
Face Decorations
- 8 whole black olives for the eyes and whiskers
- 1 small yellow bell pepper for the noses
- 16 mini pepperoni slices for the bows
- 1 tablespoon finely shredded mozzarella for securing decorations
Optional Toppings
- Finely diced ham
- Cooked crumbled sausage
- Finely diced bell peppers
- Sliced mushrooms
- Sweet corn
- Pineapple pieces
- Cooked chicken
- Parmesan cheese
For Serving
- Extra pizza sauce
- Ranch dressing
- Garlic butter
- Fresh fruit
- Vegetable sticks
How to Make Hello Kitty-Shaped Mini Pizzas
Step 1: Preheat the Oven
Preheat your oven to 425°F.
Line two large baking sheets with parchment paper.
If you have a pizza stone, place it inside the oven while it preheats and bake the pizzas on parchment over the hot stone.
Step 2: Bring the Dough to Room Temperature
Remove the pizza dough from the refrigerator approximately 20–30 minutes before shaping it.
Slightly warmer dough is easier to stretch and less likely to spring back.
Keep it covered so the surface does not dry out.
Step 3: Prepare the Decorations
Slice the black olives into small round pieces for the eyes.
Cut additional olives into very thin strips for the whiskers.
Cut the yellow bell pepper into tiny oval or triangular pieces for the noses.
For each bow, use two mini pepperoni slices as the loops and a small pepperoni piece for the center.
Step 4: Divide the Dough
Place the pizza dough on a lightly floured surface.
Divide it into eight equal portions.
For evenly sized pizzas, weigh the dough and divide its total weight by eight.
Step 5: Reserve Dough for the Ears
Pinch two small pieces from each portion of dough.
These pieces will become the cat ears.
Keep the main pieces and ear pieces covered while you work.
Step 6: Shape the Faces
Flatten each large portion of dough into an oval approximately five inches wide.
The face should be wider than it is tall.
Use your fingers to keep the center fairly flat while leaving a slightly thicker edge.
Step 7: Attach the Ears
Shape the reserved dough pieces into small triangles.
Attach two ears to the upper edge of each oval by overlapping the dough slightly.
Pinch and smooth the seams securely so the ears do not separate during baking.
Step 8: Transfer to the Baking Sheets
Carefully place the shaped dough on the parchment-lined baking sheets.
Leave at least two inches of space between the pizzas.
Reshape the ears and faces if they become distorted during transfer.
Step 9: Dock the Dough
Prick the center of each pizza several times with a fork.
Leave the outer border and ears unpierced.
This helps prevent the center from puffing excessively and moving the facial decorations.
Step 10: Brush the Edges
Combine the olive oil, garlic powder, and Italian seasoning.
Lightly brush the mixture over the edges and ears.
Avoid using too much oil in the center because it can prevent the sauce from staying in place.
Step 11: Add the Pizza Sauce
Spread approximately one tablespoon of pizza sauce over each face.
Leave a narrow border around the edges.
Use a thin layer so the facial decorations remain visible and the crust does not become soggy.
Step 12: Add the Mozzarella
Sprinkle each pizza with an even layer of finely shredded mozzarella.
Cover the sauce while keeping the ear shapes and crust border visible.
Low-moisture mozzarella works best because it melts evenly without releasing excessive liquid.
Step 13: Add the Eyes
Place two small olive rounds near the center of each face.
Space them evenly and press them gently into the cheese.
Keep the eyes away from the upper edge because the cheese will move slightly as it melts.
Step 14: Add the Noses
Place one tiny piece of yellow bell pepper below and between the eyes.
Press it lightly into the mozzarella to secure it.
A kernel of corn can also be used for the nose.
Step 15: Add the Whiskers
Arrange three thin olive strips on each side of the face.
Angle the whiskers slightly outward.
Keep the strips short so they remain on the cheese while the pizza bakes.
Step 16: Make the Pepperoni Bows
Position two mini pepperoni slices near one ear, slightly overlapping them to form the bow loops.
Place a tiny piece of pepperoni in the center.
Add a pinch of mozzarella under the pepperoni if necessary to help hold it in place.
Step 17: Add Optional Toppings
If desired, place a small amount of finely chopped topping under the mozzarella before decorating the faces.
Avoid using too many toppings because they can hide the design and make the pizzas difficult to handle.
Step 18: Bake
Bake for approximately 10–13 minutes, or until the crust is golden and the mozzarella is melted and bubbling.
Rotate the pans halfway through if your oven heats unevenly.
Watch the ears carefully because their pointed edges can brown quickly.
Step 19: Adjust the Faces
Remove the pizzas from the oven.
While the cheese is still soft, carefully reposition any olive or pepperoni pieces that shifted during baking.
Use the tip of a small knife or clean toothpick rather than your fingers.
Step 20: Cool Briefly
Allow the mini pizzas to cool on the baking sheets for approximately 5 minutes.
This gives the cheese time to set and makes the pizzas easier to lift without bending.
Step 21: Serve
Transfer the pizzas to individual plates or a serving platter.
Serve them warm with extra pizza sauce, ranch dressing, or garlic butter for dipping.
How to Shape the Cat Faces
You do not need a special cutter to make the pizzas.
Shape each main dough portion into a wide oval and attach two small triangular ears. Pinch the pieces together firmly so they become one continuous piece of dough.
If you have a large cat-face cookie cutter, roll the dough approximately ¼ inch thick and cut out the shapes. Gather and reroll the scraps only once because repeatedly worked dough can become tough.
How to Keep the Shape While Baking
Pizza dough naturally expands in the oven, so exaggerate the ears slightly and keep the face wider than you want the finished pizza to be.
For the clearest shape:
- Keep the dough moderately thin
- Make the ears slightly larger
- Pinch all seams securely
- Chill the shaped dough for 10 minutes
- Prick the centers with a fork
- Avoid excessive sauce
- Leave space between the pizzas
- Do not overload them with toppings
The Best Pizza Dough to Use
Refrigerated pizza dough is easy to shape and creates a chewy crust.
Other options include:
- Homemade pizza dough
- Frozen dough that has been thawed
- Crescent dough sheets
- Biscuit dough
- Flatbread
- Naan
- Pita bread
- Flour tortillas
Flatbreads and tortillas cannot be shaped as easily, but you can cut them with a cat-face template before adding the toppings.
Can I Use English Muffins?
Yes. English muffins make a quick no-shaping version.
Split the muffins and place them cut-side up. Cut small triangles from another muffin or a flour tortilla for the ears.
Add sauce, cheese, and facial decorations, then bake until the cheese melts.
The Best Cheese for Mini Pizzas
Low-moisture mozzarella is the best choice because it melts evenly and provides the classic pizza flavor.
Other options include:
- Provolone
- Monterey Jack
- Cheddar
- Colby Jack
- Parmesan
- Italian cheese blend
- Dairy-free mozzarella
Avoid using only fresh mozzarella because its moisture can make the small pizzas soggy and cause the decorations to slide.
How to Keep the Decorations in Place
Use finely shredded cheese and press each decoration gently into it before baking.
Do not place the pieces directly on a thick layer of sauce.
A small pinch of mozzarella placed beneath the pepperoni bow acts like glue as it melts.
Cut the olive whiskers short and thin so they do not shift easily.
Can Children Help Make Them?
Yes. This recipe is a fun cooking activity for children.
Adults should handle the oven, knives, and hot baking sheets. Children can help:
- Shape the dough
- Spread the sauce
- Sprinkle the cheese
- Add the eyes and nose
- Arrange the whiskers
- Create the pepperoni bows
- Choose extra toppings
Prepare all small decorations before inviting young children to assemble their pizzas.
Pepperoni Bow Mini Pizzas
Use mini pepperoni slices to create the bow.
If only full-size pepperoni is available, cut small circles with a piping tip or miniature cookie cutter.
You can also use thin red bell pepper pieces for a meat-free bow.
Vegetarian Mini Pizzas
Omit the pepperoni and make the bows with:
- Red bell pepper
- Roasted red pepper
- Tomato skin
- Thin carrot slices
- Plant-based pepperoni
Use olives for the eyes and whiskers and yellow bell pepper or corn for the nose.
White Cheese Mini Pizzas
Omit the tomato sauce and brush the dough lightly with garlic oil.
Top it with mozzarella, ricotta, and Parmesan.
Add the face decorations and bake until golden.
This creates a lighter-colored face that makes the eyes, whiskers, and bow especially visible.
Ham and Cheese Mini Pizzas
Sprinkle finely diced cooked ham beneath the mozzarella.
Keep the pieces small and away from the surface so the face decorations remain clear.
Cheddar can be mixed with the mozzarella for additional flavor.
Hawaiian Mini Pizzas
Add a small amount of finely diced ham and thoroughly drained pineapple under the cheese.
Pat the pineapple dry before using it so the crust does not become wet.
Decorate the surface as directed.
Breakfast Mini Pizzas
Replace the tomato sauce with a thin layer of cheese sauce.
Add scrambled eggs, cooked bacon, and shredded cheddar beneath the mozzarella.
Use olives and bell pepper to create the face after adding the cheese.
Halloween Cat Mini Pizzas
Replace most of the mozzarella with shredded cheddar or orange-tinted cheese.
Use black olives to create dark cat faces, or add olive pieces in a decorative pattern.
Serve them as a playful Halloween party snack.
What to Serve with Mini Pizzas
These pizzas pair well with:
- Fresh fruit
- Vegetable sticks
- Ranch dip
- Caesar salad
- Garden salad
- Garlic bread
- Mozzarella sticks
- Chicken tenders
- Potato wedges
- Pasta salad
- Tomato soup
- Lemonade
For a party, serve them with fruit skewers and colorful vegetables.
Can I Prepare Them Ahead?
Yes. Shape the dough and arrange it on parchment-lined baking sheets up to four hours in advance.
Cover the trays tightly and refrigerate them.
Add the sauce, cheese, and decorations immediately before baking.
You can also prepare and refrigerate all the decorations in separate covered containers.
Storage
Allow leftover pizzas to cool completely.
Transfer them to an airtight container with parchment paper between the layers.
Refrigerate for up to 3–4 days.
Store extra sauce separately.
How to Reheat Mini Pizzas
Reheat the pizzas in a 375°F oven for approximately 6–8 minutes.
You can also use an air fryer at 350°F for 3–5 minutes.
Microwaving works, but it creates a softer crust.
Can You Freeze the Mini Pizzas?
Yes. Bake the pizzas and allow them to cool completely.
Freeze them in a single layer, then transfer them to a freezer-safe container.
Store for up to 2 months.
Reheat directly from frozen in a 375°F oven until the cheese is hot and the crust is crisp.
Frequently Asked Questions
Do I need a special cutter?
No. Shape the faces into ovals and attach two triangular pieces of dough for the ears.
Can I use store-bought pizza dough?
Yes. Refrigerated or thawed frozen pizza dough works well.
How do I keep the ears attached?
Overlap them slightly with the face and pinch the seams firmly.
Why did the faces lose their shape?
The dough may have been too thick or warm. Chill the shaped pizzas for 10 minutes before topping them.
What can I use for the eyes?
Small black olive rounds are the easiest option.
What can I use for the nose?
Use yellow bell pepper, a corn kernel, or a tiny piece of yellow cheese.
How do I make the whiskers?
Cut black olives into thin, short strips and arrange three on each side.
What can replace the pepperoni bow?
Use red bell pepper, roasted red pepper, tomato skin, or plant-based pepperoni.
Can children make these pizzas?
Yes, with adult supervision for cutting and baking.
Can I make them vegetarian?
Yes. Replace the pepperoni bow with red bell pepper.
Can I use crescent dough?
Yes. Pinch the seams together before cutting or shaping the faces.
Can I cook them in an air fryer?
Yes. Air-fry small batches at 375°F until the crust is cooked and the cheese melts.
Can I prepare them ahead?
Yes. Shape and refrigerate the dough, then decorate it immediately before baking.
How long will leftovers keep?
Refrigerated leftovers keep for approximately 3–4 days.
Pro Tips
Keep the sauce layer thin and use low-moisture mozzarella so the facial decorations remain in place.
Make the ears slightly larger than necessary because the dough will expand and soften their shape as it bakes.
Prepare all the olive eyes, whiskers, pepper noses, and bows before shaping the dough. This makes assembly faster and helps every pizza have the same cute, recognizable cat-face design.
Final Thoughts
These Hello Kitty-Shaped Mini Pizzas combine a fun character-inspired appearance with the familiar flavors of pizza sauce, mozzarella, pepperoni, and golden dough. Each child can decorate an individual pizza, making the recipe both a meal and an entertaining activity.
Serve them for a birthday party, sleepover, lunch, or family pizza night. With variations such as vegetarian, breakfast, Hawaiian, white cheese, or Halloween cat pizzas, they are easy to adapt for any celebration.