
Easy & Simple Reese’s Poke Cake
If you’re a peanut butter and chocolate lover, this Reese’s Poke Cake is the kind of dessert that instantly becomes a favorite after just one bite.
It starts with a soft, moist chocolate cake, then gets filled with a rich peanut butter and sweetened condensed milk mixture that soaks down into every hole, making the whole cake extra creamy, sweet, and packed with flavor. On top of that, you get warm chocolate frosting, a fluffy peanut butter whipped topping, and plenty of chopped Reese’s to finish it all off.
It’s rich, indulgent, and full of that classic chocolate-peanut butter combo that always gets people excited.
This is the kind of dessert that looks fun, tastes amazing, and feels perfect for birthdays, parties, potlucks, holidays, or anytime you want something seriously crowd-pleasing.
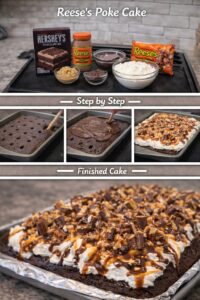
🛒 Ingredients You’ll Need
- 1 box chocolate cake mix, plus ingredients needed to prepare it
- 1 can sweetened condensed milk
- 1/2 cup milk
- 1 cup peanut butter
- 1 tub chocolate frosting
- 1 container (8 oz) Cool Whip
- 1/2 cup peanut butter
- Mini Reese’s or chopped Reese’s cups, for topping
👩🍳 How to Make Reese’s Poke Cake
⭐ Step 1: Bake the Cake
Prepare and bake the chocolate cake according to the package directions in a baking dish. Once baked, let it cool for about 15 to 20 minutes so it is still warm but not too hot.
⭐ Step 2: Poke the Holes
Using the handle of a wooden spoon or another round utensil, poke holes all over the cake. Make sure the holes are spread across the whole surface so the filling can soak in evenly.
⭐ Step 3: Make the Peanut Butter Filling
In a bowl, mix together the sweetened condensed milk, milk, and 1 cup of peanut butter until smooth and well combined.
⭐ Step 4: Pour Over the Cake
Slowly pour the peanut butter mixture all over the cake, making sure it goes down into the holes. This is what gives the cake that rich, gooey, extra-moist texture.
⭐ Step 5: Add the Chocolate Frosting
Microwave the tub of frosting for about 20 seconds, just until it becomes pourable. Then pour it over the cake and gently spread it out.
⭐ Step 6: Make the Peanut Butter Whipped Layer
In another bowl, mix the Cool Whip with 1/2 cup peanut butter until creamy and fluffy.
⭐ Step 7: Add the Topping
Spread or swirl the peanut butter Cool Whip mixture over the top of the cake.
⭐ Step 8: Finish with Reese’s
Top with mini Reese’s or chopped Reese’s cups all over the top for extra crunch, sweetness, and that iconic candy finish.
⭐ Step 9: Chill Before Serving
Refrigerate the cake for at least 3 hours before serving. This helps all the layers set and gives the best texture.
✨ Make It Even Better
- Drizzle with chocolate syrup before serving
- Add extra chopped Reese’s between layers
- Sprinkle mini chocolate chips on top
- Use peanut butter frosting for even more flavor
- Add a pinch of sea salt for contrast
- Chill overnight for an even richer texture
❤️ Why You’ll Love This Recipe
- Easy to make with simple ingredients
- Perfect for peanut butter lovers
- Rich, moist, and extra creamy
- Great make-ahead dessert
- Perfect for potlucks and parties
- Loaded with chocolate and peanut butter flavor
- Beginner-friendly
- Looks impressive with very little effort
This is one of those desserts that always gets attention the moment you set it on the table.
❓ Frequently Asked Questions
1. Can I make this ahead of time?
Yes, it’s actually even better after chilling for several hours.
2. How long does it last?
It will keep in the fridge for about 3 to 4 days.
3. Can I freeze it?
Yes, though the texture of the topping may change slightly.
4. Can I use homemade whipped cream instead of Cool Whip?
Yes, as long as it is stable enough to hold up.
5. Can I use a homemade chocolate cake?
Absolutely, that works great too.
6. Why do I need to poke holes in the cake?
So the filling can soak all the way through and make the cake extra moist.
7. Can I use crunchy peanut butter?
Yes, if you want a little texture.
8. Do I have to melt the frosting?
Melting makes it easier to spread smoothly over the cake.
9. Can I use regular-sized Reese’s?
Yes, just chop them into smaller pieces.
10. Is it very sweet?
Yes, it’s definitely a rich dessert, perfect for peanut butter and chocolate fans.
💡 Pro Tips
⭐ Let the cake cool slightly before poking holes
⭐ Use a spoon handle for evenly sized holes
⭐ Pour the filling slowly so it soaks in well
⭐ Warm the frosting just enough to pour
⭐ Chill long enough before slicing
⭐ Use a sharp knife for clean pieces
⭐ Add Reese’s right before serving for the best texture
⭐ Store covered in the fridge
⭐ Don’t skip the chilling time
⭐ Make it the day before for easy serving
🧊 Storage Tips
- Store covered in the refrigerator
- Best enjoyed within 3 to 4 days
- Keep chilled until ready to serve
- Slice only what you need
- Do not leave out too long
- Freeze only if needed
- Thaw in the fridge before serving
- Keep leftovers well covered so they stay fresh
🔐 Why This Recipe Works
- Chocolate cake gives the perfect rich base
- Poke holes allow the peanut butter filling to soak in
- Sweetened condensed milk adds sweetness and moisture
- Peanut butter brings bold, creamy flavor
- Melted frosting adds a smooth chocolate layer
- Cool Whip keeps the topping light and fluffy
- Reese’s on top add candy texture and extra indulgence
- Chilling helps all the layers come together beautifully
This Reese’s Poke Cake is rich, creamy, chocolatey, and packed with peanut butter flavor — the kind of easy dessert that feels extra indulgent and always disappears fast.


