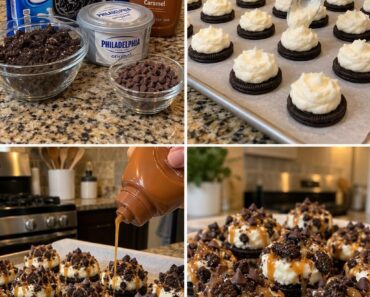
These Bloody Oreo Pops transform classic chocolate sandwich cookies into spooky Halloween treats covered in white chocolate and dripping with bright red candy “blood.” Halloween sprinkles add a festive finishing touch while lollipop sticks make them easy to serve without a mess.
They require no baking and can be prepared ahead for Halloween parties, classroom treats, movie nights, dessert tables, or trick-or-treat gatherings. The decoration looks dramatic, but the process is simple enough for the entire family to enjoy.
Prep Time: 30 minutes
Chilling Time: 30 minutes
Total Time: Approximately 1 hour
Servings: 18 Oreo pops
Why You’ll Love This Recipe
- Fun Halloween presentation
- No baking required
- Made with a few simple ingredients
- Easy to decorate
- Perfect for parties
- Convenient individual portions
- Can be prepared ahead
- Easy to package as gifts
- Customizable with different colors
- Crisp cookies with a creamy candy coating
Ingredients
For the Oreo Pops
- 18 Oreo cookies, preferably Double Stuf
- 18 lollipop sticks
- 16 ounces white candy melts or white melting wafers
- 1 teaspoon coconut oil or vegetable shortening, optional
For the Bloody Decoration
- 6 ounces red candy melts
- ½ teaspoon coconut oil or vegetable shortening, if needed
- Halloween sprinkles
- Black sugar pearls, optional
- Candy eyes, optional
- Red decorating gel, optional
Equipment
- Baking sheets
- Parchment or wax paper
- Microwave-safe bowls
- Fork or dipping tool
- Spoon or piping bag
- Tall glass or foam block, optional
How to Make Bloody Oreo Pops
Step 1: Prepare the Baking Sheet
Line a large baking sheet with parchment or wax paper.
Make sure the sheet can fit inside your refrigerator. Preparing it first gives you a clean surface for the dipped cookies before the candy coating begins to set.
Step 2: Separate the Cookies
Gently twist each Oreo apart.
Try to keep the cream filling attached to one cookie half. Double Stuf Oreos are especially useful because the thicker layer of cream provides more room for the stick.
Work slowly to avoid breaking the cookies.
Step 3: Melt a Small Amount of White Candy
Place approximately ¼ cup of the white candy melts in a microwave-safe bowl.
Microwave in 15-second intervals, stirring after each interval, until smooth.
This small amount of candy will act as glue to hold the cookies and sticks together.
Step 4: Attach the Lollipop Sticks
Dip the end of a lollipop stick into the melted candy.
Gently press the coated end into the cream filling, stopping near the center of the cookie. Do not push it all the way through.
Place the other cookie half back on top and press very gently until secure.
Repeat with the remaining Oreos.
Step 5: Chill the Cookies
Arrange the assembled cookie pops on the lined baking sheet.
Refrigerate them for approximately 10–15 minutes, allowing the melted candy around each stick to become firm.
This step helps prevent the cookies from separating during dipping.
Step 6: Melt the White Coating
Place the remaining white candy melts in a deep microwave-safe bowl.
Microwave in 20-second intervals, stirring thoroughly after each interval, until completely melted and smooth.
If the coating is too thick for dipping, stir in a small amount of coconut oil or vegetable shortening. Begin with ½ teaspoon and add more only if necessary.
Step 7: Dip the Oreo Pops
Hold one cookie pop by the stick and lower it into the melted white coating.
Turn it gently until the cookie is completely covered. Lift it from the bowl and allow the excess coating to drip back into the bowl.
Tap the stick lightly against the edge of the bowl, being careful not to loosen the cookie.
Step 8: Place on the Baking Sheet
Lay the dipped Oreo pop flat on the prepared baking sheet.
Alternatively, place the stick upright inside a foam block or cake-pop stand if you want the coating to remain smooth on both sides.
Repeat with the remaining cookies.
Step 9: Add Some Sprinkles
While the white coating is still wet, add a small amount of Halloween sprinkles near the top of each cookie.
Leave enough visible white space for the red drizzle. You can also wait and add the sprinkles after applying the red candy.
Step 10: Let the Coating Set
Allow the coated cookie pops to rest at room temperature until the surface is firm.
For faster results, refrigerate them for approximately 10 minutes.
Do not leave them in the refrigerator for too long because condensation may form when they return to room temperature.
Step 11: Melt the Red Candy
Place the red candy melts in a clean microwave-safe bowl.
Microwave in 15-second intervals, stirring frequently, until smooth.
If the mixture is too thick to drizzle, add a small amount of coconut oil or shortening.
Step 12: Create the Bloody Drips
Transfer the melted red candy to a piping bag or a small plastic food-storage bag.
Cut a very small opening in one corner.
Pipe red candy across the top of each white Oreo pop. Allow some of the candy to run down the sides in uneven lines to create a dripping-blood effect.
You can also use a spoon to drizzle the red coating.
Step 13: Finish Decorating
Before the red candy hardens, add Halloween sprinkles, black sugar pearls, or candy eyes.
Avoid covering the entire pop. A simple combination of white coating, red drips, and a few dark sprinkles creates the clearest bloody effect.
Step 14: Let the Pops Set
Leave the finished Oreo pops at room temperature until the red candy becomes firm.
You can refrigerate them for approximately 5–10 minutes if your kitchen is warm.
Step 15: Serve
Arrange the pops on a dark serving tray, place them upright in a decorated jar, or wrap them individually in clear treat bags.
Store them in a cool location until serving.
The Best Oreos for Cookie Pops
Double Stuf Oreos are usually the easiest to use because the thick cream layer helps support the lollipop stick.
You can also use:
- Original Oreos
- Halloween Oreos
- Chocolate Creme Oreos
- Golden Oreos
- Gluten-free Oreos
- Mint Oreos
- Peanut Butter Oreos
Original Oreos can work, but they require more careful handling because the thinner filling provides less support.
Candy Melts or White Chocolate
Candy melts are the easiest option because they set firmly, remain stable at room temperature, and do not require tempering.
White chocolate has a richer flavor but can be more difficult to melt and may remain softer.
If using white chocolate, choose high-quality bars or melting wafers rather than regular white chocolate chips. Chips contain stabilizers that can make the melted chocolate thick and difficult to dip.
How to Melt Candy Wafers Properly
Use a completely dry bowl and spoon. Even a small amount of water can cause melted candy or chocolate to seize.
Heat the candy in short intervals and stir frequently. The pieces may retain their shape even when they are warm enough to melt, so stirring is important.
Avoid overheating the coating. High heat can make it thick, lumpy, or scorched.
How to Thin Candy Melts
If the coating is too thick, add:
- Coconut oil
- Vegetable shortening
- Paramount crystals
Begin with ½ teaspoon and stir thoroughly before adding more.
Do not use water, milk, or liquid food coloring. Water can cause the melted candy to become stiff and grainy.
How to Color White Chocolate Red
Oil-based or candy-specific food coloring is required for chocolate and candy melts.
Regular liquid food coloring contains water and can cause the coating to seize.
The easiest option is to use red candy melts, which provide an intense color without changing the consistency.
How to Prevent the Oreos from Falling Off the Sticks
To keep the cookies secure:
- Use Double Stuf Oreos.
- Dip each stick in melted candy before inserting it.
- Do not push the stick completely through the filling.
- Chill the assembled cookies before dipping.
- Use a deep bowl so the cookie can be submerged without excessive movement.
- Tap away excess coating gently.
- Hold the stick close to the cookie for additional support.
If a cookie separates, use melted candy to glue it back together and chill it again.
How to Prevent Cracked Coating
The coating may crack if the cookies are extremely cold when dipped into warm candy.
Chill the assembled cookies only until the candy around the sticks becomes firm. Avoid freezing them solid before dipping.
Let frozen or heavily chilled cookies rest at room temperature for a few minutes before coating.
How to Get a Smooth Coating
Use a bowl that is deep enough to submerge each cookie completely.
Thin the melted candy slightly if necessary, and allow the excess to drip away before placing the pop on parchment.
Avoid repeatedly turning the cookie inside the coating. One gentle dip and turn produces a smoother surface.
Can I Make Oreo Pops Without Sticks?
Yes. Prepare them as chocolate-covered Oreos instead.
Use a fork to lower each cookie into the melted coating. Lift it carefully, tap away the excess, and slide it onto parchment paper.
Decorate with red drips and Halloween sprinkles after the white coating becomes firm.
Bloody Eyeball Oreo Pops
Add one large candy eye to the center of each freshly dipped white Oreo pop.
Once the coating sets, pipe thin red lines around the eye to resemble blood vessels.
This variation works well when mixed with the dripping-blood design on a Halloween dessert tray.
Vampire Bite Oreo Pops
Cover the cookies with white candy as directed.
Use a toothpick or piping bag to make two small red puncture marks near the center. Add narrow red drips beneath each mark.
Finish with a small amount of black sanding sugar around the edge.
Mummy Oreo Pops
Drizzle additional white candy back and forth over the coated cookies to create mummy bandages.
Add two small candy eyes before the drizzle becomes firm.
You can add a small amount of red candy near one edge for a slightly spooky finish.
Black and Red Oreo Pops
Use black candy melts instead of white coating.
Decorate the black cookies with red drips, red sugar, or orange and black sprinkles.
The dark background creates a dramatic Halloween appearance and hides small imperfections in the coating.
Halloween Sprinkle Oreo Pops
For a less spooky variation, skip the red drizzle.
Cover the pops with white, orange, purple, or green candy melts and finish with Halloween sprinkles.
This version is especially suitable for younger children.
What to Serve with Bloody Oreo Pops
Add these pops to a Halloween dessert table with:
- Halloween brownies
- Monster cookies
- Candy apples
- Pumpkin cupcakes
- Chocolate-dipped pretzels
- Popcorn balls
- Dirt pudding cups
- Rice cereal treats
- Caramel corn
- Candy corn snack mix
Use black, orange, red, and white decorations to tie the display together.
Can Children Help Make Them?
Yes. Children can add sprinkles, candy eyes, and other decorations.
An adult should handle melting the candy and dipping the cookies because the bowls and coating can become hot.
Prepare the white-coated pops first, then let children decorate them with red drizzle and sprinkles after the coating has cooled.
Can I Prepare Them Ahead?
Yes. Oreo pops can be prepared 3–5 days before serving.
Store them in an airtight container in a cool, dry place. Place parchment or wax paper between layers to protect the decorations.
For the best appearance, keep them away from direct sunlight, moisture, and heat.
Storage
Once the coating is completely firm, place the Oreo pops in an airtight container.
Store them at cool room temperature for up to 5 days.
If your kitchen is particularly warm, refrigerate them. Allow refrigerated pops to return gradually to room temperature inside the closed container to reduce condensation.
Can You Freeze Bloody Oreo Pops?
Freezing is not recommended.
The cookies may become soft, and condensation can cause the candy coating to develop spots or streaks after thawing.
Because these treats keep well for several days, preparing them ahead and storing them at room temperature is the better option.
How to Package Oreo Pops
Place each finished pop in a clear cellophane treat bag.
Tie the bag around the stick with black, red, orange, or purple ribbon.
You can also add a small Halloween tag for party favors, classroom treats, or dessert gifts.
Make sure the coating is completely firm before packaging.
Frequently Asked Questions
What are Bloody Oreo Pops?
They are Oreo cookies attached to lollipop sticks, covered with white candy coating, and decorated with red candy drips to resemble blood.
Can I use regular Oreos?
Yes, but Double Stuf Oreos are easier because the thicker filling holds the sticks more securely.
Can I use white chocolate chips?
You can, but white chocolate chips may melt very thickly. White candy melts or melting wafers are easier to work with.
Why did my candy coating become lumpy?
It may have been overheated or exposed to water. Melt it slowly in a dry bowl and stir frequently.
Can I use red decorating gel?
Yes. Red gel is easy to apply, but it may remain sticky. Red candy melts create firmer drips that are easier to package.
Why are my cookies falling off the sticks?
The sticks may not have been secured with melted candy, or the cookies may not have chilled long enough before dipping.
Do the Oreo pops need to be refrigerated?
Not usually. Store them in an airtight container in a cool room. Refrigerate only if your kitchen is warm.
Can I use popsicle sticks?
Yes, provided they are narrow enough to fit into the cookie filling without cracking the Oreo.
How long do they keep?
They maintain their best texture for approximately 3–5 days when stored properly.
Can I make them gluten-free?
Yes. Use gluten-free chocolate sandwich cookies and verify that the candy melts and sprinkles are also gluten-free.
Pro Tips
Use Double Stuf Oreos and secure every stick with melted candy before dipping. Chill the assembled cookies briefly, but do not freeze them solid.
Keep all bowls and utensils dry, melt the candy slowly, and use coconut oil or shortening only when the coating needs to be thinner.
Apply the red candy unevenly for the most convincing effect. A mixture of short streaks, long drips, and scattered Halloween sprinkles creates the best combination of creamy white coating, dramatic red decoration, crisp chocolate cookies, and festive Halloween color.
Final Thoughts
These Bloody Oreo Pops are an easy no-bake Halloween treat with a dramatic appearance. Crisp chocolate cookies are covered in smooth white candy, finished with dripping red decoration, and topped with festive sprinkles.
Prepare them for Halloween parties, classroom celebrations, dessert tables, or spooky movie nights. They’re easy to customize, simple to package, and impressive enough to become the centerpiece of your Halloween treats.