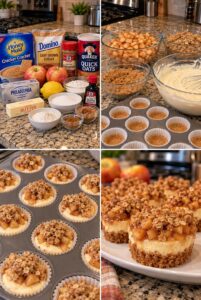
Mini Apple Crisp Cheesecakes
These combine a buttery graham cracker crust, smooth vanilla cheesecake, cinnamon-spiced apples, and a crunchy oat topping. They deliver the flavors of apple crisp and classic cheesecake in one perfectly portioned dessert.
They’re ideal for fall gatherings, Thanksgiving, parties, bake sales, holiday dessert tables, or a cozy weekend treat.
Prep Time: 30 minutes
Bake Time: 22–25 minutes
Chill Time: At least 3 hours
Total Time: Approximately 4 hours
Servings: 12 mini cheesecakes
Why You’ll Love This Recipe
- Creamy cheesecake filling
- Warm cinnamon apple topping
- Buttery graham cracker crust
- Crunchy oat crumble
- Easy individual portions
- Perfect for fall and Thanksgiving
- Can be prepared ahead
- Simple to serve
- Freezer-friendly
Ingredients
Graham Cracker Crust
- 1½ cups graham cracker crumbs
- 3 tablespoons light brown sugar
- ½ teaspoon ground cinnamon
- 5 tablespoons unsalted butter, melted
Cheesecake Filling
- 16 ounces cream cheese, softened
- ½ cup granulated sugar
- 2 large eggs, at room temperature
- ½ cup sour cream
- 1 teaspoon vanilla extract
- 1 tablespoon all-purpose flour
- 1 teaspoon lemon juice
- Pinch of salt
Cinnamon Apple Topping
- 2 medium apples, peeled and finely diced
- 2 tablespoons light brown sugar
- 1 tablespoon unsalted butter, melted
- 1 teaspoon ground cinnamon
- ¼ teaspoon ground nutmeg
- 1 teaspoon lemon juice
- 1 teaspoon cornstarch
Oat Crisp Topping
- ½ cup quick or old-fashioned oats
- ⅓ cup all-purpose flour
- ⅓ cup light brown sugar
- ½ teaspoon ground cinnamon
- Pinch of salt
- 4 tablespoons cold unsalted butter, cubed
Optional Garnishes
- Caramel sauce
- Whipped cream
- Chopped pecans
- Additional cinnamon
- Vanilla ice cream
How to Make Mini Apple Crisp Cheesecakes
Step 1: Preheat the Oven
Preheat your oven to 325°F.
Line a standard 12-cup muffin pan with paper liners.
Step 2: Prepare the Graham Cracker Crust
Combine the graham cracker crumbs, brown sugar, cinnamon, and melted butter in a medium bowl.
Stir until the crumbs are evenly moistened and resemble wet sand.
Step 3: Form the Crusts
Divide the crust mixture evenly among the muffin cups.
Press approximately two tablespoons into the bottom of each liner. Use the bottom of a small measuring cup to compact the crumbs firmly.
Bake the crusts for 5 minutes, then remove the pan from the oven and allow them to cool slightly.
Step 4: Prepare the Apples
Place the diced apples in a bowl.
Add the brown sugar, melted butter, cinnamon, nutmeg, lemon juice, and cornstarch.
Stir until the apple pieces are evenly coated.
Cut the apples into small pieces so they soften during the short baking time.
Step 5: Make the Crisp Topping
Combine the oats, flour, brown sugar, cinnamon, and salt in a separate bowl.
Add the cold butter and work it into the dry ingredients with a fork or your fingertips until coarse crumbs form.
Refrigerate the topping while preparing the cheesecake filling.
Step 6: Beat the Cream Cheese
Place the softened cream cheese in a large mixing bowl.
Beat on medium speed until smooth and free of lumps.
Scrape down the sides and bottom of the bowl.
Step 7: Add the Sugar
Add the granulated sugar and beat until just combined.
Avoid beating the filling excessively because too much air can cause the cheesecakes to rise and crack.
Step 8: Add the Remaining Filling Ingredients
Mix in the sour cream, vanilla, lemon juice, flour, and salt.
Add the eggs one at a time, mixing on low speed after each addition.
Stop mixing as soon as the filling becomes smooth.
Step 9: Fill the Muffin Cups
Divide the cheesecake filling evenly among the prepared crusts.
Fill each liner approximately three-quarters full.
Gently tap the muffin pan against the counter to release large air bubbles.
Step 10: Add the Apples
Spoon the cinnamon apple mixture over each cheesecake.
Press the apple pieces gently into the surface without pushing them deeply into the filling.
Step 11: Add the Crisp Topping
Sprinkle the oat crumble evenly over the apples.
Don’t pack the topping down; keeping it loose helps it become golden and crisp.
Step 12: Bake
Bake for approximately 22–25 minutes.
The edges should appear set, while the centers should retain a slight wobble when the pan is moved.
Avoid overbaking because the cheesecakes will continue setting as they cool.
Step 13: Cool Gradually
Turn off the oven and leave the door slightly open.
Allow the cheesecakes to rest inside for approximately 10 minutes.
Transfer the pan to a wire rack and cool completely at room temperature.
Step 14: Refrigerate
Cover the pan and refrigerate the cheesecakes for at least 3 hours, preferably overnight.
Chilling develops the flavor and creates the best cheesecake texture.
Step 15: Garnish and Serve
Remove the cheesecakes from the muffin pan and peel away the liners.
Drizzle with caramel sauce immediately before serving. Add whipped cream, chopped pecans, or a small scoop of vanilla ice cream if desired.
The Best Apples to Use
Choose firm apples that maintain their shape while baking.
Good options include:
- Honeycrisp
- Granny Smith
- Pink Lady
- Braeburn
- Fuji
- Gala
Granny Smith apples provide a tart contrast to the sweet cheesecake, while Honeycrisp apples offer a naturally sweeter flavor.
How Small Should I Cut the Apples?
Cut the peeled apples into pieces approximately ¼ inch wide.
Large chunks may remain firm after the cheesecakes finish baking. Small, evenly diced pieces soften more quickly and make the desserts easier to eat.
How to Prevent Lumpy Cheesecake Filling
Bring the cream cheese, eggs, and sour cream to room temperature before mixing.
Beat the cream cheese until completely smooth before adding the remaining ingredients.
Cold cream cheese is difficult to blend and often leaves small lumps in the filling.
How to Prevent Cheesecake Cracks
Mix the filling at low speed after adding the eggs.
Don’t overbake the cheesecakes. Remove them when the centers still have a slight wobble.
Cool them gradually before refrigerating to prevent a sudden temperature change.
Small cracks aren’t a major concern because the apple and crisp toppings cover the surface.
Recipe Variations
Caramel Apple Cheesecakes
Add a spoonful of thick caramel sauce over the chilled cheesecakes before serving.
A small amount of caramel can also be drizzled between the cheesecake and apple layers.
Apple Pecan Cheesecakes
Add ⅓ cup finely chopped pecans to the oat topping.
Toast the pecans first for a deeper, nuttier flavor.
Cinnamon Roll Apple Cheesecakes
Swirl a mixture of brown sugar, cinnamon, and melted butter into the cheesecake filling before adding the apples.
Pear Crisp Cheesecakes
Replace the apples with firm, finely diced pears.
Use the same cinnamon and oat topping.
Gluten-Free Apple Cheesecakes
Use gluten-free graham crackers, certified gluten-free oats, and a gluten-free flour blend.
Can I Use Apple Pie Filling?
Yes.
Chop the apple pieces into smaller portions and use approximately one tablespoon of filling on each cheesecake.
Because canned pie filling is already sweetened and thickened, don’t add the brown sugar, cornstarch, or butter listed for the fresh apple topping.
Can I Make Them Without the Oat Topping?
Yes.
Top the cheesecakes only with cinnamon apples, or use a simple flour, brown sugar, and butter streusel without oats.
Crushed graham crackers mixed with butter also make an easy topping.
What to Serve with Mini Apple Cheesecakes
These mini desserts are delicious with:
- Caramel sauce
- Whipped cream
- Vanilla ice cream
- Chopped toasted pecans
- Hot coffee
- Apple cider
- Chai tea
- Warm cinnamon sauce
Can I Prepare Them Ahead?
Yes.
Prepare and refrigerate the cheesecakes up to 2 days before serving.
Wait until shortly before serving to add caramel sauce or whipped cream so the presentation remains neat.
Storage
Store the cheesecakes in an airtight container in the refrigerator.
They will remain fresh for up to 4 days.
Keep them refrigerated until shortly before serving.
Can You Freeze Mini Apple Crisp Cheesecakes?
Yes.
Place the chilled cheesecakes on a tray and freeze until firm.
Transfer them to a freezer-safe container with parchment paper between the layers. Freeze for up to 2 months.
Thaw overnight in the refrigerator before serving.
For the best texture, add fresh caramel sauce after thawing.
Frequently Asked Questions
Do mini cheesecakes need a water bath?
No. Their small size allows them to bake evenly without one.
Can I use a mini muffin pan?
Yes, but reduce the baking time to approximately 12–15 minutes and cut the apples especially small.
Why did my crust crumble?
The crumbs may not have contained enough butter or may not have been pressed firmly into the liners.
Why did my cheesecakes sink?
A slight dip in the center is normal. Significant sinking may result from overmixing, underbaking, or cooling them too quickly.
Can I use low-fat cream cheese?
Full-fat cream cheese creates the richest and most stable texture. Reduced-fat cream cheese may produce a softer filling.
Should the apple topping be cooked first?
It isn’t necessary when the apples are finely diced. You may sauté them for a few minutes if you prefer an especially soft topping.
Can I serve them warm?
Cheesecake needs time to chill and set. For the best texture, serve these desserts cold or allow them to stand at room temperature for 10–15 minutes.
Pro Tips
Use room-temperature cheesecake ingredients for the smoothest filling.
Dice the apples finely and evenly so they soften during baking.
Press the graham cracker crust firmly into each liner to prevent crumbling.
Avoid opening the oven repeatedly while the cheesecakes bake.
Chill them overnight whenever possible for the best flavor and texture.
Final Thoughts
These Mini Apple Crisp Cheesecakes bring together creamy vanilla cheesecake, cinnamon apples, buttery graham cracker crust, and a golden oat topping.
Their individual size makes them easy to serve at fall gatherings, Thanksgiving dinners, and holiday parties. Finish them with caramel sauce for a cozy dessert that combines two classic favorites in every bite.