Chicken Chimichangas
These Chicken Chimichangas are filled with tender shredded chicken, creamy cheese, salsa, and warm spices, then folded into flour tortillas and fried until crisp and golden. Serve them with extra salsa, sour cream, shredded lettuce, or fresh cilantro for a satisfying dinner with restaurant-style flavor.
Prep Time: 20 minutes
Cook Time: 20 minutes
Total Time: Approximately 40 minutes
Servings: 6 chimichangas
Why You’ll Love This Recipe
- Crispy tortillas with a creamy, cheesy chicken filling
- Uses cooked or rotisserie chicken to save time
- Easy to customize with your favorite salsa
- Fried in a skillet for a golden, crunchy exterior
- Filling can be prepared ahead
- Delicious with simple toppings and sides
Ingredients
Chicken Filling
- 3 cups cooked shredded chicken
- 4 ounces cream cheese, softened
- 1 cup shredded Mexican-style cheese
- ½ cup chunky salsa, plus more for serving
- ½ teaspoon chili powder
- ½ teaspoon garlic powder
- ¼ teaspoon ground cumin
- ¼ teaspoon salt
- ¼ teaspoon black pepper
For Assembly and Frying
- 6 large burrito-size flour tortillas
- 2–3 cups vegetable oil, for frying
Optional Toppings
- Sour cream
- Shredded lettuce
- Chopped cilantro
- Extra salsa
How to Make Chicken Chimichangas
Step 1: Make the Chicken Filling
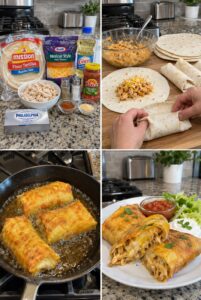
In a large bowl, combine the shredded chicken, softened cream cheese, Mexican-style cheese, salsa, chili powder, garlic powder, cumin, salt, and pepper. Stir until the mixture is evenly combined.
Step 2: Warm the Tortillas
Warm the tortillas briefly in the microwave, covered with a damp paper towel, or heat them in a dry skillet for a few seconds per side. Warm tortillas are more flexible and less likely to crack while folding.
Step 3: Fill the Tortillas
Spoon about ½ cup of chicken filling into the center of each tortilla, shaping it into a short rectangle. Leave a border around the edges so the tortillas can be folded securely.
Step 4: Fold the Chimichangas
Fold the sides of a tortilla over the filling. Fold the bottom edge up and roll tightly toward the top, keeping the sides tucked in. Place each chimichanga seam-side down while you finish assembling the rest.
Step 5: Heat the Oil
Pour about ½ inch of vegetable oil into a large, heavy skillet. Heat over medium heat until it reaches about 350°F. If you don’t have a thermometer, a small piece of tortilla should sizzle steadily when added to the oil without browning immediately.
Step 6: Fry Until Golden
Carefully place two or three chimichangas seam-side down in the skillet, leaving room between them. Fry for about 2–3 minutes per side, turning with tongs, until crisp and golden brown. Adjust the heat as needed to keep the oil from getting too hot.
Step 7: Drain and Serve
Transfer the chimichangas to a paper-towel-lined plate or wire rack. Let them rest for a few minutes before serving; the filling will be very hot.
Serve with salsa, sour cream, shredded lettuce, or chopped cilantro.
Tips for Success
- Use cooked chicken that is finely shredded so the filling is easy to roll.
- Drain excess liquid from chunky salsa to keep the filling from becoming watery.
- Don’t overfill the tortillas; a smaller, tightly wrapped chimichanga is easier to fry.
- Warm the tortillas first so they fold without cracking.
- Place each one seam-side down in the pan to help seal it.
- Fry in batches so the skillet doesn’t become crowded and the oil temperature stays steady.
- Keep an eye on the oil. If the tortillas brown too quickly, lower the heat.
Can I Bake the Chimichangas Instead?
Yes. Place the assembled chimichangas seam-side down on a parchment-lined baking sheet. Brush or lightly spray the tops with oil and bake at 400°F for 20–25 minutes, turning once, until crisp and golden. They won’t be quite as crunchy as the fried version, but they’re still delicious.
Can I Use an Air Fryer?
Yes. Brush or spray the chimichangas lightly with oil and place them seam-side down in the air fryer basket. Cook at 375°F for 8–12 minutes, turning halfway through, until crisp and golden. Work in batches if needed.
Easy Variations
Spicy Chicken Chimichangas
Use hot salsa and add a pinch of cayenne or crushed red pepper to the filling.
Chicken and Bean Chimichangas
Add ½ cup of drained black beans or refried beans to the chicken mixture.
Extra-Cheesy Chimichangas
Add another ½ cup shredded Mexican-style cheese to the filling.
Mild Chimichangas
Use mild salsa and reduce or omit the chili powder.
Make-Ahead Instructions
Prepare the chicken filling up to 2 days ahead and refrigerate it in a covered container. For the best texture, assemble and fry the chimichangas shortly before serving.
You can also assemble them a few hours ahead, cover, and refrigerate until ready to cook. Keep them seam-side down so they hold their shape.
Storage and Reheating
Refrigerate leftover chimichangas in an airtight container for up to 3 days. Reheat them in a 350°F oven for 10–15 minutes or in an air fryer until crisp and heated through. Microwaving works, but the tortilla will soften.
Frequently Asked Questions
What chicken works best?
Rotisserie chicken, leftover roast chicken, or poached chicken breasts all work well. Make sure the chicken is cooked before mixing it into the filling.
Why did my chimichangas open while frying?
They may have been overfilled or not folded tightly enough. Leave a border around the filling, tuck in the sides, and place them seam-side down in the oil first.
Can I use smaller tortillas?
Yes, but use less filling in each one. Smaller tortillas make smaller chimichangas and may cook faster.
Can I freeze Chicken Chimichangas?
Yes. Assemble the chimichangas but don’t fry them. Freeze them in a single layer until firm, then transfer to a freezer-safe container for up to 2 months. Thaw overnight in the refrigerator before frying, or bake from frozen until hot and crisp.
What should I serve with them?
Serve with salsa, sour cream, shredded lettuce, cilantro, rice, or beans.
Final Thoughts
These Chicken Chimichangas have a creamy, flavorful chicken center wrapped in a crisp golden tortilla. Fry them for the classic crunchy finish, or bake or air-fry them for an easier option. Add your favorite toppings and serve them hot for a crowd-pleasing meal.