Halloween Oreo Cookies
These Halloween Oreo Cookies are thick, soft double-chocolate cookies loaded with chocolate chips and chunks of orange-creme Halloween Oreos. The dark chocolate dough and bright orange cookie centers give them a festive look without requiring complicated decorating.
They’re perfect for Halloween parties, fall bake sales, classroom celebrations, movie nights, trick-or-treat gatherings, or a spooky seasonal dessert tray.
Prep Time: 20 minutes
Chill Time: 30 minutes
Bake Time: 10–12 minutes
Total Time: Approximately 1 hour
Servings: 18 large cookies
Why You’ll Love This Recipe
- Rich double-chocolate flavor
- Loaded with Halloween Oreos
- Soft, thick, and chewy centers
- Crisp edges
- Bright orange seasonal color
- Easy to prepare
- No complicated decorating
- Perfect for parties and bake sales
- Freezer-friendly dough
- Easy to customize with Halloween candy
Ingredients
Chocolate Cookie Dough
- ½ cup unsalted butter, softened
- ½ cup packed light brown sugar
- ⅓ cup granulated sugar
- 1 large egg
- 1 large egg yolk
- 2 teaspoons vanilla extract
- 1½ cups all-purpose flour
- ½ cup unsweetened cocoa powder
- 1 teaspoon baking soda
- ½ teaspoon salt
- 1 tablespoon cornstarch
- 1 cup semisweet chocolate chips
Oreo Mix-Ins
- 14 Halloween Oreos with orange creme
- ½ cup miniature chocolate chips, optional
- ¼ cup orange Halloween sprinkles, optional
How to Make Halloween Oreo Cookies
Step 1: Prepare the Oreo Cookies
Set aside four Halloween Oreos for decorating the tops.
Roughly chop the remaining Oreos into different-sized pieces. Some pieces should be fairly large so the orange filling remains visible after baking.
Avoid crushing all the cookies into fine crumbs.
Step 2: Combine the Dry Ingredients
Place the flour, cocoa powder, baking soda, salt, and cornstarch in a medium bowl.
Whisk until evenly combined and no large cocoa powder lumps remain.
Set the mixture aside while preparing the wet ingredients.
Step 3: Cream the Butter and Sugars
Place the softened butter, brown sugar, and granulated sugar in a large mixing bowl.
Beat with an electric mixer for approximately 2–3 minutes, or until the mixture becomes light and creamy.
Scrape down the sides and bottom of the bowl as needed.
Step 4: Add the Egg and Egg Yolk
Add the whole egg, extra egg yolk, and vanilla extract.
Beat until the mixture is smooth and evenly combined.
The additional egg yolk helps create soft, rich cookie centers.
Step 5: Add the Dry Ingredients
Gradually add the dry ingredients to the butter mixture.
Mix on low speed just until a thick chocolate dough forms.
Avoid overmixing once the flour has been added because excessive mixing can make the cookies tough.
Step 6: Add the Chocolate Chips
Fold the semisweet chocolate chips and optional miniature chocolate chips into the dough.
Reserve a small handful of chocolate chips for pressing into the cookies before baking.
Step 7: Add the Oreo Pieces
Gently fold the chopped Halloween Oreos into the dough.
Mix only until the pieces are distributed. Stirring too aggressively can crush the cookies and blend the orange filling completely into the dough.
Step 8: Chill the Dough
Cover the bowl and refrigerate the dough for approximately 30 minutes.
Chilling firms the butter and helps the cookies remain thick while baking.
If the dough chills for several hours, let it stand at room temperature briefly before scooping.
Step 9: Preheat the Oven
Preheat your oven to 350°F.
Line two large baking sheets with parchment paper or silicone baking mats.
Step 10: Portion the Cookies
Scoop approximately three tablespoons of dough for each large cookie.
Roll the dough gently into balls and arrange them on the prepared baking sheets, leaving approximately two inches between each one.
For smaller cookies, use approximately two tablespoons of dough and reduce the baking time slightly.
Step 11: Decorate the Tops
Break the reserved Oreos into visible pieces.
Press several Oreo chunks and a few reserved chocolate chips into the top of each dough ball.
Add orange or Halloween sprinkles if desired.
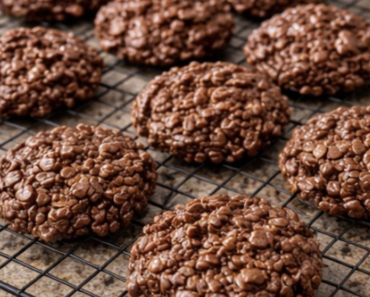
Decorating the tops before baking gives the finished cookies the chunky appearance shown in the reference image.
Step 12: Bake
Bake one sheet at a time for approximately 10–12 minutes.
The edges should look set, but the centers should remain soft and slightly underbaked.
Don’t wait for the centers to look completely firm because the cookies will continue cooking on the hot baking sheet.
Step 13: Reshape the Cookies
If any cookies spread unevenly, place a round cookie cutter or drinking glass around each warm cookie and gently move it in a circular motion.
This creates a neat, rounded shape.
Press additional Oreo pieces or chocolate chips into the tops while the cookies are still warm, if desired.
Step 14: Cool
Allow the cookies to cool on the baking sheet for approximately 10 minutes.
Transfer them carefully to a wire rack and let them finish cooling.
The cookies will become firmer as they cool while remaining soft in the center.
What Are Halloween Oreos?
Halloween Oreos are seasonal chocolate sandwich cookies filled with orange-colored creme.
The orange filling usually has the familiar vanilla flavor, but its color creates a festive contrast against the dark chocolate cookies.
If Halloween Oreos aren’t available, use regular Oreos and add orange candy pieces or sprinkles to the dough.
The Best Cocoa Powder to Use
Natural unsweetened cocoa powder gives these cookies a classic brownie-like chocolate flavor.
Dutch-processed cocoa can also be used, but it produces a darker color and smoother chocolate taste.
Avoid sweetened hot cocoa mix because it contains sugar and other ingredients that can change the cookie texture.
How to Keep the Cookies Thick
Several small details help prevent excessive spreading:
- Use softened rather than melted butter
- Measure the flour accurately
- Chill the dough before baking
- Place dough on cool baking sheets
- Don’t flatten the dough balls
- Make tall dough mounds
- Bake one sheet at a time
- Allow a warm baking sheet to cool before reusing it
If the first test cookie spreads too much, chill the remaining dough for another 20–30 minutes.
How to Keep Oreo Pieces Visible
Use a mixture of large and small Oreo chunks in the dough.
Reserve several pieces and press them into the tops before baking. You can also add a few fresh pieces immediately after the cookies leave the oven.
Don’t crush all the Oreos finely, or the orange filling will disappear into the chocolate dough.
Why Are My Cookies Dry?
Dry cookies are usually caused by too much flour or overbaking.
Measure the flour by spooning it into the measuring cup and leveling the top. Don’t scoop directly from the container because this can compact the flour.
Remove the cookies when the edges are set but the centers still look slightly soft.
Why Did My Cookies Spread Too Much?
The butter may have been too warm, the dough may not have chilled long enough, or the baking sheet may have been hot.
Place the dough back in the refrigerator until firm.
You can also add one or two tablespoons of flour if the dough remains unusually soft after chilling.
Can I Use Regular Oreos?
Yes. Regular Oreos work perfectly.
To maintain the Halloween appearance, add:
- Orange sprinkles
- Orange chocolate candies
- Candy eyes
- Orange candy melts
- Halloween-colored chocolate chips
- Black and orange sanding sugar
You can also use another seasonal sandwich cookie with colored filling.
Can I Use Double Stuf Oreos?
Yes. Double Stuf Oreos create larger pockets of sweet vanilla filling.
Because they contain more creme, chop them carefully and avoid overmixing the dough.
The cookies may be slightly sweeter than those made with regular Halloween Oreos.
Halloween Monster Oreo Cookies
Add candy eyes to the cookies immediately after baking.
Use a combination of orange, green, and purple candy-coated chocolates in the dough.
Press the eyes into the warm cookies so they remain attached after cooling.
Halloween Oreo Brookies
Prepare chocolate cookie dough and brownie batter.
Spread brownie batter in a lined baking pan, then drop spoonfuls of Halloween Oreo cookie dough over the top.
Bake until the brownie base is set and the cookie portions are lightly crisp around the edges.
Cookies and Cream Halloween Cookies
Replace the cocoa powder with an additional ⅓ cup of all-purpose flour.
Use white chocolate chips instead of semisweet chocolate chips.
Fold in Halloween Oreos for a lighter cookies-and-cream version with visible orange pieces.
Peanut Butter Halloween Oreo Cookies
Add ⅓ cup creamy peanut butter to the butter and sugar mixture.
Reduce the butter by two tablespoons and add chopped peanut butter cups to the dough.
The combination of chocolate, peanut butter, and orange-creme Oreos works especially well for Halloween.
Halloween Candy Cookies
Fold chopped chocolate Halloween candy into the dough with the Oreo pieces.
Good options include:
- Peanut butter cups
- Chocolate-covered caramel pieces
- Candy-coated chocolates
- Chopped chocolate bars
- Toffee pieces
- Miniature peanut butter candies
Limit the total mix-ins so the dough still holds together.
Can I Add Food Coloring?
The chocolate dough is already dark, so food coloring isn’t necessary.
If you want more orange color, divide a small amount of white chocolate and tint it with oil-based orange food coloring. Drizzle it over the cooled cookies.
Water-based coloring can cause melted chocolate to seize.
Decorating Ideas
Finish these Halloween cookies with:
- Candy eyes
- Orange sprinkles
- Purple and green sprinkles
- Melted orange candy wafers
- White chocolate spiderwebs
- Miniature chocolate candies
- Halloween Oreo crumbs
- Black sanding sugar
- Edible glitter
Add candy eyes and delicate decorations after baking so they don’t melt in the oven.
White Chocolate Spiderweb Decoration
Melt white chocolate or white candy wafers according to the package directions.
Transfer the melted coating to a piping bag and draw three or four circles over each cooled cookie.
Drag a toothpick from the center toward the edge to create a spiderweb pattern.
Allow the chocolate to set before storing the cookies.
Can I Make the Dough Ahead?
Yes. Prepare the cookie dough and refrigerate it in an airtight container for up to 3 days.
For easier baking, scoop the dough into individual balls before refrigerating it.
Let very firm dough sit at room temperature for approximately 10 minutes before baking.
Storage
Allow the cookies to cool completely.
Store them in an airtight container at room temperature for up to 4–5 days.
Place a small piece of bread inside the container to help keep the cookies soft. Replace the bread if it becomes hard.
Don’t refrigerate the baked cookies unless necessary because refrigeration can make them dry.
Can You Freeze Halloween Oreo Cookies?
Yes. Baked cookies can be frozen in an airtight container for up to 3 months.
Place parchment paper between the layers and thaw the cookies at room temperature before serving.
For a freshly baked texture, warm each thawed cookie in the microwave for approximately 8–10 seconds.
How to Freeze the Cookie Dough
Scoop the dough into individual portions and arrange them on a parchment-lined baking sheet.
Freeze until firm, then transfer the dough balls to a freezer-safe bag or container.
Freeze for up to 3 months.
Bake directly from frozen, adding approximately 2–3 minutes to the baking time. Press fresh Oreo pieces into the dough before baking for the most attractive appearance.
What to Serve with Halloween Oreo Cookies
Serve these cookies with:
- Cold milk
- Hot chocolate
- Coffee
- Vanilla ice cream
- Chocolate ice cream
- Pumpkin milkshakes
- Halloween punch
- Caramel dip
- Fresh strawberries
- Other Halloween desserts
For a party platter, combine them with brownies, popcorn balls, chocolate-covered pretzels, and candy corn treats.
Frequently Asked Questions
What are Halloween Oreo Cookies?
They’re thick chocolate cookies filled with chocolate chips and pieces of orange-creme Halloween Oreos.
Do Halloween Oreos taste different?
The orange filling generally has a familiar sweet vanilla flavor. The primary difference is its seasonal color.
Can I use regular Oreos?
Yes. Add orange sprinkles or candies if you want the same Halloween color.
Do I need to chill the dough?
Chilling is strongly recommended because it helps the cookies stay thick and prevents excessive spreading.
How long should I bake the cookies?
Large cookies usually need approximately 10–12 minutes at 350°F.
Why do the centers look underbaked?
The cookies continue baking on the hot pan. Removing them while the centers are soft keeps them chewy after cooling.
Can I use salted butter?
Yes. Reduce the added salt to approximately ¼ teaspoon.
Can I add candy eyes?
Yes. Press them into the cookies immediately after baking.
Can I make smaller cookies?
Yes. Use two tablespoons of dough and begin checking them after approximately eight minutes.
How many cookies does the recipe make?
The recipe makes approximately 18 large cookies or 24 smaller cookies.
Can I freeze the dough?
Yes. Portioned cookie dough can be frozen for up to three months.
How do I keep the cookies soft?
Avoid overbaking and store the cooled cookies in an airtight container.
Pro Tips
Use large Oreo chunks inside the dough and reserve several pieces for decorating the tops. This keeps the bright orange filling visible in every cookie.
Bake the cookies only until their edges are set. The centers should remain soft when they leave the oven.
For the best presentation, press additional Oreo pieces and chocolate chips into the warm cookies, then add candy eyes or a drizzle of orange chocolate after they cool.
Final Thoughts
These Halloween Oreo Cookies combine rich chocolate dough, melted chocolate chips, crunchy sandwich cookies, and bright orange creme in one festive dessert.
They’re simple enough for a family baking day but eye-catching enough for Halloween parties, bake sales, and dessert tables. Serve them plain or decorate them with candy eyes, sprinkles, or chocolate spiderwebs for an easy seasonal treat.