Cherry Cheesecake Phyllo Cups
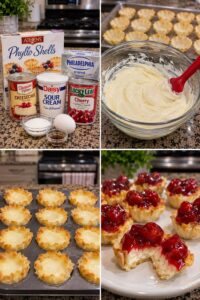
These Cherry Cheesecake Phyllo Cups pair crisp, flaky pastry shells with a smooth cheesecake filling and glossy cherry topping. They look elegant on a holiday dessert table, yet the mini phyllo shells make them easy to prepare without rolling out pastry or making a crust from scratch.
Each bite has a crunchy shell, creamy center, and sweet-tart cherry topping. Serve them at parties, family gatherings, or whenever you want a small dessert that’s easy to pick up and enjoy.
Prep Time: 20 minutes
Bake Time: 15–18 minutes
Chill Time: 1 hour
Total Time: About 1 hour 40 minutes
Servings: 15 mini cups
Why You’ll Love This Recipe
- Crisp phyllo shells make a quick, convenient base
- Creamy cheesecake filling pairs beautifully with cherries
- Mini portions are easy to serve at parties
- The shells and filling can be prepared ahead
- Simple ingredients create a polished-looking dessert
Ingredients
- 15 mini phyllo shells, thawed if frozen
- 8 ounces cream cheese, softened
- ⅓ cup granulated sugar
- ¼ cup sour cream
- 1 large egg
- 1 teaspoon vanilla extract
- 1 tablespoon all-purpose flour
- ¾ cup cherry pie filling
How to Make Cherry Cheesecake Phyllo Cups
Step 1: Prepare the Oven and Phyllo Shells
Preheat the oven to 325°F (165°C). Arrange the phyllo shells on a baking sheet or in the cups of a mini muffin pan. If the package gives different heating directions, follow those instructions.
Step 2: Make the Cheesecake Filling
In a mixing bowl, beat the softened cream cheese and sugar until smooth. Mix in the sour cream and vanilla.
Add the egg and flour, then mix on low speed just until combined. Scrape the sides of the bowl as needed. Avoid overmixing, which can add air to the filling and make it puff unevenly.
Step 3: Fill the Phyllo Shells
Spoon the cheesecake mixture into the phyllo shells, filling each about three-quarters full. Leave a little room at the top for the filling to puff as it bakes.
Step 4: Bake Until Just Set
Bake for 15–18 minutes, until the centers look set but still have a slight wobble. The filling should not look liquid. Remove the cups from the oven and let them cool in the pan for about 15 minutes.
Step 5: Chill the Cheesecake Cups
Transfer the cooled cups to a tray and refrigerate for at least 1 hour. Chilling helps the filling firm up and makes the cups easier to serve.
Step 6: Add the Cherry Topping
Spoon a small amount of cherry pie filling onto each chilled cheesecake cup. Keep the topping centered so the phyllo edges remain crisp. Serve cold or slightly chilled.
Tips for the Best Cherry Cheesecake Phyllo Cups
- Bring the cream cheese to room temperature. Soft cream cheese blends more smoothly and helps prevent lumps.
- Mix gently after adding the egg. Stop as soon as the batter is combined for a creamy texture.
- Don’t overfill the shells. The cheesecake filling expands slightly as it bakes.
- Cool before chilling. Letting the cups cool first helps prevent condensation from forming in the refrigerator.
- Add the topping close to serving time. Cherry filling can soften the pastry if it sits on the shells for too long.
- Use a small spoon. A teaspoon makes it easier to portion the cherries neatly.
Easy Variations
Use Blueberry or Strawberry Topping
Replace the cherry pie filling with blueberry, strawberry, raspberry, or apple pie filling. Use the same amount and spoon it onto the cups just before serving.
Add Lemon Flavor
Mix 1 teaspoon of lemon zest into the cheesecake batter for a bright, lightly tangy flavor that complements the cherries.
Use Prepared Cheesecake Filling
For a shortcut, use a prepared cheesecake filling in place of the homemade batter. Spoon it into the shells and follow the package directions for whether it needs baking or chilling. Add the cherry topping before serving.
Add Chocolate
Drizzle the finished cups lightly with melted chocolate, or add a few mini chocolate chips to the cheesecake filling.
Make Them Less Sweet
Reduce the sugar in the filling to ¼ cup and use a smaller spoonful of cherry topping on each cup.
Make-Ahead and Storage
The cheesecake cups can be baked and chilled up to 1 day ahead. Store them in a covered container in the refrigerator, and add the cherry topping shortly before serving for the crispest phyllo shells.
Store finished cups in an airtight container in the refrigerator for up to 3 days. The pastry will gradually soften as it sits, so these are best enjoyed within the first day.
Freezing is not recommended because the phyllo shells can lose their crisp texture and the cheesecake filling may change after thawing.
Frequently Asked Questions
Can I use frozen mini phyllo shells?
Yes. Thaw them according to the package directions before filling. Some brands recommend baking the shells briefly first, so check the package instructions.
How do I know when the cheesecake filling is baked?
The edges should look set, and the centers should have only a slight wobble when the pan is gently moved. The filling will firm further as it cools and chills.
Can I make these without sour cream?
Yes. Use an equal amount of plain Greek yogurt or heavy cream. The texture and tang may vary slightly.
Why did my cheesecake filling crack?
Small cracks can happen if the filling is overmixed or baked too long. Keep the mixer on low after adding the egg and remove the cups once the centers are just set.
Can I add the cherries before baking?
It’s best to add the cherry topping after baking and chilling. This keeps the fruit topping bright and prevents it from sinking into the cheesecake filling.
How many cups does this recipe make?
This recipe makes about 15 mini cups, depending on how much filling you add to each shell. Use the package count as your guide and adjust the filling amount as needed.
Final Thoughts
These Cherry Cheesecake Phyllo Cups are a lovely little dessert with crisp pastry, creamy cheesecake, and sweet cherry topping in every bite. They’re easy to portion, simple to prepare ahead, and just right for sharing at a holiday gathering or serving after dinner.