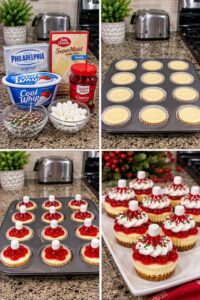
These Christmas Cherry Cheesecake Bites are mini vanilla cheesecakes topped with glossy cherry filling, whipped topping, festive sprinkles, and a little marshmallow “hat.” Their red-and-white finish makes them a cheerful addition to a Christmas dessert table, and the individual portions are easy to serve at parties.
The vanilla cake mix helps make a simple cookie-style crust, while a creamy cheesecake filling bakes in a muffin pan. Once chilled, each bite gets dressed up with cherries and whipped topping.
Prep Time: 25 minutes
Bake Time: 20–25 minutes
Chill Time: 2 hours
Total Time: About 3 hours
Servings: 12 mini cheesecakes
Why You’ll Love This Recipe
- Individual cheesecakes are easy to serve and share
- Cherry topping and Christmas sprinkles make them party-ready
- A vanilla cake-mix crust keeps the preparation simple
- The cheesecakes can be baked and chilled ahead of time
- Cool Whip makes an easy finishing topping
- Each mini dessert combines a buttery crust, creamy center, and fruity cherry topping
Ingredients
For the Crust
- 1½ cups vanilla cake mix
- 4 tablespoons unsalted butter, melted
- 1 large egg
For the Cheesecake Filling
- 2 packages (8 ounces each) cream cheese, softened
- ½ cup granulated sugar
- 1 large egg
- 1 teaspoon vanilla extract
For the Topping
- 1 can (about 21 ounces) cherry pie filling
- 1 cup whipped topping, thawed
- 12 mini marshmallows
- 2 tablespoons red and green Christmas sprinkles
How to Make Christmas Cherry Cheesecake Bites
Step 1: Prepare the Pan
Preheat the oven to 325°F. Place 12 paper liners in a standard muffin pan.
For easier removal, use sturdy liners or lightly spray the inside of each liner with cooking spray. Set the pan aside while you prepare the crust and filling.
Step 2: Make the Vanilla Cake-Mix Crust
In a medium bowl, combine the vanilla cake mix, melted butter, and egg. Stir until a soft, crumbly dough forms.
Divide the mixture evenly among the 12 liners. Press it firmly into the bottom of each cup using the back of a spoon or the bottom of a small glass. A compact, even layer helps the crust hold together after baking.
Step 3: Prepare the Cheesecake Filling
In a large bowl, beat the softened cream cheese and sugar until smooth and creamy. Scrape down the sides of the bowl as needed so no large cream-cheese lumps remain.
Add the egg and vanilla extract. Mix on low speed just until combined. Avoid beating the mixture for too long; incorporating too much air can cause the cheesecakes to puff and crack as they bake.
Step 4: Fill the Muffin Cups
Spoon the cheesecake filling over the crusts, dividing it evenly among the 12 liners. Fill each cup about three-quarters full.
Tap the muffin pan gently on the counter to release any large air bubbles and level the filling.
Step 5: Bake the Mini Cheesecakes
Bake for 20–25 minutes, until the edges look set and the centers still have a slight wobble when the pan is gently moved. The cheesecakes will continue to firm as they cool.
Remove the pan from the oven and let the cheesecakes cool in the pan for about 30 minutes.
Step 6: Chill Until Firm
Once the cheesecakes have cooled, transfer the pan to the refrigerator. Chill for at least 2 hours, or until the centers are completely cold and firm.
Chilling is important for both texture and presentation. The topping will sit more neatly on cold cheesecakes.
Step 7: Add the Cherry Topping
Spoon a small amount of cherry pie filling onto each cheesecake. Add a few cherries to each one, along with enough filling to create a glossy red layer.
If the pie filling has very large cherries, cut them in half so the topping is easier to eat and stays centered.
Step 8: Decorate and Serve
Pipe or spoon a swirl of whipped topping over the cherry layer. Add a mini marshmallow to the top of each swirl and finish with red and green sprinkles.
Serve the cheesecake bites cold. Keep any extras refrigerated until ready to enjoy.
Tips for the Best Christmas Cherry Cheesecake Bites
- Soften the cream cheese first. Room-temperature cream cheese blends more smoothly and helps prevent lumps.
- Mix the filling gently. Once the egg is added, mix only until combined to help prevent cracks and puffing.
- Press the crust firmly. A compact crust is easier to lift and eat.
- Don’t overbake. The centers should retain a slight wobble when you remove the pan from the oven.
- Cool before refrigerating. Let the pan cool first to avoid condensation forming on the cheesecakes.
- Chill thoroughly before decorating. Cold cheesecakes hold the cherry and whipped-topping layers better.
- Drain excess cherry syrup if needed. A spoonful of topping should look glossy without running down the sides.
- Add the marshmallows and sprinkles near serving time. This keeps the decorations looking fresh and prevents the marshmallows from becoming sticky.
- Use a piping bag for the whipped topping. It creates a tidy swirl, but a spoonful works just as well.
Easy Variations
Use Another Pie Filling
Swap the cherry pie filling for blueberry, strawberry, raspberry, or apple pie filling. Choose a topping that complements the vanilla cheesecake and suits the occasion.
Make Chocolate Crusts
Replace the vanilla cake mix in the crust with chocolate cake mix. The chocolate base pairs especially well with cherry topping.
Add a Chocolate Drizzle
Drizzle a little melted chocolate or chocolate syrup over the whipped topping before adding the sprinkles. Add the drizzle just before serving for a neat finish.
Use Homemade Whipped Cream
Beat cold heavy cream with a little powdered sugar until soft peaks form, then pipe it onto the chilled cheesecakes. Keep homemade whipped cream refrigerated.
Make Them Without Paper Liners
Use a well-greased mini cheesecake pan or muffin pan. Let the cheesecakes chill completely before carefully loosening the edges and lifting them out.
Make Mini Versions
Use a mini muffin pan and divide the crust and filling among the wells. Reduce the baking time and check the centers early; the smaller cheesecakes will bake faster.
Make-Ahead and Storage
Bake the mini cheesecakes up to 2 days ahead. Cool and chill them without the toppings, then add the cherry filling, whipped topping, marshmallows, and sprinkles on the day you plan to serve them.
Store finished cheesecake bites in a covered container in the refrigerator for up to 3 days. Arrange them in a single layer so the decorations stay intact. Keep them refrigerated until serving because the cream cheese and whipped topping need to stay cold.
Freezing works best before adding the toppings. Freeze the cooled, undecorated cheesecakes in an airtight container for up to 1 month. Thaw them overnight in the refrigerator, then decorate shortly before serving.
Frequently Asked Questions
Can I use a different crust?
Yes. A graham-cracker crust or crushed vanilla-cookie crust works well. Mix the crumbs with melted butter, press them into the liners, and bake briefly before adding the cheesecake filling.
Why did my mini cheesecakes crack?
They may have been overmixed, overbaked, or cooled too quickly. Mix the filling only until smooth, remove the pan while the centers still have a slight wobble, and let the cheesecakes cool gradually.
How can I tell when the cheesecakes are done?
The edges should look set, while the centers move slightly when the pan is gently shaken. They will firm as they cool and chill.
Can I use a tub of whipped topping?
Yes. Thaw it in the refrigerator according to the package directions before adding it to the chilled cheesecakes.
Can I decorate the cheesecakes the day before?
You can add the cherry topping ahead. For the best-looking whipped topping and sprinkles, decorate the same day you plan to serve them.
How do I stop the cherry topping from sliding?
Make sure the cheesecakes are fully chilled before decorating. Spoon the topping into the center and avoid adding too much syrup.
Can I make these in a regular muffin pan?
Yes. This recipe makes 12 standard-size bites in a regular muffin pan. If using a mini muffin pan, divide the mixture into more portions and reduce the baking time.
Do the cheesecakes need to stay refrigerated?
Yes. Keep them refrigerated until serving and return leftovers to the refrigerator promptly.
Final Thoughts
These Christmas Cherry Cheesecake Bites bring together a simple vanilla crust, creamy baked filling, bright cherry topping, and festive decorations. Make the cheesecakes ahead, chill them until firm, and add the whipped topping and sprinkles before serving for an easy holiday dessert that looks ready for the celebration.