Jack-o’-Lantern Quesadillas
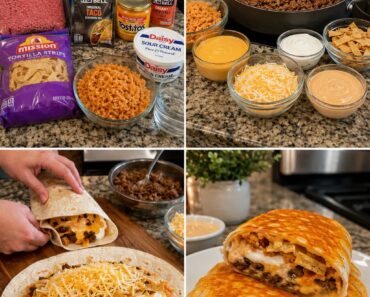
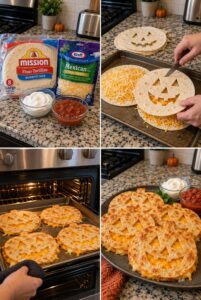
These Jack-o’-Lantern Quesadillas turn simple cheese quesadillas into a fun Halloween meal. Flour tortillas are cut into pumpkin faces, filled with plenty of shredded cheese, and baked until golden and crispy with gooey melted centers.
Serve them with salsa, sour cream, guacamole, or taco sauce for an easy Halloween lunch, dinner, or party snack that both children and adults can enjoy.
Prep Time: 20 minutes
Bake Time: 10–12 minutes
Total Time: Approximately 35 minutes
Servings: 4 large quesadillas
Why You’ll Love This Recipe
- Fun jack-o’-lantern design
- Easy to make with simple ingredients
- Crispy tortillas and melted cheese
- Perfect for Halloween parties
- Family-friendly
- Easy to customize
- Baked instead of fried
- Ready in about 35 minutes
- Delicious with your favorite dips
- Children can help assemble them
Ingredients
Quesadillas
- 8 large flour tortillas
- 3 cups shredded Mexican-style cheese blend
- 2 tablespoons melted butter or olive oil
- ½ teaspoon garlic powder, optional
- ½ teaspoon taco seasoning, optional
For Serving
- Salsa
- Sour cream
- Guacamole
- Taco sauce
- Chopped cilantro
- Sliced green onions
How to Make Jack-o’-Lantern Quesadillas
Step 1: Preheat the Oven
Preheat your oven to 400°F.
Lightly coat a large baking sheet with nonstick cooking spray or line it with parchment paper.
You may need two baking sheets if your tortillas are especially large.
Step 2: Pair the Tortillas
Arrange the eight tortillas into four pairs.
One tortilla from each pair will form the solid bottom, while the second will become the jack-o’-lantern face.
Keep the bottom tortillas whole so the cheese remains contained.
Step 3: Draw the Pumpkin Faces
Place the four top tortillas on a cutting board.
Use a food-safe marker, the tip of a small knife, or a paper template to plan the eyes, nose, and mouth.
Create a different expression on each tortilla if desired.
Simple triangular eyes and noses are easiest to cut and hold their shape during baking.
Step 4: Cut the Jack-o’-Lantern Faces
Using a small, sharp paring knife, carefully cut out the eyes, nose, and mouth from each top tortilla.
Remove the cut pieces and set them aside.
An adult should complete this step because the knife needs to be sharp enough to cut cleanly through the tortilla.
Avoid cutting facial features too close to the tortilla’s edge because the top may tear when moved.
Step 5: Make the Pumpkin Stems
Cut small rectangular or slightly curved stem shapes from an extra tortilla or from some of the removed tortilla pieces.
Position one stem at the top of each bottom tortilla.
Place a small pinch of cheese over the lower part of the stem to hold it in place when the quesadilla melts.
The stems are optional, but they make the finished quesadillas look more like pumpkins.
Step 6: Add the Cheese
Place the four whole tortillas on the prepared baking sheet.
Sprinkle approximately ¾ cup of shredded cheese evenly over each tortilla.
Leave a small border around the edges to reduce the amount of cheese that escapes during baking.
Make sure there is cheese beneath the cutout areas because the orange color creates the glowing jack-o’-lantern appearance.
Step 7: Add Optional Seasoning
Sprinkle the cheese lightly with garlic powder or taco seasoning if desired.
Use only a small amount because packaged cheese and dipping sauces may already contain salt.
You can also add cooked meat, beans, or vegetables at this stage.
Step 8: Add the Pumpkin Faces
Carefully place one cut tortilla over each cheese-covered bottom tortilla.
Align the edges and press gently so the top rests against the cheese.
Make sure the cheese is visible through the eyes, nose, and mouth.
Step 9: Brush the Tortillas
Combine the melted butter with garlic powder if desired.
Brush a thin layer over the top of each quesadilla.
This helps the tortillas become crisp and golden in the oven.
Don’t use too much butter because excessive moisture can make the tortillas greasy.
Step 10: Bake
Place the quesadillas in the preheated oven.
Bake for approximately 8–12 minutes, or until the cheese is completely melted and the tortillas are lightly golden.
For more even browning, rotate the baking sheet halfway through cooking.
Step 11: Broil for Extra Color
For darker, crispier tops, broil the quesadillas for approximately 30–60 seconds.
Watch them constantly because tortillas can burn quickly under the broiler.
Step 12: Rest
Remove the quesadillas from the oven and allow them to rest for approximately 3–5 minutes.
This gives the cheese time to settle and makes the quesadillas easier to transfer.
Step 13: Serve
Carefully transfer the Jack-o’-Lantern Quesadillas to a serving platter.
Serve them warm with bowls of salsa, sour cream, guacamole, or taco sauce.
You can leave them whole for the full pumpkin effect or cut them into wedges immediately before eating.
The Best Tortillas to Use
Large flour tortillas work best because they are flexible and easy to cut.
Burrito-size tortillas create large jack-o’-lanterns that work well as individual meals.
You can also use:
- Soft taco-size flour tortillas
- Whole-wheat tortillas
- Spinach tortillas
- Tomato tortillas
- Low-carb tortillas
- Gluten-free tortillas
Corn tortillas are less flexible and may crack when the faces are cut. If using them, warm them briefly before cutting.
The Best Cheese for Jack-o’-Lantern Quesadillas
A Mexican-style shredded cheese blend produces the orange-and-white color shown through the pumpkin faces.
Other good options include:
- Cheddar
- Colby Jack
- Monterey Jack
- Pepper Jack
- Mozzarella
- Quesadilla cheese
- Taco cheese blend
Cheddar provides the brightest orange color, while Monterey Jack and mozzarella create an especially stretchy center.
Freshly shredded cheese generally melts more smoothly than pre-shredded cheese.
How to Cut Clean Pumpkin Faces
Use a sharp paring knife and work on a sturdy cutting board.
Press gently rather than dragging the tortilla, which can stretch or tear it.
For consistent designs, draw a face on parchment paper and use it as a template.
Choose simple shapes such as:
- Triangle eyes
- Triangle nose
- Zigzag smile
- Round eyes
- Small square teeth
Don’t create extremely thin details because they may become too crisp or break during baking.
How to Keep the Tortillas from Curling
Lightly brushing the tortillas with butter or oil helps them remain flat and brown evenly.
You can also place a second baking sheet gently over the quesadillas during the first five minutes of baking. Remove it afterward so the tops can become golden.
Avoid overbaking because the exposed edges around the face will crisp faster than the rest of the tortilla.
How to Keep the Cheese from Leaking Out
A small amount of melted cheese around the edges is normal and becomes deliciously crispy.
To reduce leaking:
- Leave a border around the tortilla
- Don’t overfill the quesadillas
- Spread the cheese evenly
- Press the top tortilla gently into place
- Use cheese rather than wet fillings near the edges
- Allow the quesadillas to rest before moving them
Line the baking sheet with parchment paper for easy cleanup.
Can I Cook Them in a Skillet?
Yes, but baking is easier because it keeps the detailed pumpkin faces intact.
To use a skillet, heat it over medium-low heat and lightly grease the surface.
Add one assembled quesadilla, cover the pan, and cook until the bottom is golden and the cheese begins to melt.
Avoid flipping it because the cut top tortilla may shift. Instead, finish it briefly under the broiler if necessary.
Can I Make Them in an Air Fryer?
Yes.
Prepare smaller quesadillas that fit comfortably inside the air-fryer basket.
Air-fry at 350°F for approximately 5–7 minutes, or until the cheese melts and the tortillas are crisp.
Place an air-fryer-safe rack over the quesadilla if the top tortilla begins lifting from the circulating air.
Filling Ideas
The quesadillas can be made with cheese only or filled with your favorite cooked ingredients.
Good options include:
- Shredded chicken
- Taco-seasoned ground beef
- Pulled pork
- Black beans
- Refried beans
- Corn
- Sautéed bell peppers
- Cooked mushrooms
- Chopped spinach
- Jalapeños
- Diced green chiles
Keep the filling layer thin so the quesadillas remain flat and the pumpkin faces stay visible.
Chicken Jack-o’-Lantern Quesadillas
Combine two cups of cooked shredded chicken with one teaspoon of taco seasoning.
Spread a thin layer over the bottom tortillas and cover it with shredded cheese.
Add the pumpkin-face tortillas and bake as directed.
Beef Taco Quesadillas
Brown one pound of ground beef and drain away the excess grease.
Season it with taco seasoning and allow it to cool slightly.
Add a thin layer of beef beneath the cheese before assembling the quesadillas.
Bean and Cheese Quesadillas
Spread a thin layer of refried beans over each bottom tortilla.
Add shredded cheddar or Mexican-blend cheese.
Avoid spreading the beans too close to the edges.
Spicy Jack-o’-Lantern Quesadillas
Use Pepper Jack cheese and add sliced jalapeños or diced green chiles.
Serve with spicy salsa, hot sauce, or chipotle sour cream.
Breakfast Jack-o’-Lantern Quesadillas
Fill the tortillas with scrambled eggs, cooked bacon or sausage, and shredded cheddar.
Bake until the cheese melts and serve with salsa.
These are a fun option for a Halloween breakfast or brunch.
What to Serve with Jack-o’-Lantern Quesadillas
Serve these festive quesadillas with:
- Salsa
- Sour cream
- Guacamole
- Taco sauce
- Pico de gallo
- Mexican rice
- Black beans
- Corn salad
- Tortilla chips
- Fresh fruit
- Taco soup
- Halloween vegetable trays
Place salsa and sour cream in small bowls beside the quesadillas so everyone can choose a favorite dip.
Halloween Serving Ideas
Create a complete Halloween meal by serving the quesadillas with:
- Guacamole decorated like a monster
- Salsa labeled as “witch’s brew”
- Black tortilla chips
- Bell peppers carved like miniature pumpkins
- Olive spiders
- Mummy hot dogs
- Halloween fruit cups
Keep the decorations simple so the jack-o’-lantern quesadillas remain the centerpiece.
Can Children Help Make Them?
Yes. Children can sprinkle the cheese, choose the facial designs, position the tortilla faces, and brush the tops with butter.
An adult should handle the sharp knife and cut the facial features.
You can cut the tortillas in advance and let the children assemble their own pumpkin quesadillas.
Can I Prepare Them Ahead?
Yes.
Cut the jack-o’-lantern faces up to one day ahead and store the tortillas in an airtight bag at room temperature.
You can assemble the quesadillas several hours before baking.
Cover them tightly and refrigerate until ready to cook.
Brush the tops with butter immediately before baking for the crispest texture.
Storage
Place cooled leftovers inside an airtight container.
Refrigerate for up to 3 days.
Separate stacked quesadillas with parchment paper so they don’t stick together.
Store salsa, sour cream, and guacamole separately.
How to Reheat Jack-o’-Lantern Quesadillas
Reheat them in a 350°F oven for approximately 6–8 minutes.
An air fryer also works well and helps restore the crisp texture.
Microwaving is convenient, but it makes the tortillas softer.
Watch the cutout edges carefully during reheating because they can brown quickly.
Can You Freeze Them?
Yes, although the cut tortilla details may become slightly more fragile after freezing.
Allow the baked quesadillas to cool completely.
Place parchment paper between them and store them in a freezer-safe container for up to 2 months.
Reheat them from frozen in a 350°F oven until the cheese is hot and melted.
For the best appearance, make and bake the quesadillas fresh.
Frequently Asked Questions
Can I use corn tortillas?
Yes, but warm them first so they don’t crack while being cut.
Can I use only cheddar cheese?
Yes. Cheddar melts well and creates a bright orange color behind the pumpkin face.
Do I need to flip the quesadillas?
No. Baking melts the cheese and crisps both tortillas without flipping.
How do I make the pumpkin stems?
Cut small stem shapes from an extra tortilla and secure them beneath the top tortilla with cheese.
Can I add meat?
Yes. Use cooked chicken, ground beef, pork, bacon, or turkey.
Why did my tortillas burn?
The oven may have been too hot, or the quesadillas were placed too close to the broiler. Begin checking them early.
Why did the top tortilla lift?
The baking sheet may have been exposed to strong circulating air. Press the tortilla gently into the cheese or use an oven-safe rack to hold it down.
Can I use cooking spray instead of butter?
Yes. Lightly spray the tops before baking.
Can I make mini quesadillas?
Yes. Use small taco-size tortillas and shorten the baking time slightly.
What dipping sauce works best?
Salsa and sour cream are classic choices. Guacamole, taco sauce, and queso are also delicious.
Can I prepare them the night before?
The faces can be cut the night before. For the best texture, assemble and bake the quesadillas on the day they’re served.
Are these spicy?
The basic cheese version is mild. Use Pepper Jack, jalapeños, or hot salsa for a spicy variation.
Pro Tips
Use large, soft flour tortillas because they are the easiest to cut and assemble.
Keep the jack-o’-lantern designs simple so the tortillas don’t tear.
Place plenty of orange cheddar beneath the openings to create a bright pumpkin appearance.
Leave a small border around the cheese to reduce leaking.
Bake the quesadillas rather than flipping them in a skillet so the faces stay aligned.
Broil only briefly and watch constantly because the cut edges brown quickly.
Allow the quesadillas to rest for several minutes before serving so the melted cheese doesn’t spill out.
Final Thoughts
These Jack-o’-Lantern Quesadillas are a simple and festive way to turn an everyday meal into a fun Halloween treat. Crispy flour tortillas surround plenty of melted cheese, while the cutout eyes, nose, and smile create a cheerful pumpkin face.
Serve them with salsa, sour cream, guacamole, or taco sauce for a Halloween lunch, party snack, or easy family dinner. Customize them with chicken, beef, beans, vegetables, or Pepper Jack cheese to create a version everyone will enjoy.