Christmas Tree Oreo Strawberries
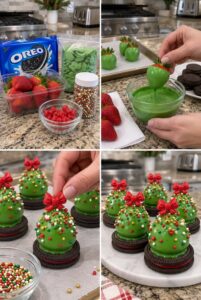
Christmas Tree Oreo Strawberries are a festive no-bake dessert made with fresh strawberries, green candy coating, and Oreo cookies. Each strawberry is dipped until glossy, decorated with colorful sprinkles, and set on a chocolate sandwich cookie to create a little edible Christmas tree. A red candy bow on top completes the holiday look.
They’re a fun alternative to traditional Christmas cookies and make a bright addition to a dessert platter. The strawberries bring a fresh, juicy bite, while the Oreo base adds crunch and chocolate flavor. Because the recipe does not require baking, it’s also a cheerful kitchen project to make with family or friends.
For the neatest results, dry the strawberries thoroughly before dipping and allow the green coating to set before adding the finishing bow. You can prepare the trees a few hours ahead, then arrange them on a platter shortly before serving.
Prep Time: 30 minutes
Setting Time: 20–30 minutes
Total Time: About 1 hour
Servings: 12–16, depending on the size of the strawberries
Why You’ll Love This Recipe
- No baking is required.
- The strawberry “trees” look festive and colorful.
- Oreo cookies make sturdy, easy-to-serve bases.
- Green candy coating sets quickly and gives a smooth finish.
- Sprinkles make decorating simple and customizable.
- The recipe is fun for holiday parties, family activities, and dessert trays.
Ingredients
Strawberry Trees
- 12–16 fresh strawberries, similar in size
- 12–16 Oreo cookies
- 12 ounces green candy melts or green melting wafers
- 1–2 teaspoons coconut oil or shortening, optional, to thin the coating
- ¼ cup red, green, white, and gold holiday sprinkles
- 12–16 small red candy bows or red bow-shaped candies
Optional Decorations
- White or gold nonpareils
- Mini star sprinkles
- Extra green candy melts for securing decorations
- Melted white chocolate for a light drizzle
Equipment
- Baking sheet or flat tray
- Parchment or wax paper
- Microwave-safe bowl
- Fork, dipping tool, or skewer
- Paper towels
- Small spoon or piping bag, optional
How to Make Christmas Tree Oreo Strawberries
Step 1: Prepare the Tray
Line a baking sheet or flat tray with parchment paper. This gives the dipped strawberries a nonstick place to set. Set the Oreo cookies nearby so they are ready when the strawberries are coated.
Step 2: Wash and Dry the Strawberries
Rinse the strawberries gently under cool water. Pat them dry with paper towels, including around the leafy tops. Let them air-dry until there is no moisture on the surface.
Dry strawberries are essential for a smooth coating. Water can make melted candy coating seize, and moisture on the berries can keep the coating from sticking properly.
Step 3: Melt the Green Candy Coating
Place the green candy melts in a microwave-safe bowl. Heat for 20–30 seconds at a time, stirring after each interval. Continue until the coating is mostly melted, then stir until completely smooth.
If it feels too thick for dipping, mix in a small amount of coconut oil or shortening. Add it gradually; the coating should flow easily but still cling to the strawberries.
Step 4: Dip the Strawberries
Hold a strawberry by its leafy top and dip it into the green coating. Turn it gently to cover the berry, leaving the leaves uncovered. Lift it out and let the extra coating drip back into the bowl.
If the leafy tops are small or difficult to hold, insert a skewer into the top of the strawberry and use it as a handle. Remove the skewer carefully after dipping, if you prefer the finished tree to sit upright on its Oreo.
Step 5: Add the Sprinkles
While the coating is still wet, scatter holiday sprinkles over the strawberry. Turn the berry as needed so the decorations are distributed around the sides. Work over a bowl or tray to catch extra sprinkles.
For a more tree-like appearance, concentrate some of the sprinkles toward the front and sides. You can use small white, red, green, and gold sprinkles to suggest ornaments and lights.
Step 6: Set the Strawberries on the Oreos
Place each dipped strawberry upright in the center of an Oreo cookie. Press very gently so the berry rests securely on the cookie without squeezing out too much filling.
If the strawberry does not stay upright, add a small dot of melted green candy coating to the center of the Oreo first. Set the berry on top and hold it in place for a few seconds until the coating begins to firm.
Step 7: Add the Red Bows
When the green coating has started to set but is still slightly tacky, press a red candy bow onto the top of each strawberry. If the coating has already hardened, attach the bow with a tiny dot of melted green candy coating.
Step 8: Let the Trees Set
Allow the finished strawberries to rest on the lined tray until the coating is firm. This usually takes about 20–30 minutes at a cool room temperature. If your kitchen is warm, place the tray in the refrigerator for a short time.
Step 9: Arrange and Serve
Transfer the Christmas Tree Oreo Strawberries to a serving platter. Arrange them upright and add a few extra holiday sprinkles around the plate for a festive finish.
Tips for the Best Results
Dry the Berries Thoroughly
The strawberries should be completely dry before dipping. Even a little water can cause the coating to become lumpy or slide off. After washing, pat them dry and allow time for any moisture around the leaves to evaporate.
Choose Firm, Similar-Sized Strawberries
Firm berries are easier to dip and stand more securely on the Oreo bases. Similar-sized strawberries also help the finished platter look consistent.
Keep the Leaves Above the Coating
The leafy tops give you a convenient handle and add a natural green detail. Hold each berry by the leaves and dip only the fruit.
Work in Small Batches
Candy coating can begin to thicken as it cools. Dip a few strawberries at a time and add decorations immediately. If the coating becomes too thick, warm it briefly and stir until smooth.
Secure the Berry to the Oreo
A small dot of melted coating between the strawberry and cookie helps hold the tree in place. This is especially helpful for larger berries or when preparing the treats for a party platter.
Decoration Ideas
- Classic ornaments: Use red, white, and gold round sprinkles.
- Snowy trees: Add white nonpareils or a light dusting of edible white shimmer.
- Star toppers: Use small yellow or gold star sprinkles instead of bows.
- Candy-cane look: Add a few crushed peppermint pieces to the green coating while it is wet.
- White chocolate garland: Drizzle a little melted white chocolate in thin lines around each tree.
- Edible glitter: Add a small amount of food-safe edible glitter for extra sparkle.
- Different cookie base: Use chocolate wafer cookies or another round cookie if you do not have Oreos.
Make-Ahead Instructions
For the freshest flavor, make these treats on the day you plan to serve them. You can wash and dry the strawberries several hours ahead, then keep them refrigerated and uncovered until ready to dip.
The candy decorations can be set out in advance, and the Oreo cookies can be arranged on the lined tray. Dip and assemble the strawberries as close to serving time as your schedule allows. Once assembled, keep the tray refrigerated until serving.
Storage
Because the recipe uses fresh strawberries, these treats are best enjoyed the same day. Store leftovers in a single layer in a covered container in the refrigerator and eat them within about 24 hours.
The strawberries may release moisture as they sit, which can soften the Oreo bases and affect the candy coating. For the best texture, avoid stacking the finished trees and do not leave them at room temperature for an extended period.
Frequently Asked Questions
Can I use chocolate chips instead of candy melts?
You can, but chocolate chips may need a little coconut oil or shortening to become fluid enough for dipping. Green candy melts or melting wafers are usually easier to work with and set more firmly.
Why is the candy coating sliding off the strawberries?
The berries may be wet, or the coating may be too warm or thin. Dry the strawberries completely and let the coating cool slightly if it seems very runny.
How do I keep the strawberries standing upright?
Use firm berries with flat bottoms when possible. Add a small dot of melted candy coating to the center of each Oreo, then press the strawberry gently into place while the coating is still soft.
Can I prepare these a day ahead?
They can be made ahead, but the strawberries may release moisture and soften the cookies. For the best appearance and texture, assemble them the same day you plan to serve them.
Can I use frozen strawberries?
Fresh strawberries are recommended. Frozen berries thaw with extra moisture and become too soft to dip neatly.
What can I use instead of candy bows?
Small star candies, star sprinkles, or a tiny star made from yellow candy melts work well as tree toppers. Add them with a small dot of melted coating if the green shell has already set.
Can kids help make these?
Yes. An adult can melt the candy coating and handle the warm bowl. Kids can add sprinkles and help place the cooled trees on a platter.
How do I thin candy melts?
Stir in coconut oil or shortening a little at a time until the coating becomes smooth and easy to dip. Do not add water, which can cause the coating to seize.
Serving Suggestions
Arrange the trees on a white platter so the green coating and colorful sprinkles stand out. They pair well with Christmas cookies, brownies, peppermint bark, and other small desserts. For a party, place them in cupcake liners to make them easier to pick up and serve.
These strawberry trees also make a fun centerpiece for a holiday dessert table. Add a few extra Oreo cookies and sprinkles around the platter, then serve them chilled for a refreshing bite after a rich meal.
Recipe Summary
Wash and thoroughly dry fresh strawberries. Melt green candy coating until smooth, then dip each berry and add holiday sprinkles while the coating is wet. Set each strawberry upright on an Oreo cookie, secure it with a small amount of coating if needed, and add a red candy bow or star topper. Let the coating set, refrigerate until serving, and enjoy the same day for the best texture.