Peppermint Hot Chocolate Bombs
Peppermint Hot Chocolate Bombs are chocolate spheres filled with cocoa mix and mini marshmallows. Drop one into a mug, pour hot milk over it, and watch the shell melt to reveal the filling. Stir until smooth for a cozy cup of hot chocolate with a festive peppermint finish.
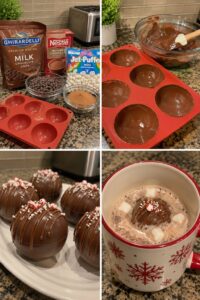
These homemade cocoa bombs make a fun winter treat, a charming addition to a holiday dessert table, or a thoughtful edible gift. The shells are made in a silicone half-sphere mold, filled, and sealed together. A drizzle of chocolate, crushed peppermint, and holiday sprinkles give them the decorated look shown in the photos.
The process takes a little patience, especially while the chocolate shells chill, but the steps are simple. For the cleanest results, make the shells thick enough to handle, let them set fully, and work with one half at a time when assembling. Once you’ve made a batch, you can keep a few for your own mugs and wrap the rest for friends and family.
What Are Hot Chocolate Bombs?
Hot chocolate bombs are hollow chocolate shells filled with hot cocoa mix and small treats, usually mini marshmallows. When a bomb is placed in a mug and covered with hot milk, the chocolate begins to melt and the filling spills out. Stirring combines everything into a rich, creamy drink.
The chocolate shell adds extra flavor and sweetness, so the cocoa inside can be a standard packet or your favorite homemade cocoa blend. Peppermint candies add a cool, minty crunch that works particularly well with milk chocolate. If you prefer a gentler mint flavor, use just a small amount of crushed candy cane on top.
Why You’ll Love This Recipe
- A festive drink and dessert in one: Each bomb becomes a mug of hot chocolate and makes a fun reveal.
- Easy to personalize: Change the chocolate, cocoa mix, and toppings to create different flavors.
- Great for gifting: Wrap each set chocolate bomb individually and add a note with simple instructions.
- Fun to make together: Decorating the finished spheres is an easy activity for family or friends.
- Useful for winter gatherings: Serve them as a special after-dinner drink or set up a cocoa bomb station.
Ingredients
For 6 hot chocolate bombs:
- 12 ounces milk chocolate melting wafers or chocolate chips
- 6 tablespoons hot cocoa mix, about 1 tablespoon per bomb
- ¾ cup mini marshmallows
- 2 tablespoons crushed peppermint candies or candy canes
- 2 tablespoons white or milk chocolate, for drizzling
- 1–2 tablespoons holiday sprinkles
- Optional: ¼ teaspoon peppermint extract
Use mini marshmallows so the filling fits inside the shells without making them difficult to seal. If your cocoa mix is already mint flavored, skip the peppermint extract. A small amount goes a long way, and too much can overpower the chocolate.
Melting wafers are convenient because they are made to melt and set smoothly. Chocolate chips can also work, but they may be thicker and can be more delicate to handle unless melted gently. If you plan to give the bombs as gifts or want a firmer, glossier shell, use chocolate intended for candy making or properly temper the chocolate.
Equipment You’ll Need
- Silicone half-sphere mold, with cavities about 2–2½ inches wide
- Microwave-safe bowl or double boiler
- Small spoon or pastry brush
- Baking sheet or flat tray
- Piping bag or small zip-top bag for the drizzle
- Clean, dry gloves, optional, for handling the shells
A silicone mold releases the shells easily once the chocolate has set. Place the mold on a flat baking sheet before filling it, since moving a flexible mold while it contains melted chocolate can cause spills.
How to Make Peppermint Hot Chocolate Bombs
- Prepare the mold. Wash and dry the silicone mold thoroughly. Any water left in the cavities can affect the chocolate. Place the mold on a flat baking sheet so it stays level while you work.
- Melt the chocolate gently. Put the chocolate in a dry microwave-safe bowl. Heat in 20–30-second intervals, stirring well after each interval, until mostly melted. Continue stirring until the remaining pieces melt and the chocolate is smooth. Alternatively, melt it in a heatproof bowl over gently simmering water, making sure the bowl does not touch the water.
- Coat the mold cavities. Spoon melted chocolate into each half-sphere cavity. Use the back of a spoon or a pastry brush to spread it into an even layer, taking the chocolate all the way to the rim. Aim for a layer thick enough to handle without cracking.
- Chill the first layer. Place the mold on its tray in the refrigerator for about 10–15 minutes, until the chocolate is firm. If the shells look thin or you can see gaps, add another layer of chocolate and chill again.
- Release the shells. Carefully peel the silicone away from the chocolate rather than pushing hard on the shells. Set the half-spheres on a clean, chilled tray or piece of parchment.
- Fill half of the shells. Add about 1 tablespoon of hot cocoa mix to each of six half-spheres. Add a small handful of mini marshmallows and a pinch of crushed peppermint. Keep the filling below the rim so the two halves can join.
- Warm the edges. Heat a small plate for a few seconds in the microwave, then turn it upside down. Working with one empty half at a time, lightly touch its open edge to the warm plate for just a moment so the rim softens.
- Seal the bombs. Place the warmed half over a filled half and press gently around the seam. Hold briefly until the chocolate sets. If the seam has gaps, smooth a little melted chocolate around it with a small spoon or clean finger.
- Decorate. Drizzle melted chocolate over the set spheres. While the drizzle is still wet, add crushed peppermint and holiday sprinkles. Let the decorations harden before moving or wrapping the bombs.
- Make a mug of cocoa. Place one hot chocolate bomb in a large mug. Pour about 1 cup of hot milk over it, wait for the shell to melt and open, then stir until the cocoa mix and chocolate are fully dissolved.
Tips for Smooth, Sturdy Chocolate Shells
Keep everything dry. Chocolate can seize if it comes into contact with water. Make sure the bowl, spoon, mold, and hands are dry before you start.
Use short heating intervals. Chocolate continues to melt as you stir it, so stop heating when a few small pieces remain and stir until smooth. Overheating can make it thick, grainy, or difficult to spread.
Make the shells slightly thicker at the rim. The edges are the most fragile part. Spreading a little extra chocolate around the rim helps the halves seal and makes the bombs easier to handle.
Apply a second coating if needed. If light shows through the shell or the first layer feels very thin, add a second coat after the first has set. A sturdy shell is more forgiving during assembly.
Don’t overfill. Too much cocoa mix or too many marshmallows can prevent the halves from closing. Keep the filling below the rim and leave a clear edge for sealing.
Work one at a time when sealing. Warm just one shell edge, join it to a filled half, and then move to the next bomb. The edge can harden again if you warm several halves before assembling them.
Handle the spheres gently. The warmth from your hands can leave fingerprints or soften the chocolate. If you have clean food-safe gloves, use them, or handle the bombs briefly by their sides.
How to Serve Them
Place one chocolate bomb in a heat-safe mug and pour hot milk over it. The milk should be hot enough to melt the shell but not boiling. Give it a few seconds to open, then stir from the bottom of the mug until the cocoa mix and chocolate are dissolved.
Whole milk makes a creamy drink, while reduced-fat milk creates a lighter cup. You can also use oat, soy, or another milk alternative, choosing one that you enjoy heated. The final drink may taste sweeter than ordinary cocoa because the chocolate shell melts into the milk too.
For an extra-special serving, top the finished cocoa with whipped cream, a few mini marshmallows, or a pinch of crushed peppermint. Since the bomb already contains chocolate and cocoa mix, taste it before adding any extra sweetener.
Flavor Variations
- Dark chocolate peppermint: Use dark chocolate for the shell and peppermint pieces for a stronger, less-sweet flavor.
- White chocolate cocoa bombs: Use white melting wafers and a lighter cocoa mix. Decorate with crushed candy cane for color.
- Mocha bombs: Add ½ teaspoon instant espresso powder to each filling portion.
- Salted caramel: Add a small caramel candy or caramel bits with the cocoa mix and use a light chocolate drizzle.
- Cookies and cream: Add a teaspoon of finely crushed chocolate sandwich cookie pieces to the filling.
- Classic chocolate: Skip the peppermint and sprinkles, and fill the shells with cocoa mix and marshmallows only.
- Cinnamon cocoa: Add a small pinch of cinnamon to each filling portion for a warm flavor.
- Extra-minty: Add a tiny drop of peppermint extract to the cocoa mix. Avoid adding liquid extract directly to melted chocolate, as liquid can make chocolate seize.
Packaging and Gifting
Once completely set, place each bomb in a paper cupcake liner or a small treat bag. Tie the bag closed with ribbon and include a note such as: “Place in a mug and pour 1 cup of hot milk over the top. Stir and enjoy.”
Keep the bombs away from heat and moisture, and package them only after the chocolate decoration has hardened. If giving them to someone with dietary restrictions, label the ingredients and check the package information for the chocolate, cocoa mix, and peppermint candies.
Make-Ahead and Storage
Hot chocolate bombs can be made several days ahead. Store them in an airtight container in a cool, dry place for up to 2 weeks. Keep them away from direct sunlight, a warm kitchen, and strong odors, which chocolate can absorb.
Refrigeration is usually unnecessary if the room is cool. In a warm home, you can refrigerate the bombs in an airtight container, but allow them to come to room temperature while still inside the container before opening it. This helps reduce condensation on the chocolate.
Do not add the bombs to hot milk until just before serving. Once assembled as a drink, the cocoa is best enjoyed immediately.
Frequently Asked Questions
Can I use chocolate chips for the shells?
Yes. Melt them slowly and stir often. Chocolate chips may be thicker or softer after setting than melting wafers, so a second coating can help make the shells sturdier.
Why did my chocolate turn thick or grainy?
It may have overheated or come into contact with water. Use a completely dry bowl and utensils, and heat in short intervals while stirring.
Why are my shells cracking?
They may be too thin, too cold and brittle, or handled too firmly. Add a second chocolate layer, let the shells release fully from the mold, and press gently when sealing.
How much milk should I pour over a bomb?
About 1 cup of hot milk works well for a standard 2–2½-inch bomb. Use a larger mug and add more milk if you prefer a milder drink.
Can I use regular marshmallows?
Mini marshmallows fit best. If using larger marshmallows, cut them into smaller pieces so they don’t interfere with sealing.
Can I make these without peppermint?
Yes. Omit the crushed peppermint and use plain cocoa mix and mini marshmallows. Decorate with sprinkles or a contrasting chocolate drizzle instead.
Peppermint Hot Chocolate Bombs Recipe
Makes: 6 hot chocolate bombs
Prep time: 35 minutes
Chilling time: 20–30 minutes
Ingredients
- 12 ounces milk chocolate melting wafers or chocolate chips
- 6 tablespoons hot cocoa mix
- ¾ cup mini marshmallows
- 2 tablespoons crushed peppermint candy
- 2 tablespoons melted chocolate, for drizzling
- Holiday sprinkles, for decorating
Instructions
- Set a clean, dry silicone half-sphere mold on a flat baking sheet.
- Melt the chocolate in short microwave intervals, stirring until smooth.
- Spread chocolate inside the mold cavities, coating the sides and rims evenly.
- Refrigerate for 10–15 minutes until firm. Add a second layer if the shells look thin, then chill again.
- Carefully peel the mold away from the set chocolate shells.
- Fill half of the shells with cocoa mix, mini marshmallows, and crushed peppermint.
- Warm the rim of one empty shell briefly on a warm plate. Place it over a filled shell and press gently to seal.
- Repeat with the remaining shells, then patch any gaps with melted chocolate.
- Drizzle chocolate over the finished spheres and add sprinkles and peppermint while the drizzle is wet.
- Let the decorations set completely. To serve, place one bomb in a mug, pour about 1 cup of hot milk over it, and stir once the shell opens.