
Christmas Tree Sugar Cookie Stacks
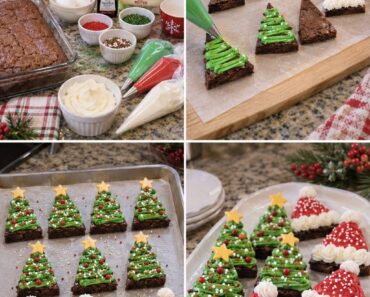
These Christmas Tree Sugar Cookie Stacks turn simple sugar cookies into festive little trees with layers of green frosting and colorful decorations. The cookies are baked in three sizes, stacked from largest to smallest, then piped with green buttercream and finished with red candy “ornaments” and a yellow star.
They’re a cheerful addition to a holiday dessert table and a fun project to make with kids. Using refrigerated sugar cookie dough keeps the preparation simple, while homemade frosting makes it easy to control the color and consistency. The finished cookies look impressive, but you don’t need special decorating skills to assemble them.
Why You’ll Love These Christmas Cookies
- Easy shortcut: Refrigerated sugar cookie dough saves time and still gives you a soft, buttery cookie base.
- Festive presentation: Each stack resembles a miniature decorated Christmas tree.
- Fun to decorate: Set out the frosting and candies and let everyone make their own cookie trees.
- Make-ahead friendly: Bake the cookies in advance, then frost and assemble them closer to serving.
- Easy to customize: Change the frosting color, use different sprinkles, or add your favorite small candies.
Ingredients
For the cookies
- 1 package refrigerated sugar cookie dough, about 16 ounces
- All-purpose flour, a little for shaping if needed
For the green buttercream
- ½ cup unsalted butter, softened
- 2 cups powdered sugar
- 1 teaspoon vanilla extract
- 1–2 tablespoons milk or heavy cream
- Green gel food coloring, as needed
For decorating
- Red round candies or mini candy-coated chocolates
- Yellow star-shaped candies or fondant stars
- Christmas sprinkles, optional
Ingredient Notes
Refrigerated sugar cookie dough: Store-bought dough makes this recipe approachable and quick. Follow the package directions for baking and adjust the baking time slightly if you make cookies in different sizes.
Butter: Let the butter soften at room temperature before making the frosting. Soft butter blends smoothly with powdered sugar and helps create a pipeable texture.
Powdered sugar: Sift it if it has lumps. This helps the frosting turn out smooth and makes piping easier.
Gel food coloring: Gel coloring gives the frosting a vivid green shade without thinning it. Add it a little at a time until you reach the color you like.
Decorations: Use small candies that will stay in place on the frosting. If you can’t find star candies, cut small stars from yellow fondant or use a star-shaped sprinkle.
How to Make Christmas Tree Sugar Cookie Stacks
1. Heat the oven and prepare the pans
Heat the oven to the temperature listed on the sugar cookie dough package, usually around 350°F (175°C). Line two baking sheets with parchment paper.
2. Shape the cookies in different sizes
Divide the dough into balls for small, medium, and large cookies. You’ll need three cookies of different sizes for each tree. For a batch of about eight trees, prepare eight large cookies, eight medium cookies, and eight small cookies.
Flatten each dough ball slightly. Keep the cookies evenly thick so they bake at a similar rate, even though their diameters are different. Leave space between them on the baking sheets because the dough will spread as it bakes.
3. Bake the cookies
Bake the smaller cookies first and check them early, since they may finish sooner than the larger ones. Bake until the edges are lightly golden and the centers look set. Let the cookies rest on the baking sheet for several minutes before transferring them to a wire rack.
Cool the cookies completely before frosting. Warm cookies can melt the buttercream and make the stacks slide.
4. Make the green buttercream
Beat the softened butter in a mixing bowl until smooth and creamy. Add the powdered sugar gradually, mixing on low speed at first to prevent it from puffing out of the bowl.
Add the vanilla and 1 tablespoon of milk or cream. Beat until fluffy. If the frosting is too thick to pipe, add more milk a teaspoon at a time. If it seems too soft, mix in a little more powdered sugar.
Add green gel food coloring a few drops at a time, mixing after each addition until the frosting reaches your preferred shade.
5. Fill a piping bag
Spoon the frosting into a piping bag fitted with a star tip. If you don’t have a piping bag, place the frosting in a zip-top bag and snip off one corner. A star tip creates ridged edges that make the cookie stacks look like layered tree branches.
6. Stack the cookies
Place one large cookie on a serving tray. Pipe a layer of frosting on top, then gently set a medium cookie over it. Add another layer of frosting and place the smallest cookie on top.
Press lightly so the layers hold together without squeezing out too much frosting.
7. Decorate the trees
Pipe frosting in a swirl on the top cookie and add a small amount to the edges of the lower layers, if desired. Decorate with red candies and Christmas sprinkles. Finish each tree with a yellow star on top.
Let the frosting set for about 20–30 minutes before moving the cookies or arranging them on a serving platter.
Tips for Neat, Stable Cookie Trees
- Bake the sizes separately: Small cookies bake faster than large ones. Keep an eye on each pan and remove cookies as soon as they’re set.
- Let the cookies cool fully: This is the most important step for preventing melted frosting and leaning stacks.
- Use firm frosting: Buttercream that is too soft may make the cookies slide. Add powdered sugar a little at a time until the frosting holds its shape.
- Pipe a level base: A small, even frosting layer helps each cookie sit securely on the one below it.
- Keep the sizes distinct: The large, medium, and small cookies should have clearly different diameters to create a tree shape.
- Use a light hand when stacking: Too much pressure can crack the cookies or push the frosting out between layers.
Decorating Ideas
Add edible glitter: A light dusting of edible shimmer gives the trees a snowy, sparkling look.
Try different ornament colors: Use a mix of red, white, and gold candies for a classic holiday palette.
Make snowy trees: Use white frosting and sprinkle the finished stacks with powdered sugar or white sanding sugar.
Add a cookie trunk: Break a pretzel stick into short pieces and tuck one beneath the bottom cookie to create a simple trunk.
Use different star toppers: Yellow fondant, a small star cookie, or a candy star can all work as the tree topper.
Make-Ahead Instructions
Bake the cookies up to 2 days before assembling them. Once completely cool, store them in an airtight container at room temperature, separating layers with parchment paper.
The buttercream can also be made up to 3 days ahead. Store it in a covered container in the refrigerator. Before piping, let it sit at room temperature until softened, then beat it briefly to restore its fluffy texture.
For the easiest assembly, decorate the trees the day you plan to serve them. This keeps the colors bright and the cookie layers crisp.
Storage
Store assembled cookie stacks in a single layer in an airtight container. Keep them in a cool place for up to 2 days. If your kitchen is warm, refrigerate them so the buttercream stays firm, then let them stand at room temperature for about 15–20 minutes before serving.
To freeze the cookies, freeze the baked, undecorated cookies in a sealed container with parchment between the layers for up to 2 months. Thaw them completely before frosting and decorating.
Frequently Asked Questions
Can I use homemade sugar cookie dough?
Yes. Choose a dough that holds its shape when baked. If it spreads too much, chill the shaped dough for 20–30 minutes before baking.
How many cookies do I need for each tree?
Each tree uses three cookies: one large, one medium, and one small. For eight trees, bake 24 cookies total.
Can I use canned frosting?
Yes. Canned frosting works in a pinch, but it may be softer than homemade buttercream. Chill it briefly if it doesn’t hold its shape when piped.
What can I use instead of a piping bag?
A zip-top bag works well. Fill it with frosting and snip a small corner. You can also spread the frosting with a butter knife, though the tree details will look less defined.
How do I keep the stacks from tipping over?
Use cooled cookies, pipe a stable layer of frosting between each cookie, and make sure each cookie is centered. A slightly firmer buttercream helps hold the stack together.
Recipe Card
Christmas Tree Sugar Cookie Stacks
Prep time: 30 minutes
Bake time: 10–12 minutes per batch, depending on cookie size
Cooling and decorating time: About 45 minutes
Yield: About 8 cookie trees
Ingredients
- 1 package refrigerated sugar cookie dough, about 16 ounces
- ½ cup unsalted butter, softened
- 2 cups powdered sugar
- 1 teaspoon vanilla extract
- 1–2 tablespoons milk or cream
- Green gel food coloring
- Red candies, yellow star candies, and Christmas sprinkles
Instructions
- Heat the oven according to the cookie dough package directions and line baking sheets with parchment.
- Shape the dough into large, medium, and small cookies. Make three cookies of different sizes for each tree.
- Bake the smaller cookies for less time than the larger ones, removing each batch when the edges are lightly golden and centers are set.
- Cool the cookies completely.
- Beat the butter until creamy. Gradually mix in powdered sugar, vanilla, and enough milk to make pipeable frosting.
- Tint the frosting green and transfer it to a piping bag.
- Stack one large cookie, one medium cookie, and one small cookie with frosting between the layers.
- Pipe frosting on top, decorate with candies and sprinkles, and add a yellow star.
- Let the frosting set before serving.
These Christmas Tree Sugar Cookie Stacks bring a playful, homemade touch to holiday celebrations. With soft sugar cookies, creamy green frosting, and colorful candy decorations, they make a festive centerpiece for a cookie tray and a fun baking project to share.