Biscoff Cheesecake Cookie Cups
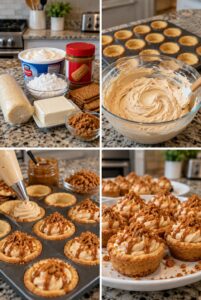
These Biscoff Cheesecake Cookie Cups feature soft cookie shells filled with smooth cookie-butter cheesecake and topped with melted Biscoff spread and crunchy cookie crumbs. Every bite combines warm caramelized spice, creamy cheesecake, and a buttery cookie base.
They’re perfect for parties, holidays, dessert tables, potlucks, birthdays, or whenever you need an easy individual dessert that looks impressive.
Prep Time: 25 minutes
Bake Time: 12–15 minutes
Chill Time: 1 hour
Total Time: Approximately 2 hours
Servings: 24 mini cookie cups
Why You’ll Love This Recipe
- Rich Biscoff cookie-butter flavor
- Soft cookie cups with creamy centers
- Easy to prepare with refrigerated dough
- Convenient individual portions
- Beautiful on a dessert tray
- No slicing required
- Perfect for making ahead
- Easy to decorate
- Delicious for holidays and parties
- A wonderful dessert for cookie-butter fans
Ingredients
Cookie Cups
- 1 package (16.5 ounces) refrigerated sugar cookie dough
- ½ teaspoon ground cinnamon
- Nonstick cooking spray
Biscoff Cheesecake Filling
- 8 ounces cream cheese, softened
- ½ cup Biscoff cookie butter
- ½ cup powdered sugar
- 1 teaspoon vanilla extract
- 1 cup whipped topping, thawed
Topping
- ⅓ cup Biscoff cookie butter
- 6 Biscoff cookies, crushed
- 12 Biscoff cookies, halved
- Whipped cream, optional
How to Make Biscoff Cheesecake Cookie Cups
Step 1: Preheat the Oven
Preheat your oven to 350°F.
Lightly coat a 24-cup mini muffin pan with nonstick cooking spray.
Step 2: Prepare the Cookie Dough
Place the refrigerated sugar cookie dough in a bowl.
Sprinkle the cinnamon over the dough and mix gently until evenly incorporated.
The cinnamon complements the warm caramelized spices in the Biscoff spread and cookies.
Step 3: Portion the Dough
Divide the cookie dough into 24 equal portions.
Roll each portion into a ball and place one ball in each prepared mini muffin cup.
Step 4: Shape the Cups
Press each ball gently into the bottom and slightly up the sides of its muffin cup.
Do not make the bottom too thin because it needs to support the cheesecake filling.
Step 5: Bake
Bake for approximately 12–15 minutes, or until the cookie edges are lightly golden.
The centers will puff while baking, which is normal.
Step 6: Create the Wells
Remove the muffin pan from the oven.
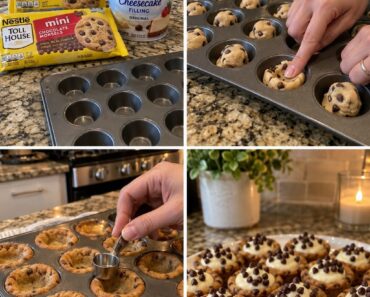
While the cookies are still warm, press the rounded back of a teaspoon or small measuring spoon into the center of each cookie.
Create a deep well without pressing completely through the bottom.
Step 7: Cool the Cookie Cups
Allow the cookie cups to cool inside the pan for approximately 10 minutes.
Carefully loosen the edges with a thin butter knife, then transfer the cups to a wire rack.
Let them cool completely before adding the filling.
Prepare the Biscoff Cheesecake Filling
Step 8: Beat the Cream Cheese
Place the softened cream cheese in a medium mixing bowl.
Beat with an electric mixer until completely smooth and creamy.
Step 9: Add the Cookie Butter
Add ½ cup of Biscoff cookie butter.
Beat until the cream cheese and cookie butter are evenly blended.
Step 10: Add the Sugar and Vanilla
Add the powdered sugar and vanilla extract.
Continue beating until the mixture is smooth and no lumps remain.
Step 11: Fold in the Whipped Topping
Gently fold the whipped topping into the cream cheese mixture.
Do not overmix. The finished cheesecake filling should be light, fluffy, and thick enough to hold its shape.
Step 12: Chill the Filling
Refrigerate the filling for approximately 20–30 minutes.
Chilling makes it easier to pipe neatly into the cookie cups.
Assemble the Cookie Cups
Step 13: Fill the Cups
Transfer the cheesecake mixture to a piping bag fitted with a large tip.
Pipe the filling generously into each cooled cookie cup. You can also use a small spoon if you do not have a piping bag.
Step 14: Melt the Cookie Butter
Place the remaining ⅓ cup of Biscoff cookie butter in a microwave-safe bowl.
Microwave for approximately 10–15 seconds, just until it becomes easy to drizzle.
Do not overheat it.
Step 15: Decorate
Drizzle the melted cookie butter over each cheesecake cup.
Sprinkle crushed Biscoff cookies over the top and insert half a cookie into the filling.
Add a small swirl of whipped cream if desired.
Step 16: Chill
Refrigerate the assembled cookie cups for at least one hour before serving.
Chilling firms the cheesecake filling and allows the flavors to blend.
What Is Biscoff Cookie Butter?
Biscoff cookie butter is a smooth spread made from crushed caramelized spiced cookies. Its texture is similar to peanut butter, but its flavor includes warm notes of cinnamon, caramel, and brown sugar.
Both smooth and crunchy cookie butter work in this recipe. Smooth spread creates the creamiest cheesecake filling, while crunchy spread adds small cookie pieces.
How to Keep Cookie Cups from Sticking
Grease every cavity of the mini muffin pan, including the bottom and sides.
Allow the baked cups to cool for approximately 10 minutes before removing them. Removing them immediately may cause them to break, while leaving them in the pan until completely cold can make them difficult to release.
Run a thin knife gently around the edges before lifting them out.
Can I Use Homemade Cookie Dough?
Yes. Homemade sugar cookie dough works beautifully.
You can also use:
- Snickerdoodle cookie dough
- Chocolate chip cookie dough
- Chocolate cookie dough
- Gingerbread cookie dough
- Biscoff cookie dough
Snickerdoodle dough provides an especially delicious cinnamon flavor.
Can I Use Biscoff Cookies for the Crust?
Yes. For a stronger cookie-butter flavor, prepare a crumb crust instead of using sugar cookie dough.
Combine:
- 2 cups finely crushed Biscoff cookies
- 6 tablespoons melted butter
Press approximately one tablespoon of the mixture into each lined mini muffin cup.
Bake at 350°F for 5–7 minutes, cool completely, and add the cheesecake filling.
These cups will be more delicate, so paper liners are recommended.
Delicious Variations
Chocolate Biscoff Cookie Cups
Use chocolate cookie dough and drizzle the finished cups with melted chocolate.
Salted Caramel Biscoff Cups
Add caramel sauce and a tiny pinch of flaky sea salt to each cup.
Banana Biscoff Cheesecake Cups
Place a fresh banana slice inside each cookie cup before adding the cheesecake filling.
Pumpkin Biscoff Cups
Add ⅓ cup pumpkin puree and ½ teaspoon pumpkin pie spice to the filling.
Biscoff Oreo Cheesecake Cups
Use chocolate cookie dough and decorate the cups with crushed Oreos and Biscoff cookies.
No-Bake Biscoff Cheesecake Cups
Layer crushed Biscoff cookies, cheesecake filling, and melted cookie butter inside small dessert glasses instead of baking cookie shells.
Can I Make Them Ahead?
Yes. Prepare the cookie cups up to two days in advance and store them in an airtight container at room temperature.
The cheesecake filling can be prepared one day ahead and refrigerated separately.
For the best texture, assemble the cups up to 24 hours before serving. Add the cookie halves shortly before serving so they stay crisp.
Storage
Place the assembled cookie cups in a single layer inside an airtight container.
Refrigerate for up to 4 days.
Because the filling contains cream cheese, do not leave the cookie cups at room temperature for more than two hours.
Can You Freeze Biscoff Cheesecake Cookie Cups?
Yes. Arrange the finished cups in a freezer-safe container.
Freeze for up to one month. For the best appearance, freeze them without the cookie garnish.
Thaw overnight in the refrigerator, then decorate with fresh Biscoff cookie halves before serving.
Frequently Asked Questions
Do I need to use muffin liners?
No. A well-greased nonstick mini muffin pan works well. Liners can be used if you prefer easier removal.
Why did my cookie cups puff up?
Cookie dough naturally rises during baking. Press the centers down while the cookies are still warm.
Can I use regular muffin pans?
Yes, but the cups will be larger and require additional dough, filling, and baking time.
Why is my cheesecake filling runny?
The cream cheese may have been too warm, or the whipped topping may have been overmixed. Refrigerate the filling until firm enough to pipe.
Can I use whipped cream instead of whipped topping?
Yes. Use one cup of stabilized whipped cream so the filling maintains its shape.
Can I use crunchy cookie butter?
Absolutely. It will add small crunchy cookie pieces to the cheesecake filling.
Should these cookie cups be served cold?
Yes. They are best served chilled or slightly cool so the cheesecake filling stays firm.
Can I make them without Biscoff cookies?
Yes. Use graham crackers, gingersnaps, or cinnamon cookies for the garnish.
Pro Tips
Use room-temperature cream cheese to prevent lumps in the filling.
Press the wells into the cookie cups immediately after baking while the dough is still soft.
Cool the cookie shells completely before filling them, and chill the cheesecake mixture before piping.
Add the Biscoff cookie garnish shortly before serving so it remains crisp.
Final Thoughts
These Biscoff Cheesecake Cookie Cups combine soft cookie shells, fluffy cookie-butter cheesecake, melted Biscoff spread, and crunchy spiced cookies in one irresistible miniature dessert.
They’re simple enough for casual gatherings yet beautiful enough for holidays, parties, birthdays, and special dessert tables.