Halloween Reese’s Brownie Bites
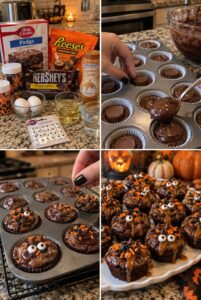
These Halloween Reese’s Brownie Bites combine rich fudge brownies with a creamy peanut butter cup center, caramel drizzle, chocolate chips, candy eyes, and colorful Halloween sprinkles. They’re baked in a muffin pan, giving every guest an individual brownie with a hidden Reese’s surprise.
Inspired by the reference image, this easy dessert uses boxed brownie mix and miniature peanut butter cups for quick preparation. It’s perfect for Halloween parties, school celebrations, bake sales, movie nights, fall gatherings, or trick-or-treat dessert tables.
Prep Time: 20 minutes
Bake Time: 18–23 minutes
Cooling and Decorating Time: 30 minutes
Total Time: Approximately 1 hour 15 minutes
Servings: 12 brownie bites
Why You’ll Love This Recipe
- Rich and fudgy brownie base
- Reese’s peanut butter cup center
- Gooey caramel topping
- Fun candy-eye decorations
- Easy to make with boxed brownie mix
- Convenient individual portions
- Perfect for Halloween parties
- Simple enough for children to help decorate
- Easy to transport
- Delicious combination of chocolate and peanut butter
Ingredients
Brownie Bites
- 1 box fudge brownie mix
- Eggs required on the brownie-mix package
- Vegetable oil required on the package
- Water required on the package
- 1 teaspoon vanilla extract, optional
- 12 Reese’s miniature peanut butter cups, wrappers removed
- ½ cup semisweet chocolate chips
Halloween Decorations
- ⅓ cup caramel sundae syrup
- ¼ cup Halloween sprinkles
- 24 candy eyes
- ¼ cup additional chocolate chips
- Orange and black decorating icing, optional
- Flaky sea salt, optional
Equipment
- Standard 12-cup muffin pan
- 12 paper or parchment liners
- Large mixing bowl
- Whisk or spatula
- Cookie scoop or large spoon
- Cooling rack
- Piping bag or squeeze bottle, optional
How to Make Halloween Reese’s Brownie Bites
Step 1: Preheat the Oven
Preheat your oven according to the instructions on the brownie-mix package, usually 350°F for a light metal pan.
If you’re using a dark nonstick muffin pan, the package may recommend a slightly lower temperature.
Step 2: Prepare the Muffin Pan
Place one paper or parchment liner inside each cavity of a standard 12-cup muffin pan.
Lightly spray the liners with nonstick cooking spray if they are made from regular paper.
Parchment liners usually release more cleanly from fudgy brownies.
Step 3: Prepare the Reese’s Cups
Remove the wrappers from 12 miniature Reese’s peanut butter cups.
Place the unwrapped candies in the refrigerator while preparing the batter.
Chilled peanut butter cups hold their shape better while the brownie batter is added.
Step 4: Prepare the Brownie Batter
Pour the dry brownie mix into a large mixing bowl.
Add the eggs, oil, and water listed on the package. Add the vanilla extract if using.
Stir until the ingredients are evenly combined and no dry pockets remain.
Avoid overmixing because too much air can create cake-like brownies rather than dense, fudgy bites.
Step 5: Add the Chocolate Chips
Fold ½ cup of semisweet chocolate chips into the brownie batter.
This adds small pockets of melted chocolate throughout the brownie bites.
Milk chocolate, dark chocolate, or peanut butter chips can also be used.
Step 6: Add the First Layer of Batter
Spoon approximately one heaping tablespoon of brownie batter into each prepared muffin cup.
The batter should cover the bottom of the liner.
Spread it gently if necessary, but avoid getting too much batter along the upper edges of the liner.
Step 7: Add the Peanut Butter Cups
Place one chilled miniature Reese’s cup in the center of each muffin cup.
Position the wider side upward, as shown in the reference image.
Press it down gently without pushing it completely through the bottom layer of brownie batter.
Step 8: Cover with More Batter
Spoon additional brownie batter over and around each peanut butter cup.
Fill every muffin cavity approximately two-thirds to three-quarters full.
Make sure the candy is mostly covered. It is fine if a small portion remains visible because the batter will rise during baking.
Step 9: Bake
Place the muffin pan in the preheated oven.
Bake for approximately 18–23 minutes, or until the tops are set and a toothpick inserted into the brownie portion comes out with a few moist crumbs.
Do not test directly through the peanut butter cup because the melted filling will make the toothpick appear wet.
Step 10: Avoid Overbaking
Remove the brownies while the centers still appear slightly soft.
The residual heat from the pan will continue cooking them as they cool.
Waiting for a completely clean toothpick may result in dry brownies.
Step 11: Cool in the Pan
Allow the brownie bites to cool inside the muffin pan for approximately 15 minutes.
The brownies will be delicate while hot, and the peanut butter center will be very soft.
Step 12: Transfer to a Cooling Rack
Carefully lift the brownie bites from the pan.
Transfer them to a wire cooling rack and allow them to cool completely before decorating.
Adding caramel and candy decorations to very warm brownies may cause them to slide or melt.
Step 13: Add the Caramel Drizzle
Drizzle caramel sundae syrup over each cooled brownie bite.
Allow some caramel to run naturally down the sides for a gooey, homemade appearance like the finished bites in the reference image.
Use a spoon, squeeze bottle, or piping bag for the drizzle.
Step 14: Add the Chocolate Chips
Place a few chocolate chips on top of each brownie while the caramel is still sticky.
Arrange some chips with their pointed ends facing upward to create small monster horns.
Step 15: Add the Candy Eyes
Place two candy eyes on each brownie bite.
Press them gently into the caramel or attach them with a small dot of melted chocolate.
Use different sizes or positions to create a collection of playful Halloween monsters.
Step 16: Add the Halloween Sprinkles
Scatter orange, black, and purple Halloween sprinkles over the brownies.
Use a mixture of jimmies, pumpkin shapes, bats, and sanding sugar for added texture.
Avoid completely covering the candy eyes.
Step 17: Let the Decorations Set
Allow the decorated brownies to rest for approximately 10–15 minutes.
For firmer caramel, refrigerate them briefly before arranging them on a serving platter.
Step 18: Serve
Serve the brownie bites at room temperature or slightly chilled.
Cut one in half to reveal the hidden peanut butter cup center.
The Best Brownie Mix to Use
A fudge brownie mix works especially well because it creates a dense, moist base that contrasts with the creamy peanut butter center.
Good choices include:
- Fudge brownie mix
- Dark chocolate brownie mix
- Chocolate-chunk brownie mix
- Triple-chocolate brownie mix
- Milk chocolate brownie mix
- Gluten-free brownie mix
If the package offers different directions for fudgy and cake-like brownies, follow the fudgy version.
Different brands require different amounts of eggs, oil, and water, so always check the package.
Can I Use Homemade Brownie Batter?
Yes.
You can use your favorite homemade fudge brownie recipe instead of a boxed mix.
Prepare enough batter for approximately one 8×8-inch or 9×9-inch pan.
A thick batter is ideal because it supports the Reese’s cups and helps keep them centered.
Thin, cake-like batter may allow the candies to sink toward the bottom.
The Best Reese’s Cups to Use
Miniature Reese’s peanut butter cups fit well inside a standard muffin pan.
They are larger than Reese’s Minis but smaller than full-size peanut butter cups.
You can also use:
- Reese’s Minis
- Dark chocolate Reese’s cups
- White chocolate Reese’s cups
- Caramel peanut butter cups
- Store-brand miniature peanut butter cups
- Mini peanut-free chocolate cups
If using very small Reese’s Minis, place two or three in each brownie bite.
Full-size peanut butter cups may be too large unless you use jumbo muffin cavities.
Should I Freeze the Reese’s Cups?
Freezing is not required, but chilling them is helpful.
Cold peanut butter cups are easier to handle and less likely to soften while you assemble the brownies.
For a more defined candy center, freeze them for approximately 15 minutes before adding them to the batter.
Do not freeze the assembled muffin pan before baking.
How to Keep the Reese’s Cups Centered
Add enough brownie batter to fully cover the bottom of each liner.
Place the peanut butter cup directly in the center and press it down only slightly.
Spoon the remaining batter around the sides before covering the top.
If the candy touches the liner, melted chocolate may stick to the paper.
How to Make Fudgy Brownie Bites
For the best fudgy texture:
- Follow the fudgy directions on the box
- Measure the ingredients accurately
- Avoid overmixing
- Use a standard rather than mini muffin pan
- Do not overbake
- Cool the brownies in the pan
- Store them in an airtight container
The brownie bites will become denser and chewier after chilling.
Why Did My Brownies Sink?
A small depression in the center is normal for fudgy brownie bites.
Severe sinking can occur if the brownies are underbaked, overmixed, or removed from the pan too quickly.
Allow them to cool before decorating. Caramel, chocolate chips, and candy eyes can easily cover small depressions.
Why Did the Reese’s Cups Melt?
The chocolate exterior of the Reese’s cups will soften during baking.
This is expected and creates a creamy peanut butter center.
Chilling the cups before assembly and avoiding excessive baking help them retain more of their shape.
Allow the brownies to cool before cutting them so the centers can set.
How to Prevent the Liners from Sticking
For easy removal:
- Use parchment liners
- Lightly grease regular paper liners
- Allow the brownies to cool completely
- Avoid removing the liners while warm
- Use a high-fat fudge brownie recipe
- Store the brownies at room temperature before serving
Chilled brownies may release more cleanly from the liners.
Monster Reese’s Brownie Bites
Decorate every brownie with two or three candy eyes.
Add pointed chocolate chips for horns and Halloween sprinkles for texture.
Use orange, green, or purple decorating icing to create mouths and monster hair.
Make each brownie different for a playful party platter.
Spider Brownie Bites
Place one Reese’s Mini or chocolate truffle in the center of each baked brownie.
Pipe four chocolate legs on each side.
Add two small candy eyes to the candy body.
Allow the chocolate legs to set before moving the brownies.
Caramel Peanut Butter Brownies
Increase the caramel topping to ½ cup.
Drizzle caramel over the cooled brownies and sprinkle them with chopped peanuts and flaky sea salt.
This version has a sweet, salty, and slightly crunchy finish.
Double Reese’s Brownie Bites
Place one miniature peanut butter cup inside each brownie.
After baking, add one smaller Reese’s Mini on top.
Finish with melted chocolate, chopped peanut butter cups, and orange sprinkles.
Reese’s Pieces Brownie Bites
Fold ½ cup of Reese’s Pieces into the brownie batter instead of chocolate chips.
Decorate the cooled brownies with additional orange, yellow, and brown candies.
Reese’s Pieces naturally complement a fall or Halloween color palette.
Chocolate Ganache Brownie Bites
Replace the caramel topping with chocolate ganache.
Heat ½ cup of heavy cream until steaming, then pour it over one cup of chocolate chips.
Allow the mixture to stand for two minutes before stirring until smooth.
Spoon the ganache over the cooled brownies and add the Halloween decorations.
Can I Make Mini Brownie Bites?
Yes.
Use a mini muffin pan and miniature paper liners.
Add a small spoonful of batter, one Reese’s Mini, and enough batter to cover it.
Bake for approximately 10–14 minutes, checking early.
Mini bites are ideal for larger parties because guests can enjoy them in one or two bites.
Can I Bake Them Without Liners?
Yes.
Coat every muffin cavity generously with nonstick spray.
Allow the brownies to cool for approximately 15 minutes, then loosen the edges carefully with a thin knife.
Do not leave them in an unlined pan until completely cold because they may become difficult to remove.
Can Children Help Make Them?
Yes.
Children can place the peanut butter cups in the batter and decorate the cooled brownies with candy eyes, chocolate chips, caramel, and sprinkles.
An adult should handle the oven and hot muffin pan.
Set the decorations in small bowls to create an easy Halloween decorating station.
What to Serve with Halloween Brownie Bites
Serve these brownies with:
- Vanilla ice cream
- Chocolate ice cream
- Whipped cream
- Cold milk
- Hot chocolate
- Caramel apples
- Halloween popcorn
- Monster cookies
- Chocolate-covered pretzels
- Halloween punch
Arrange them on a white, orange, or black serving platter for a colorful seasonal display.
Can I Prepare Them Ahead?
Yes.
Bake the brownie bites up to two days before serving.
Allow them to cool completely and store them in an airtight container.
For the freshest appearance, add the caramel, candy eyes, and sprinkles on the day of the event.
The brownie centers may become even fudgier after resting overnight.
Storage
Store the cooled brownie bites in an airtight container at room temperature for up to 3 days.
Refrigerate them for up to 5 days if your kitchen is warm or if the caramel topping requires refrigeration.
Place parchment paper between layers to protect the decorations.
Allow chilled brownies to sit at room temperature briefly before serving for a softer texture.
How to Reheat Reese’s Brownie Bites
For a warm and gooey peanut butter center, microwave an undecorated brownie bite for approximately 8–12 seconds.
Candy eyes and caramel may melt when heated, so warm the brownies before decorating whenever possible.
Do not overheat them because the peanut butter center can become extremely hot.
Can You Freeze Halloween Brownie Bites?
Yes.
Freeze the brownie bites before decorating them.
Wrap each cooled brownie individually and place them in a freezer-safe container.
Freeze for up to 2 months.
Thaw at room temperature, then add caramel, candy eyes, chocolate chips, and Halloween sprinkles.
Frequently Asked Questions
What are Halloween Reese’s Brownie Bites?
They are individual fudge brownies baked around miniature Reese’s peanut butter cups and decorated with caramel, candy eyes, chocolate chips, and Halloween sprinkles.
Do I need to unwrap the peanut butter cups?
Yes. Remove every paper and foil wrapper before placing the candies in the brownie batter.
Should I bake the Reese’s cups inside the brownies?
Yes. Place one cup between two layers of brownie batter before baking.
Can I use full-size Reese’s cups?
They may be too large for standard muffin cavities. Use jumbo muffin cups or cut the candies into smaller pieces.
Can I use caramel inside the brownies?
Yes, but use only a small amount because excessive caramel can make the center sticky and difficult to bake evenly.
How full should the muffin cups be?
Fill them approximately two-thirds to three-quarters full.
How do I know when the brownies are finished?
The tops should look set, and a toothpick inserted into the brownie portion should have a few moist crumbs.
Can I leave out the candy eyes?
Yes. Decorate the brownies with sprinkles, chocolate chips, chopped Reese’s, or icing instead.
Can I make them gluten-free?
Use gluten-free brownie mix and verify that every candy and decoration is gluten-free.
Can I make them peanut-free?
Use peanut-free chocolate cups or another filled candy produced in a peanut-free facility.
How long will they keep?
The brownie bites keep for approximately three days at room temperature or five days in the refrigerator.
Pro Tips
Chill the miniature Reese’s cups before assembling the brownies so they remain easier to position.
Place batter underneath and around each candy to keep the peanut butter cup centered.
Do not overbake the brownies. Remove them when a toothpick has a few moist crumbs.
Allow the brownie bites to cool completely before adding the caramel and decorations.
Use candy eyes in different sizes and positions to give every brownie its own monster personality.
Final Thoughts
These Halloween Reese’s Brownie Bites combine fudgy chocolate brownies, creamy peanut butter cups, gooey caramel, chocolate chips, candy eyes, and festive sprinkles in one easy party dessert.
Inspired by the layered brownie bites in the reference image, they’re simple to assemble but impressive enough for a Halloween dessert table, bake sale, or movie night. Customize them as monsters, spiders, double-Reese’s bites, or caramel peanut butter brownies for a fun seasonal treat.