
Dirt Cake Cups
If you’re looking for a cute, creamy, chocolatey no-bake dessert that is fun for kids and perfect for parties, these Dirt Cake Cups are the perfect treat to make.
Made with Oreo pudding, milk, cream cheese, Cool Whip, crushed Oreo cookies, gummy worms, and royal icing flowers, these little dessert cups look like mini cups of “dirt” but taste sweet, creamy, and delicious. They are playful, easy to serve, and always a hit on dessert tables.
This recipe is perfect for kids’ birthday parties, spring desserts, summer treats, garden-themed parties, classroom snacks, baby showers, Easter tables, picnic desserts, or anytime you want something fun and simple that does not require baking.
The combination of creamy Oreo pudding filling, crushed cookie crumbs, and colorful decorations makes these dirt cake cups both adorable and tasty.
Why You’ll Love This Recipe
No baking required
Fun for kids
Perfect party dessert
Creamy and chocolatey
Easy individual servings
Great for dessert tables
Cute spring or summer treat
Simple ingredients
Easy to decorate
Make-ahead friendly
Rich Oreo flavor
Fun gummy worm topping
Great for themed parties
Quick to assemble
Always a crowd favorite
Ingredients You’ll Need
1/4 cup butter
4.2 oz Oreo pudding
2 cups milk
4 oz cream cheese
1 1/2 cups Cool Whip
30 Oreo cookies
Gummy worms
Royal icing flowers
Optional Add-Ins
Chocolate pudding
Vanilla pudding
Extra Cool Whip
Mini chocolate chips
Crushed brownies
Chocolate sprinkles
Green sprinkles
Candy rocks
Candy flowers
Marshmallow bugs
Crushed graham crackers
Chocolate syrup
Whipped cream
Mini Oreos
Edible flowers
How to Make Dirt Cake Cups
Step 1: Prepare the Pudding
Add the Oreo pudding mix to a mixing bowl.
Pour in the milk according to the package directions.
Whisk until smooth and creamy.
Let the pudding sit for a few minutes so it can thicken.
The pudding should be thick enough to fold into the cream cheese mixture without becoming runny.
Step 2: Soften the Cream Cheese
Place the cream cheese in a separate bowl.
Let it soften slightly before mixing so it blends smoothly.
Soft cream cheese helps create a creamy filling without lumps.
Step 3: Mix the Cream Cheese
Beat or stir the cream cheese until smooth and creamy.
Make sure there are no large lumps left.
This step gives the dirt cake cups a rich cheesecake-style texture.
Step 4: Add the Pudding
Add the thickened Oreo pudding to the bowl with the cream cheese.
Mix until everything is combined and creamy.
The pudding adds chocolate flavor while the cream cheese makes the filling richer and thicker.
Step 5: Fold in the Cool Whip
Add the Cool Whip to the pudding mixture.
Gently fold it in until the filling becomes light, fluffy, and smooth.
Do not overmix too hard because you want the filling to stay airy and creamy.
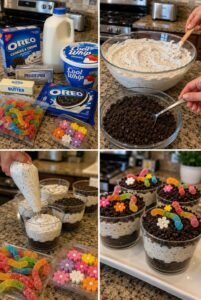
Step 6: Crush the Oreos
Place the Oreo cookies in a food processor or a sealed bag.
Crush them into fine crumbs.
The crumbs should look like dirt so they create the classic dirt cake look.
You can leave a few slightly larger cookie pieces if you want extra crunch.
Step 7: Prepare the Cups
Set out small clear dessert cups.
Clear cups work best because you can see the layers.
Add a layer of crushed Oreo crumbs to the bottom of each cup.
This creates the first “dirt” layer.
Step 8: Add the Creamy Filling
Spoon the Oreo pudding mixture over the cookie crumb layer.
Smooth it gently with a spoon.
Do not fill the cups all the way to the top because you still need room for more cookie crumbs and decorations.
Step 9: Add More Oreo Crumbs
Sprinkle more crushed Oreo crumbs over the pudding layer.
Cover the top completely so it looks like a cup of dirt.
This top layer gives the dessert its classic look and adds a nice cookie crunch.
Step 10: Decorate
Add gummy worms to the top of each cup.
Press some worms slightly into the crumbs so they look like they are crawling through the dirt.
Add royal icing flowers for a cute garden-style look.
You can place the flowers on top or tuck them lightly into the crumbs.
Step 11: Chill
Refrigerate the cups until ready to serve.
Chilling helps the filling stay thick and creamy.
It also gives the cookie crumbs time to soften slightly while still keeping some texture.
Step 12: Serve
Serve cold with spoons.
These Dirt Cake Cups are best served chilled and decorated right before serving for the freshest look.
They are creamy, fun, chocolatey, and perfect for kids and adults.
Serving Ideas
These Dirt Cake Cups are perfect for:
Kids’ birthday parties
Spring dessert tables
Summer parties
Garden parties
Classroom treats
Easter desserts
Baby showers
Picnics
BBQs
Potlucks
Sleepovers
Movie nights
After-school treats
Farm-themed parties
No-bake dessert tables
What to Serve With Them
These dirt cake cups pair well with:
Fruit punch
Lemonade
Chocolate milk
Strawberry milk
Mini sandwiches
Party pizza
Chicken nuggets
Hot dogs
Cupcakes
Cookies
Fruit trays
Ice cream cups
Popcorn
Snack boards
Birthday cake
Frequently Asked Questions
Can I make Dirt Cake Cups ahead of time?
Yes. These cups are great for making ahead.
Prepare the cups and refrigerate them until ready to serve.
For the best look, add gummy worms and royal icing flowers closer to serving time.
Can I use regular chocolate pudding?
Yes. Chocolate pudding works well if you cannot find Oreo pudding.
You can also use vanilla pudding mixed with crushed Oreos.
Can I use homemade whipped cream instead of Cool Whip?
Yes. Homemade whipped cream can be used.
Make sure it is whipped thick enough so the filling stays fluffy.
Can I skip the cream cheese?
Yes, but the filling will be lighter and less rich.
Cream cheese gives the cups a thicker, cheesecake-like texture.
Can I use chocolate sandwich cookies instead of Oreos?
Yes. Any chocolate sandwich cookies will work.
Oreos are classic, but store-brand cookies are fine too.
Can I make these in one large dish?
Absolutely. Layer everything in a large serving dish instead of individual cups.
Add gummy worms and flowers on top before serving.
Can kids help make this recipe?
Yes. Kids can help crush cookies, spoon the filling into cups, and decorate with gummy worms and flowers.
It is a fun recipe for kids to help assemble.
How long do they last in the fridge?
They are best enjoyed within 2 to 3 days.
The cookie crumbs will soften more the longer they sit.
Can I freeze Dirt Cake Cups?
Freezing is not recommended because the creamy filling may change texture after thawing.
They taste best fresh from the refrigerator.
What cups should I use?
Small clear plastic cups, dessert cups, or mini parfait cups work best.
Clear cups show off the layers and make the dessert look extra cute.
20 Detailed Tips for the Best Dirt Cake Cups
⭐ Let the pudding thicken before mixing it with the cream cheese.
⭐ Soften the cream cheese first for a smoother filling.
⭐ Mix the cream cheese until completely creamy.
⭐ Fold in the Cool Whip gently.
⭐ Crush the Oreos finely so they look like dirt.
⭐ Save some Oreo crumbs for the top layer.
⭐ Use clear cups for the prettiest presentation.
⭐ Do not overfill the cups.
⭐ Chill before serving for the best texture.
⭐ Add gummy worms right before serving if you want them to look fresh.
⭐ Use royal icing flowers for a cute garden look.
⭐ Add green sprinkles for a grass effect.
⭐ Use mini cups for party trays.
⭐ Make a large batch for birthdays or classroom treats.
⭐ Keep them cold until serving.
⭐ Use a piping bag for cleaner layers.
⭐ Add extra cookie crumbs for more crunch.
⭐ Use chocolate pudding for a deeper chocolate flavor.
⭐ Add mini Oreos on top for extra decoration.
⭐ Make extra because kids love them.
Fun Variations
Garden Dirt Cups
Top the cups with royal icing flowers, green sprinkles, and gummy worms.
This version is perfect for spring parties and garden-themed dessert tables.
Extra Chocolate Dirt Cups
Use chocolate pudding instead of Oreo pudding.
Add mini chocolate chips between the layers for extra chocolate flavor.
Birthday Dirt Cups
Add colorful sprinkles, candy flowers, and birthday candles on the dessert table.
This version is fun for kids’ birthday parties.
Brownie Dirt Cups
Add small brownie pieces between the pudding and Oreo crumbs.
This makes the cups richer and more fudgy.
Halloween Dirt Cups
Use gummy worms, candy eyes, and spooky sprinkles.
This version is perfect for Halloween parties.
Easter Dirt Cups
Add pastel candy eggs, royal icing flowers, and green sprinkles.
This makes a cute Easter dessert cup.
Storage & Reheating
These Dirt Cake Cups do not need reheating because they are served cold.
Store them covered in the refrigerator for up to 3 days.
For the best texture and appearance, add the gummy worms and royal icing flowers shortly before serving.
The Oreo crumbs will soften as they sit, which gives the dessert a cake-like texture.
Make-Ahead Tips
You can make the pudding mixture ahead of time and keep it covered in the refrigerator.
You can also crush the Oreos ahead and store the crumbs in a sealed bag or container.
When ready to serve, layer the crumbs and pudding mixture in cups, then decorate with gummy worms and flowers.
For parties, assemble the cups a few hours before guests arrive and keep them chilled.
Why This Recipe Works
This recipe works because it combines a creamy pudding filling with crunchy Oreo crumbs and fun decorations.
The Oreo pudding brings chocolate cookie flavor, the cream cheese makes the filling rich and smooth, and the Cool Whip keeps it light and fluffy. The crushed Oreo cookies create the “dirt” look while adding texture and sweetness.
The gummy worms and royal icing flowers make the cups playful, colorful, and perfect for kids’ parties or themed dessert tables.
These Dirt Cake Cups are creamy, chocolatey, fun, and easy to make. They are perfect for spring desserts, summer treats, kids’ parties, classroom snacks, or a cute no-bake dessert table.


