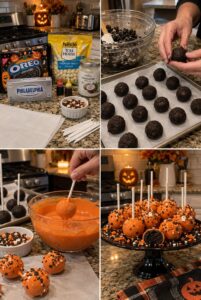
Spooky Oreo Cake Pops
These Spooky Oreo Cake Pops are an easy no-bake Halloween treat made with crushed Oreo cookies, cream cheese, orange candy coating, and festive sprinkles. They have a rich cookies-and-cream center surrounded by a smooth, colorful shell.
Despite the name, these treats do not require baked cake. Crushed Oreos create the dark, fudgy center, while cream cheese holds everything together. They’re perfect for Halloween parties, school celebrations, fall dessert tables, trick-or-treat gatherings, or a fun family activity.
Prep Time: 30 minutes
Chill Time: 45 minutes
Total Time: Approximately 1 hour 15 minutes
Servings: 18–22 cake pops
Why You’ll Love This Recipe
- No baking required
- Rich Oreo filling
- Easy to prepare
- Fun Halloween appearance
- Perfect for making with children
- Easy to decorate
- Great for parties
- Can be prepared ahead
- Uses only a few ingredients
Ingredients
Oreo Filling
- 36 Oreo cookies
- 8 ounces cream cheese, softened
- ½ teaspoon vanilla extract, optional
Candy Coating
- 16 ounces white candy melts or white melting wafers
- Orange oil-based candy coloring, if using white melts
- 1–2 teaspoons refined coconut oil or vegetable shortening, if needed
- 18–22 lollipop sticks
Decorations
- Orange, black, and white sprinkles
- Halloween confetti sprinkles
- Candy eyes
- Black decorating icing
- Melted dark chocolate, optional
How to Make Spooky Oreo Cake Pops
Step 1: Prepare the Baking Sheet
Line a large baking sheet with parchment or wax paper.
Make enough room in your refrigerator or freezer for the tray before beginning.
Step 2: Crush the Oreo Cookies
Place the Oreo cookies, including the cream filling, in a food processor.
Pulse until they become fine, even crumbs.
If you do not have a food processor, place the cookies in a sealed plastic bag and crush them with a rolling pin. Make sure no large pieces remain.
Step 3: Add the Cream Cheese
Add the softened cream cheese and optional vanilla extract to the cookie crumbs.
Process until the mixture begins to hold together and resembles thick chocolate dough.
If mixing by hand, use a sturdy spatula and continue stirring until no streaks of cream cheese remain.
Step 4: Portion the Mixture
Use a tablespoon or small cookie scoop to portion the Oreo mixture.
Each portion should contain approximately 1½ tablespoons.
Keeping the portions similar in size helps the cake pops look uniform.
Step 5: Roll into Balls
Roll each portion between your palms to create a smooth ball.
Arrange the Oreo balls on the prepared baking sheet.
If the mixture becomes sticky, wash and dry your hands or chill the mixture for a few minutes.
Step 6: Chill the Oreo Balls
Refrigerate the Oreo balls for approximately 30 minutes, or freeze them for approximately 10–15 minutes.
They should be firm enough to dip but not completely frozen.
Step 7: Prepare the Candy Coating
Place the candy melts in a microwave-safe bowl.
Microwave in 20-second intervals, stirring well after each interval, until smooth.
If using white candy melts, stir in orange oil-based candy coloring. Do not use water-based food coloring because it can cause the coating to seize.
Step 8: Adjust the Consistency
If the melted coating is too thick, stir in refined coconut oil or vegetable shortening, ½ teaspoon at a time.
The coating should flow smoothly from a spoon without becoming watery.
Step 9: Attach the Sticks
Dip approximately ½ inch of one end of each lollipop stick into the melted coating.
Insert the coated end halfway into an Oreo ball.
Repeat with the remaining balls, then chill them for another 5–10 minutes.
The hardened coating works like glue and keeps the cake pops attached to their sticks.
Step 10: Dip the Cake Pops
Hold one cake pop by its stick and lower it straight into the melted orange coating.
Make sure the entire Oreo ball is covered.
Lift it out and allow the excess coating to drip back into the bowl. Gently tap your wrist rather than striking the stick against the bowl.
Step 11: Add the Decorations
While the coating is still wet, add Halloween sprinkles, candy eyes, or decorative sugar.
Work quickly because candy coating begins to set within a few minutes.
Step 12: Let the Cake Pops Set
Place each finished cake pop upright in a foam block or cake-pop stand.
You can also place them stick-side-up on a parchment-lined tray.
Allow the coating to set completely at room temperature or refrigerate the pops for approximately 10 minutes.
Step 13: Add Spooky Details
Once the coating has hardened, use black decorating icing or melted dark chocolate to add:
- Jack-o’-lantern faces
- Spiderwebs
- Stitches
- Ghost faces
- Monster mouths
- Drizzle patterns
Allow the decorations to set before serving.
The Best Oreos to Use
Original Oreos create the classic dark cookies-and-cream center.
You can also use:
- Halloween Oreos
- Chocolate cream Oreos
- Golden Oreos
- Mint Oreos
- Peanut butter Oreos
- Gluten-free Oreos
Avoid heavily filled varieties unless you reduce the amount of cream cheese, as too much filling can make the mixture overly soft.
Do I Need to Remove the Oreo Filling?
No. Crush the entire cookie, including the cream center.
The Oreo filling adds sweetness and helps create the smooth, truffle-like texture.
Can I Make Them Without a Food Processor?
Yes. Place the cookies inside a strong zip-top bag, remove the excess air, and seal it.
Crush them with a rolling pin until they become very fine crumbs. Transfer the crumbs to a bowl and mix them thoroughly with softened cream cheese.
The crumbs need to be fine so the cake pops hold together properly.
How to Keep Cake Pops on the Sticks
Cake pops can fall from their sticks if they are too large, too soft, or dipped incorrectly.
For the best results:
- Keep each ball approximately 1 inch wide
- Chill the balls before dipping
- Dip each stick in coating before inserting it
- Insert the stick only halfway
- Use a deep, narrow bowl for dipping
- Lift the cake pop straight out
- Gently tap away excess coating
- Do not leave the Oreo balls in the coating too long
Why Is My Candy Coating Too Thick?
Candy melts can become thick when overheated or when they come into contact with water.
Reheat them briefly and stir in a small amount of refined coconut oil or vegetable shortening.
Do not add milk, water, or regular liquid food coloring.
Why Is the Coating Cracking?
Cracks usually occur when very cold Oreo balls are dipped into hot candy coating.
Allow frozen balls to sit at room temperature for a few minutes before dipping. The centers should be firm and chilled but not frozen solid.
Let the melted coating cool slightly before using it.
Decorating Ideas
Jack-o’-Lantern Cake Pops
Cover the Oreo balls with orange coating.
Once set, use black decorating icing to draw triangular eyes, noses, and smiling pumpkin mouths.
Monster Cake Pops
Use green or purple candy melts.
Add candy eyes and draw crooked mouths or stitches with black icing.
Mummy Cake Pops
Dip the pops in white candy melts.
Drizzle additional white coating over the surface and add two candy eyes.
Spiderweb Cake Pops
Cover the pops with orange or white coating.
Pipe thin black icing in circles, then drag a toothpick outward to create a web pattern.
Bloody Cake Pops
Use white candy coating.
Drizzle red candy melts over the top to create a spooky blood effect.
Ghost Cake Pops
Dip the Oreo balls in white coating.
Use melted dark chocolate to add simple eyes and open mouths.
Can I Use Chocolate Instead of Candy Melts?
Yes, but melted chocolate may remain softer at room temperature.
Use white baking chocolate with a small amount of coconut oil. If coloring it, use only oil-based candy coloring.
Orange candy melts are usually the easiest option for achieving a bright, smooth Halloween coating.
Can I Make Them Without Sticks?
Yes. Prepare them as Spooky Oreo Truffles.
Place the chilled Oreo balls on a fork, lower them into the melted coating, and transfer them to parchment paper. Add sprinkles before the coating sets.
Can I Make Them Ahead?
Yes. Oreo cake pops are an excellent make-ahead dessert.
Prepare and decorate them up to 3 days before serving. Store them in a covered container in the refrigerator.
Allow them to sit at room temperature for approximately 10–15 minutes before serving for the best texture.
Storage
Arrange the cake pops in a single layer inside an airtight container.
Place parchment paper between layers if stacking is necessary.
Refrigerate for up to 5 days because the filling contains cream cheese.
Can You Freeze Oreo Cake Pops?
Yes. Freeze the undecorated Oreo balls for up to 2 months.
Place them on a baking sheet until firm, then transfer them to a freezer-safe container.
Thaw the balls overnight in the refrigerator before adding the sticks and candy coating.
Fully decorated cake pops can also be frozen, but condensation may affect the coating and sprinkles.
How to Display Cake Pops
For an attractive Halloween dessert table, arrange the cake pops in:
- A cake-pop stand
- A foam block covered with decorative paper
- Small jars filled with candy
- A black dessert platter
- A Halloween-themed bucket
- Individually wrapped treat bags
Keep the pops away from direct sunlight and warm surfaces so the coating remains firm.
Frequently Asked Questions
Are these made with cake?
No. They use crushed Oreo cookies and cream cheese to create a rich truffle-style center.
Do I need to refrigerate them?
Yes. The filling contains cream cheese, so the finished cake pops should be refrigerated.
Can I use reduced-fat cream cheese?
Yes, but full-fat block-style cream cheese creates the firmest filling.
Why is my Oreo mixture too soft?
The cream cheese may have been too warm, or too much was added. Refrigerate the mixture until firm.
Can I use frosting instead of cream cheese?
Yes, but begin with only a few tablespoons because frosting is sweeter and softer.
How many cake pops does this recipe make?
It produces approximately 18–22 pops, depending on their size.
Can I use wooden skewers?
Yes. Cut the skewers into shorter lengths and make sure the ends are not sharp when serving children.
How long does the coating take to set?
Candy coating usually hardens within 10–15 minutes.
Can children help decorate them?
Yes. Children can add sprinkles, candy eyes, and other decorations with adult supervision.
Pro Tips
Crush the Oreos into very fine crumbs so the filling becomes smooth and holds together.
Use block-style cream cheese rather than whipped cream cheese. Whipped varieties contain more air and may make the mixture too soft.
Chill the Oreo balls until firm, but do not freeze them solid before dipping.
Decorate each cake pop immediately after dipping because candy coating hardens quickly.
Keep all bowls, spoons, and coloring completely dry. Even a small amount of water can cause candy melts to seize.
Final Thoughts
These Spooky Oreo Cake Pops combine a rich Oreo center with colorful candy coating and playful Halloween decorations. They are easy to prepare, require no baking, and can be customized as pumpkins, ghosts, monsters, mummies, or spiderwebs.
Prepare them for a Halloween party, school celebration, dessert table, or family decorating activity. With their dark cookies-and-cream centers and bright orange coating, they make a fun seasonal treat that looks as good as it tastes.