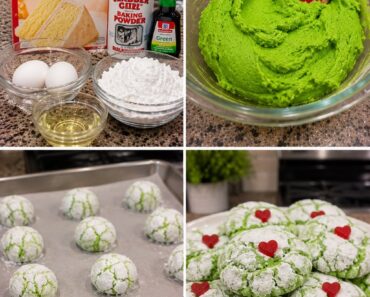
Easy Grinch Cheesecake Cookie Cups
These Easy Grinch Cheesecake Cookie Cups bring a little holiday color to the dessert table. Sprinkle-coated sugar cookie dough bakes into small cups, then gets filled with a fluffy green cheesecake mixture and topped with a red heart for a playful Grinch-inspired finish.
They’re easy to portion, simple to decorate, and fun to make ahead for a Christmas party, cookie exchange, or holiday movie night. Using refrigerated cookie dough and prepared no-bake cheesecake filling keeps the recipe approachable, while the finished cups still look festive and special.
Prep time: 25 minutes
Bake time: 10–13 minutes
Chill time: 1 hour
Total time: About 1 hour 40 minutes
Makes: 24 cookie cups
Why You’ll Love This Recipe
- A cheerful holiday dessert: Green filling and red heart decorations give the cups a fun seasonal look.
- Easy to serve: Each cookie cup is an individual treat, so there’s no slicing or serving utensils needed.
- Simple shortcuts: Refrigerated sugar cookie dough and prepared cheesecake filling save time.
- Great for decorating: Add sprinkles, hearts, or your favorite Christmas candies.
- Make-ahead friendly: Bake the cookie cups in advance and fill them closer to serving.
Ingredients
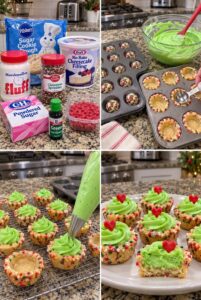
- 1 package refrigerated sugar cookie dough, about 16 ounces
- ½ cup Christmas sprinkles, plus more for decorating
- 1 tub prepared no-bake cheesecake filling, about 24 ounces
- ½ cup marshmallow fluff
- ¼ cup powdered sugar
- ½ teaspoon vanilla extract
- Green food coloring, a few drops
- 24 small red heart candies or heart-shaped sprinkles
How to Make Grinch Cheesecake Cookie Cups
1. Prepare the pan and oven
Preheat the oven to 350°F (175°C). Lightly grease a 24-cup mini muffin pan. If you have only one pan, bake the cookie cups in batches.
2. Add sprinkles to the cookie dough
Break the sugar cookie dough into small pieces and place them in a bowl. Add the Christmas sprinkles and gently knead until the sprinkles are distributed throughout the dough.
3. Form the cookie cups
Divide the dough into 24 equal portions. Roll each portion into a ball and place one in each muffin cup. Bake for 10–13 minutes, or until the edges are lightly golden and the centers look set.
4. Shape the cups while warm
Remove the pan from the oven. While the cookies are still warm, gently press the center of each one with the rounded end of a small measuring spoon or the back of a teaspoon to create a cup shape.
If the cookie centers puff up during baking, press them down again while warm. Let the cups cool in the pan for about 10 minutes, then carefully transfer them to a wire rack to cool completely.
5. Make the green cheesecake filling
In a mixing bowl, stir together the prepared cheesecake filling, marshmallow fluff, powdered sugar, and vanilla until smooth. Add green food coloring a drop at a time, mixing between additions, until the filling reaches the shade you like.
For a firmer filling that pipes neatly, chill it for 20–30 minutes before using.
6. Fill and decorate
Spoon the filling into a piping bag or a zip-top bag with one corner snipped off. Pipe the green cheesecake mixture into each cooled cookie cup. Top each one with a red heart candy or heart-shaped sprinkle.
Refrigerate the filled cups for at least 1 hour before serving so the filling can set.
Tips for the Best Cookie Cups
- Press the centers while warm: Warm cookies are flexible and easier to shape. If they cool first, they may crack when pressed.
- Cool completely before filling: Warm cookie cups can soften the cheesecake filling.
- Add coloring gradually: A few drops of green food coloring usually go a long way. Mix well before adding more.
- Chill the filling if needed: If the filling feels too soft to pipe, refrigerate it briefly.
- Make even portions: A small cookie scoop helps divide the dough evenly and keeps the cups a similar size.
- Check the dough package: Baking times can vary by brand and by pan, so use the package directions as a guide and watch for lightly golden edges.
Easy Variations
Use homemade sugar cookie dough
Homemade sugar cookie dough works well. Keep the portions small enough to fit the mini muffin pan and check the cookies for doneness as they bake.
Change the sprinkles
Use red and green nonpareils, holiday jimmies, or a mix of festive sprinkles. Avoid adding too many large decorations to the dough, since they can make the cookie cups harder to shape.
Add a chocolate base
Place a small chocolate wafer or a few mini chocolate chips in the bottom of each cooled cup before adding the cheesecake filling.
Try a different topping
Use red sanding sugar, a tiny gumdrop, or a small piece of strawberry candy instead of a heart decoration.
Make them extra creamy
Fold a few spoonfuls of whipped topping into the cheesecake filling for a lighter texture. Chill the mixture before piping.
Make-Ahead and Storage
Bake the cookie cups up to 2 days ahead. Once completely cool, store them in an airtight container at room temperature. Prepare the filling separately and keep it covered in the refrigerator.
Fill and decorate the cookie cups several hours before serving, then refrigerate them in a covered container. Store leftovers in the refrigerator for up to 3 days. The cookie cups may soften slightly as they sit with the filling, but they’ll still be delicious.
For the neatest presentation, add the red hearts shortly before serving.
Frequently Asked Questions
Can I make these in a regular muffin pan?
Yes, but the cups will be larger and you’ll make fewer of them. Use a little more dough per cup and expect the baking time to increase. Watch for lightly golden edges and shape the centers while warm.
Why did my cookie cups lose their shape?
The centers can puff up as the dough bakes. Press them gently again as soon as they come out of the oven, while they’re still warm and pliable.
Can I use homemade cheesecake filling?
Yes. Use a thick, chilled no-bake cheesecake filling that can hold its shape when piped. If it’s too soft, chill it before filling the cups.
Can I freeze the cookie cups?
You can freeze the baked, unfilled cookie cups in an airtight container for up to 1 month. Thaw them completely before adding the cheesecake filling. Freezing the assembled cups may change the texture of the filling and decorations.
When should I add the heart decorations?
Add the hearts after piping the filling. For the freshest appearance, decorate the cups on the day you plan to serve them.
Final Thoughts
Easy Grinch Cheesecake Cookie Cups are a festive little dessert with a crisp-edged sugar cookie shell and a smooth green cheesecake center. The red heart topping gives each one its playful holiday look, and the individual portions make them easy to share. Bake the cups ahead, fill them once they’re cool, and chill before serving.