
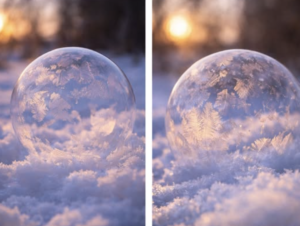
Frozen bubbles are one of the most magical winter science activities you can try. With just a few simple household ingredients and freezing temperatures, ordinary soap bubbles transform into stunning spheres covered in icy crystal patterns. As the bubbles freeze, delicate frost forms across the surface, creating designs that look like tiny snowflakes, feathers, or spiderwebs.
This activity is perfect for kids, families, classrooms, photographers, and winter lovers. It combines science, art, and outdoor fun in a way that feels almost unreal. Best of all, frozen bubbles are easy to make, inexpensive, and incredibly fun to watch. Every bubble freezes differently, making each one a unique winter masterpiece.
Why You’ll Love Frozen Bubbles
-
Visually stunning and magical
-
Easy science experiment with instant results
-
Uses simple household ingredients
-
Fun for kids and adults
-
Perfect winter outdoor activity
-
Great for photos and videos
Why You Should Try This Activity
Ingredients You’ll Need
-
Warm water
-
Dish soap (regular liquid dish soap works best)
-
Sugar
-
Corn syrup
-
Glycerin (optional but highly recommended)
-
Bubble wand or straw
-
Bowl or container
How to Make Frozen Bubbles (Step by Step)
Step 1: Prepare the base
Pour warm water into a bowl. The warmth helps the ingredients dissolve more easily.
Step 2: Add dish soap
Gently stir in dish soap, mixing slowly to avoid creating too many suds. Fewer bubbles in the bowl means stronger bubbles later.
Step 3: Dissolve the sugar
Add sugar to the mixture and stir until it is completely dissolved. Sugar helps strengthen the bubble walls and improves freezing patterns.
Step 4: Add corn syrup and glycerin
Slowly pour in corn syrup and glycerin. Stir gently until everything is fully combined. These ingredients make the bubbles thicker and more durable, allowing them to freeze instead of popping instantly.
Step 5: Let the solution rest
Allow the bubble solution to rest for at least 30 minutes. This resting time improves bubble strength and overall performance.
Step 6: Blow the bubbles
Dip a bubble wand into the mixture. Go outside when temperatures are below freezing and gently blow bubbles.
Step 7: Watch the magic
As the bubbles land or float, they will begin to freeze, forming stunning icy crystals and frost patterns before your eyes.
The Science Behind Frozen Bubbles
When a bubble is blown in freezing temperatures, the water inside the soap film begins to crystallize. Ice crystals spread across the bubble’s surface, forming intricate frost patterns. Ingredients like sugar, corn syrup, and glycerin slow evaporation and freezing, allowing crystals time to grow instead of popping instantly.
Best Conditions for Frozen Bubbles
-
Temperature: Below 28°F / -2°C
-
Calm weather with little wind
-
Fresh snow or icy surfaces
-
Early morning or late evening cold
Common Mistakes to Avoid
-
Blowing bubbles when it’s not cold enough
-
Stirring the mixture too aggressively
-
Skipping the resting time
-
Using foamy or diluted soap
-
Blowing bubbles too hard
Blowing frozen bubbles takes a little patience, but these tips will help you get the most beautiful results possible.
Blow bubbles slowly and gently
Use a soft, steady breath rather than blowing hard. Gentle bubbles form thicker walls, which freeze more slowly and create clearer, more detailed ice patterns instead of popping right away.
Use gloves to keep the wand cold
Your hands give off heat, which can warm the bubble wand and weaken the bubbles. Wearing gloves keeps the wand cold and helps the bubbles freeze evenly once they’re blown.
Blow bubbles onto snow or icy surfaces
Letting bubbles land on snow, ice, or frozen ground gives them a stable place to freeze. Snow acts like insulation, allowing frost patterns to spread slowly across the bubble’s surface.
Experiment with different bubble sizes
Small bubbles freeze quickly and often show sharp crystal patterns, while larger bubbles freeze more slowly and display more detailed designs. Try both to see the difference.
Choose calm weather when possible
Wind can break bubbles before they freeze. Calm, still air makes it easier for bubbles to float or settle gently.
Let the bubble solution rest before use
Resting the solution helps ingredients bond together, creating stronger bubbles that last longer in cold air.
Take photos quickly
Frozen bubbles are delicate and may only last seconds or minutes. Keep your camera or phone ready so you can capture the icy patterns before they disappear.
Safety Tips
Frozen bubbles are safe and fun, but a few simple precautions help keep everyone comfortable and protected.
Supervise young children at all times
Children should always be supervised to ensure they don’t slip on ice or put the bubble solution in their mouths.
Watch your footing on icy surfaces
Winter conditions can be slippery. Choose flat areas, wear proper footwear, and move slowly to avoid falls.
Do not ingest the bubble solution
The solution is for blowing bubbles only and should never be tasted or swallowed.
Wash hands after handling
After the activity, wash hands with soap and water, especially before eating or touching your face.
Dress warmly
Cold temperatures are necessary for frozen bubbles, so wear gloves, hats, and warm clothing to stay comfortable.
Avoid windy or extreme weather
If conditions are too harsh, it’s best to wait for a safer day to enjoy the activity.
Storing the Bubble Solution
-
Store unused solution in a sealed container
-
Keep at room temperature
-
Use within 24–48 hours for best results
-
Gently stir before reuse
Conclusion
Frozen bubbles turn cold winter days into moments of pure wonder. With minimal effort and simple ingredients, you can create breathtaking icy bubbles that feel straight out of a fairy tale. Whether you’re exploring science, creating winter art, or just having fun outside, frozen bubbles are an unforgettable experience worth trying at least once each winter.
General Information
-
Activity Type: Winter science experiment
-
Difficulty: Easy
-
Prep Time: 10 minutes
-
Rest Time: 30 minutes
-
Best For: Kids, families, classrooms, winter fun
Frequently Asked Questions (FAQ)
1. How cold does it need to be to make frozen bubbles?
Below freezing, ideally under 28°F (-2°C).
2. Can I make frozen bubbles without glycerin?
Yes, but glycerin greatly improves strength and freezing patterns.
3. Why do my bubbles pop before freezing?
The temperature may not be cold enough or the solution may be too weak.
4. Is this safe for kids?
Yes, with adult supervision.
5. Can I do this without sugar?
Sugar helps strengthen bubbles, but it’s optional.
6. What soap works best?
Regular liquid dish soap works best.
7. Can I use store-bought bubble solution?
You can, but homemade solutions freeze better.
8. Why are my bubbles cloudy?
Too much soap or foam can cause cloudiness.
9. Can I do this on snow?
Yes, snow is ideal for freezing bubbles.
10. How long do frozen bubbles last?
Anywhere from a few seconds to a few minutes.
11. Can I photograph frozen bubbles?
Yes, they make stunning winter photos.
12. Does wind affect frozen bubbles?
Yes, calm conditions work best.
13. Can adults enjoy this too?
Absolutely—it’s mesmerizing at any age.
14. What happens if it’s too cold?
Bubbles may freeze too fast or pop instantly.
15. Can I reuse the solution?
Yes, within 1–2 days.
16. Why do ice patterns look different each time?
Crystal growth changes based on temperature and airflow.
17. Can I color the bubbles?
Food coloring can be added, but lightly.
18. Is this a science experiment?
Yes, it demonstrates crystallization and surface tension.
19. Can I do this at night?
Yes, cold nighttime temperatures work well.
20. Is this good for school projects?
Absolutely—it’s a perfect winter science activity.


