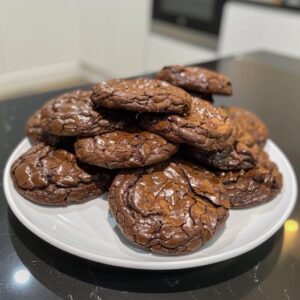
Earthquake Brownie Cookies


Ingredients:

  • 1/2 cup unsalted butter (1 stick)
  • 8 ounces semi-sweet chocolate, chopped (or chocolate chips)
  • 3/4 cup granulated sugar
  • 1/4 cup light brown sugar, packed
  • 2 large eggs
  • 1 teaspoon vanilla extract
  • 3/4 cup all-purpose flour
  • 2 tablespoons unsweetened cocoa powder
  • 1/2 teaspoon sea salt
  • 1/2 teaspoon baking powder
  • 1 cup chocolate chips or chunks (optional for extra chocolatey cookies)
  • Powdered sugar (for rolling)

Instructions:

  1. Preheat your oven to 350°F (175°C). Line a baking sheet with parchment paper.
  2. In a medium saucepan over low heat, melt the butter and chopped chocolate, stirring until smooth. Remove from heat and let cool slightly.
  3. In a large bowl, whisk together the granulated sugar, brown sugar, eggs, and vanilla extract. Gradually pour in the melted chocolate mixture and stir to combine.
  4. Sift the flour, cocoa powder, sea salt, and baking powder into the chocolate mixture. Fold the ingredients together until just combined. If you’re using additional chocolate chips or chunks, fold them in now.
  5. Chill the dough for a few hours to firm up.
  6. Roll the chilled dough into balls and then roll each ball in powdered sugar until coated. Place the dough balls rolled in powdered sugar onto the prepared baking sheet, spacing them about 2 inches apart.
  7. Bake for 10-12 minutes, or until the cookies are just set around the edges but still soft in the middle.
  8. Remove from the oven and let the cookies cool on the baking sheet for 5 minutes before transferring them to a wire rack to cool completely.
  9. These brownie cookies should come out with crisp edges and fudgy centers, just like a brownie in cookie form! Enjoy them with a glass of milk or a cup of coffee for the ultimate treat.

Here are some helpful tips to make your Earthquake Brownie Cookies even more delightful:

  1. Use High-Quality Chocolate: Since chocolate is the star of these cookies, using high-quality chocolate will enhance the flavor and texture. Opt for good-quality semi-sweet chocolate or chocolate chips for the best results.
  2. Add Espresso Powder: Espresso powder enhances the chocolate flavor without adding a coffee taste. Adding a teaspoon or two to the batter can intensify the chocolatey goodness of the cookies.
  3. Chill the Dough: Chilling the dough for a few hours or overnight before baking helps solidify the butter and chocolate, resulting in cookies with a richer flavor and chewier texture. Plus, chilled dough is easier to handle and less likely to spread excessively during baking.
  4. Roll in Powdered Sugar: Rolling the dough balls in powdered sugar before baking creates a crackly crust on the cookies’ surface, adding an extra layer of sweetness and texture. Be generous with the powdered sugar for maximum effect.
  5. Experiment with Mix-ins: While the recipe calls for chocolate chips or chunks, you can get creative with mix-ins to add texture and flavor. Consider adding chopped nuts (such as walnuts or pecans), dried fruit (such as cherries or cranberries), or even a swirl of peanut butter for a delightful twist.
  6. Don’t Overbake: To achieve the perfect fudgy texture, avoid overbaking the cookies. They should be set around the edges but still slightly soft in the middle when you remove them from the oven. Remember that they will continue to firm up as they cool on the baking sheet.
  7. Use a Cookie Scoop: Using a cookie scoop ensures uniform-sized cookies, which ensures even baking. It also makes it easier to roll the dough into balls before coating them in powdered sugar.
  8. Sea Salt Garnish: Sprinkling a pinch of flaky sea salt on top of each cookie just before baking enhances the flavor and balances the sweetness. The contrast of salty and sweet flavors takes these cookies to the next level.
  9. Allow for Resting Time: Letting the dough rest after mixing allows the flavors to meld together and develop. It also gives the flour time to hydrate, resulting in a better texture and flavor in the finished cookies.
  10. Enjoy Fresh: While these cookies can be stored in an airtight container for a few days, they are best enjoyed fresh from the oven when the centers are still warm and gooey. If you have leftovers, you can reheat them in the microwave for a few seconds to restore that fresh-baked taste.

Here are some secrets to help you achieve perfection:

  1. Use Room Temperature Eggs: Room temperature eggs incorporate more easily into the batter, resulting in a smoother texture. Take your eggs out of the refrigerator about 30 minutes before you start baking.
  2. Properly Measure Ingredients: Accurately measuring your ingredients is crucial for consistent results. Use a kitchen scale for precise measurements, especially for ingredients like flour and chocolate.
  3. Avoid Overmixing: Overmixing the batter can lead to tough cookies. Mix the ingredients until just combined to avoid overworking the dough. A few streaks of flour or cocoa powder are okay.
  4. Chill the Dough: Chilling the dough before baking helps solidify the butter and chocolate, which prevents the cookies from spreading too much in the oven. It also enhances the flavor and texture of the cookies.
  5. Roll Dough Balls Evenly: When rolling the dough into balls, aim for uniform sizes to ensure even baking. This can be easily achieved by using a cookie scoop or weighing each dough ball.
  6. Dust Hands with Powdered Sugar: To prevent the dough from sticking to your hands when rolling into balls, dust your hands lightly with powdered sugar. This also helps create a thin layer of powdered sugar on the outside of the cookies for that signature crackly crust.
  7. Don’t Skip the Sea Salt: A sprinkle of sea salt on top of each cookie before baking enhances the rich chocolate flavor and adds a delightful contrast to the sweetness. Don’t skip this step!
  8. Monitor Baking Time Closely: Every oven is different, so keep a close eye on your cookies as they bake. They should be set around the edges but still soft in the middle when you take them out. Remember that they will continue to cook slightly as they cool on the baking sheet.
  9. Cool Completely Before Serving: Allow the cookies to cool completely on the baking sheet before transferring them to a wire rack. This helps them set and develop their fudgy texture.
  10. Store Properly: Store the cooled cookies in an airtight container at room temperature for up to several days. If you prefer warm cookies, you can reheat them in the microwave for a few seconds before serving.

By following these secrets, you’ll be well on your way to achieving the perfect Earthquake Brownie Cookies that are crackly on the outside and fudgy on the inside!

Here are some frequently asked questions (FAQs) related to Earthquake Brownie Cookies along with their answers:

  1. Can I use cocoa powder instead of melted chocolate? Yes, you can use cocoa powder instead of melted chocolate in this recipe. Substitute 3 tablespoons of cocoa powder for every ounce of chocolate called for in the recipe. However, keep in mind that using melted chocolate will result in a richer and more fudgy texture.
  2. Can I freeze the dough? Yes, you can freeze the dough for Earthquake Brownie Cookies. After rolling the dough into balls, place them on a baking sheet lined with parchment paper and freeze until solid. Then transfer the frozen dough balls to a freezer-safe bag or container. When ready to bake, simply place the frozen dough balls on a baking sheet and bake as directed, adding a few extra minutes to the baking time.
  3. How do I prevent the cookies from spreading too much? Chilling the dough is key to preventing the cookies from spreading too much. Make sure to chill the dough for at least a few hours, or overnight if possible, before rolling it into balls and baking. This helps solidify the butter and chocolate, resulting in cookies with a thicker texture and less spread.
  4. Can I omit the powdered sugar coating? Yes, you can omit the powdered sugar coating if you prefer. The powdered sugar coating creates a crackly crust on the cookies, but they will still be delicious without it. Simply skip the step of rolling the dough balls in powdered sugar before baking.
  5. How can I make these cookies gluten-free? To make Earthquake Brownie Cookies gluten-free, you can substitute gluten-free all-purpose flour for the regular all-purpose flour called for in the recipe. Make sure all other ingredients, such as the cocoa powder and chocolate chips, are also gluten-free.
  6. What’s the difference between Earthquake Brownie Cookies and regular brownies? Earthquake Brownie Cookies are a hybrid between brownies and cookies, offering the best of both worlds. They have the crackly crust and fudgy texture of brownies but are portioned and shaped like cookies. This makes them easier to serve and share, and they’re perfect for those who love the edges of brownies.
  7. Can I add nuts or other mix-ins to the cookies? Yes, you can add nuts, chocolate chips, or other mix-ins to customize the cookies to your preference. Simply fold them into the batter along with the chocolate chips or chunks before chilling the dough.
  8. How long do these cookies stay fresh? Earthquake Brownie Cookies can be stored in an airtight container at room temperature for up to several days. If you prefer warm cookies, you can reheat them in the microwave for a few seconds before serving.
  9. Can I double the recipe? Yes, you can double the recipe to make a larger batch of cookies. Simply double all the ingredients listed in the recipe, and make sure to use a larger mixing bowl and baking sheet to accommodate the extra dough.
  10. What’s the best way to enjoy Earthquake Brownie Cookies? Earthquake Brownie Cookies are best enjoyed fresh from the oven when the centers are still warm and gooey. Serve them with a glass of milk or a scoop of ice cream for the ultimate indulgence!