White Chocolate Blood Drip Apples
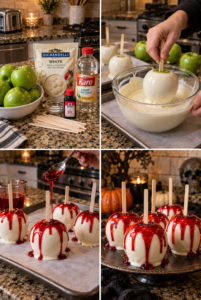
These White Chocolate Blood Drip Apples transform crisp, juicy apples into a dramatic Halloween dessert. Each apple is covered with a smooth white chocolate coating and finished with a glossy red “blood” drip that looks spooky while tasting sweet and delicious.
They’re perfect for Halloween parties, horror-themed movie nights, haunted-house celebrations, fall dessert tables, or festive homemade gifts.
Prep Time: 30 minutes
Chilling Time: 30 minutes
Total Time: Approximately 1 hour
Servings: 8 apples
Why You’ll Love This Recipe
- Dramatic Halloween presentation
- Crisp apples with a creamy chocolate shell
- Easy to make without baking
- Uses only a few ingredients
- Fun to decorate
- Perfect for Halloween parties
- Easy to prepare ahead
- Customizable with different toppings
- Individually portioned
- Great for gifting
Ingredients
White Chocolate Apples
- 8 small or medium apples
- 16 ounces white candy melts or white melting wafers
- 1–2 teaspoons refined coconut oil or vegetable shortening, if needed
- 8 sturdy wooden apple sticks
Red Blood Drip
- 8 ounces red candy melts
- 1 teaspoon refined coconut oil or vegetable shortening, if needed
- 1 tablespoon light corn syrup, optional for a glossier appearance
- A few drops of deep-red oil-based candy coloring, optional
Optional Decorations
- Halloween sprinkles
- Candy eyes
- Black sanding sugar
- Edible glitter
- Crushed chocolate cookies
- Mini candy knives or axes
- Black decorating icing
- Melted dark chocolate
Equipment
- Baking sheet
- Parchment or wax paper
- Microwave-safe bowls
- Rubber spatula
- Tall dipping glass or measuring cup
- Spoon or piping bag
- Refrigerator
How to Make White Chocolate Blood Drip Apples
Step 1: Choose the Apples
Select small or medium apples without bruises, soft spots, or broken skin.
Smaller apples are easier to coat and serve. Their lighter weight also helps them remain securely attached to the sticks.
Remove any leaves and stems.
Step 2: Remove the Wax
Most store-bought apples have a wax coating that can prevent chocolate from sticking.
Bring a pot of water almost to a boil. Dip each apple into the hot water for approximately 5–10 seconds, then wipe it firmly with a clean kitchen towel.
Do not leave the apple in hot water for too long because the heat can begin softening the fruit.
Step 3: Dry the Apples
Dry every apple thoroughly.
Allow them to sit at room temperature until no moisture remains around the top or bottom.
Even a small amount of water can cause melted chocolate or candy coating to seize, clump, or slide off the apple.
Step 4: Insert the Sticks
Push a sturdy wooden stick into the center of each apple where the stem was removed.
Insert it approximately halfway through the apple.
Test each stick gently to make sure the apple feels secure before dipping.
Step 5: Chill Briefly
Place the prepared apples in the refrigerator for approximately 10–15 minutes.
Slightly chilled apples help the white coating set more quickly. However, avoid making them extremely cold because condensation may form on their surfaces.
Step 6: Prepare the Baking Sheet
Line a baking sheet with parchment or wax paper.
Lightly spray the paper with nonstick cooking spray if your candy coating tends to stick.
Make sure there is enough room between the apples so their coatings do not touch.
Step 7: Melt the White Coating
Place the white candy melts in a microwave-safe bowl or tall measuring cup.
Microwave for 30 seconds, stir thoroughly, and then continue heating in 15-second intervals.
Stir after every interval until the coating is completely smooth.
Do not overheat the candy melts. Excessive heat can make the coating thick, lumpy, or difficult to use.
Step 8: Adjust the Consistency
If the melted coating is too thick for dipping, stir in approximately ½ teaspoon of refined coconut oil or vegetable shortening.
Add only a small amount at a time.
The coating should be fluid enough to cover the apple smoothly but thick enough to remain opaque.
Step 9: Dip the Apples
Hold one apple by the stick and lower it into the melted white coating.
Tilt and rotate the apple until it is completely covered. Use a spoon to help coat the area near the stick if necessary.
Lift the apple and allow the excess coating to drip back into the bowl.
Step 10: Remove Excess Coating
Slowly rotate the apple above the bowl for several seconds.
Gently tap your wrist rather than striking the stick against the bowl. This helps remove excess coating without loosening the apple.
Scrape the coating from the very bottom of the apple against the edge of the bowl.
Step 11: Set the White Layer
Place the coated apple upright on the prepared baking sheet.
Repeat with the remaining apples.
Refrigerate them for approximately 15 minutes, or until the white shell feels firm.
The white layer must be set before adding the red drip, or the colors may blend together.
Step 12: Melt the Red Coating
Place the red candy melts in a clean microwave-safe bowl.
Heat for 30 seconds, stir, and continue microwaving in 15-second intervals until smooth.
Add a small amount of coconut oil or shortening if the coating is too thick.
For a deep, glossy blood-red appearance, stir in light corn syrup or a small amount of oil-based candy coloring.
Do not use water-based food coloring because it may cause the candy coating to seize.
Step 13: Test the Drip
Spoon a small amount of red coating over a chilled glass or the side of one apple.
Watch how quickly it moves.
If it runs too fast, allow it to cool for a few minutes. If it remains in a thick mound, add a tiny amount of coconut oil.
A slightly thick coating creates controlled drips that stop before reaching the bottom.
Step 14: Create the Blood Drips
Spoon the red coating around the top edge of each white apple.
Gently push some of the coating toward the sides, allowing drips of different lengths to run down the apple.
Do not cover the entire white surface. Leaving plenty of white visible creates the strongest contrast.
You can also transfer the red coating to a piping bag, cut a small opening, and pipe the drips for greater control.
Step 15: Decorate
While the red coating is still soft, add Halloween sprinkles, candy eyes, edible glitter, or black sanding sugar if desired.
For a more dramatic appearance, leave the glossy red drips undecorated.
Step 16: Chill Until Firm
Return the apples to the refrigerator for approximately 10–15 minutes, or until the red coating has set.
Avoid refrigerating them uncovered for many hours because moisture can form on the coating.
Step 17: Serve
Allow the apples to stand at room temperature for approximately 10 minutes before serving.
Serve them whole or carefully slice them into wedges with a sharp knife.
The Best Apples to Use
Tart, crisp apples balance the sweetness of the white chocolate and red candy coating.
Excellent options include:
- Granny Smith
- Honeycrisp
- Pink Lady
- Fuji
- Gala
- Braeburn
- Jazz apples
Granny Smith apples provide the strongest sweet-and-tart contrast.
Choose apples that are firm, fresh, and relatively round. Irregular apples can still be used, but they may be more difficult to coat evenly.
White Chocolate or Candy Melts?
White candy melts are the easiest option because they set firmly and do not require tempering.
Real white chocolate provides a richer flavor but can be more difficult to melt and may remain soft at room temperature.
If using real white chocolate, choose high-quality bars containing cocoa butter. Finely chop the chocolate before melting it.
White chocolate chips are not always ideal because they contain stabilizers that can make the melted chocolate thick.
How to Melt White Chocolate Safely
White chocolate burns more easily than milk or dark chocolate.
Heat it slowly and stir frequently. Stop microwaving while a few small pieces remain, then continue stirring until the residual heat melts them.
The bowl and spoon must be completely dry.
If using a double boiler, make sure steam and water cannot enter the chocolate.
How to Make the Red Coating Look Like Blood
Use deep-red candy melts rather than bright cherry-red melts if available.
You can deepen the color with a tiny amount of black or burgundy oil-based candy coloring.
Add coloring one drop at a time because too much black can quickly make the coating look brown.
A small amount of light corn syrup creates a shinier appearance, although it can make the coating slightly softer.
How to Create Perfect Drips
The temperature and consistency of the red coating determine how the drips will look.
For the best results:
- Let the red coating cool slightly before using it
- Test one drip before decorating every apple
- Create drips of different lengths
- Use a spoon for a natural appearance
- Use a piping bag for precise drips
- Keep the white apples chilled
- Avoid thinning the red coating too much
If the drip runs directly to the bottom, the coating is too warm or thin.
Why Is the Coating Sliding Off?
The coating may slide if the apples are wet, waxy, or extremely cold.
To prevent this:
- Remove the store-bought wax
- Dry the apples completely
- Avoid touching the cleaned skin
- Do not freeze the apples
- Wipe away condensation before dipping
- Use a properly thick coating
- Allow excess coating to drain
Preparing the apples correctly is the most important part of the recipe.
Why Did My Candy Melts Become Thick?
Candy melts can thicken when overheated or exposed to moisture.
Stir in a small amount of vegetable shortening or refined coconut oil to improve the consistency.
Do not add water, milk, or regular liquid food coloring.
If the coating has become grainy and completely seized, replacing it may be easier than trying to repair it.
Bloody Caramel Apples
Dip the cleaned apples in melted caramel and allow it to set.
Cover the caramel with white candy coating, then add the red blood drips.
The caramel adds a soft, chewy layer beneath the chocolate shell.
Make sure the caramel is completely set before applying the white coating.
Vampire Bite Apples
Prepare the white chocolate apples as directed.
Use a clean skewer to create two small holes near one side of each apple.
Pipe a thin line of red candy coating from the holes to resemble vampire bites.
Add small white candy fangs near the holes if desired.
Eyeball Blood Drip Apples
Add one large candy eye to the front of each white-coated apple.
Pipe red lines around the eye and finish with red drips around the top.
This variation creates a playful monster or eyeball theme.
Black and Red Poison Apples
Replace the white candy melts with black candy melts.
Add glossy red drips over the black coating for a darker, dramatic Halloween appearance.
You can also reverse the colors by dipping the apples in red coating and adding black drips.
White Chocolate Ghost Apples
Skip the red drip.
Attach two candy eyes to each white-coated apple and pipe a small black mouth underneath.
These ghost apples are a less frightening option for younger children.
Halloween Sprinkle Apples
Cover the freshly dipped white apples with orange, black, green, and purple sprinkles.
Add a smaller amount of red coating over the top once the white layer has set.
Can I Add Nuts or Cookie Crumbs?
Yes.
Before the white coating sets, roll the bottom of each apple in:
- Crushed chocolate cookies
- Chopped peanuts
- Chopped pecans
- Graham cracker crumbs
- Halloween sprinkles
- Mini chocolate chips
- Toffee pieces
Keep the upper portion plain so the red drips remain visible.
Can I Make Apple Slices Instead?
Yes.
Cut the apples into thick wedges and remove the seeds.
Pat the slices extremely dry and insert a small wooden stick into each piece.
Dip them in white chocolate and add the red coating.
Apple slices release moisture quickly, so serve them the same day. Brush the cut surfaces with a small amount of lemon juice, then dry them before dipping.
What to Serve with Blood Drip Apples
These Halloween apples pair well with:
- Spooky brownies
- Monster cookies
- Caramel popcorn
- Halloween cupcakes
- Chocolate-covered pretzels
- Candy corn snack mix
- Pumpkin cookies
- Hot chocolate
- Apple cider
- Halloween punch
Arrange them on a black serving tray for a dramatic dessert-table centerpiece.
How to Wrap the Apples
Wait until both coatings are completely firm.
Place each apple inside a clear treat bag and tie it around the stick with a black or red ribbon.
Do not wrap warm or wet apples because condensation can damage the coating.
For gifting, include a label advising that the apples should be enjoyed within one or two days.
Can I Prepare Them Ahead?
Yes.
The apples can be prepared one day before serving.
Store them in the refrigerator, loosely covered, until the coating is firm. Once set, place them in a container without allowing them to touch.
They have the best appearance and texture when served within 24 hours.
Storage
Store the decorated apples in a single layer inside an airtight container.
Refrigerate for up to 2–3 days.
Place parchment paper underneath them to catch moisture or melted coating.
Do not leave the apples at room temperature for an extended period, especially after they have been cut.
Can You Freeze Chocolate-Covered Apples?
Freezing is not recommended.
The apples can become soft after thawing, and condensation may make the chocolate coating sticky or cracked.
Prepare the apples fresh and refrigerate them instead.
Frequently Asked Questions
What are White Chocolate Blood Drip Apples?
They are whole apples covered with white chocolate or candy melts and decorated with a red coating that resembles dripping blood.
Do I need to remove the wax?
Yes. Removing the wax helps the chocolate coating adhere to the apple.
Can I use white chocolate chips?
Yes, but they may melt more thickly than candy wafers. Add a small amount of coconut oil if necessary.
Can I use regular food coloring?
Water-based food coloring can cause melted candy or chocolate to seize. Use oil-based candy coloring instead.
Why is my coating not smooth?
It may be too thick, overheated, or exposed to moisture. Melt it slowly and add a small amount of shortening if needed.
Should the apples be refrigerated before dipping?
Chill them briefly, but do not freeze them. Wipe away any condensation before dipping.
How do I stop the red coating from running too far?
Allow it to cool and thicken slightly before spooning it over the apples.
Can I use caramel underneath the chocolate?
Yes. Let the caramel layer set completely before adding the white coating.
Can children help decorate?
Yes. Children can add sprinkles and candy decorations, while an adult handles the hot melted coating.
How long will the apples keep?
They have the best quality within 24 hours but can be refrigerated for approximately two to three days.
Can I make them without sticks?
Yes, but the sticks make the apples easier to dip, decorate, and serve.
Pro Tips
Use small, tart apples for the best balance of flavors and the easiest dipping.
Remove all wax and moisture before adding the coating. This is essential for preventing the white chocolate from sliding off.
Allow the white layer to become completely firm before adding the red drip.
Test the red coating on one apple first. Let it cool if it runs too quickly, or thin it with a tiny amount of coconut oil if it is too thick.
Serve the apples within one day for the best combination of crisp fruit, creamy white chocolate, and glossy red Halloween drips.
Final Thoughts
These White Chocolate Blood Drip Apples are a simple but striking Halloween dessert. Crisp apples are covered with a smooth white shell and finished with dramatic red drips for a spooky appearance that stands out on any dessert table.
Make them for a Halloween party, horror-movie night, classroom celebration, or seasonal gift. You can also transform the same basic recipe into vampire-bite apples, poison apples, ghost apples, eyeball apples, or caramel-filled blood drip apples.