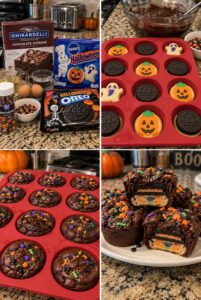
These Spooky Halloween Brownies combine three irresistible treats in every bite: soft Halloween sugar cookies, crunchy chocolate sandwich cookies, and rich, fudgy brownies. Baked in a muffin pan and finished with colorful Halloween sprinkles, these individual brownie cups reveal a fun cookie-filled center when sliced open.
Inspired by the reference image, this easy recipe uses boxed brownie mix, refrigerated Halloween cookie dough, Halloween Oreos, and festive sprinkles. It’s perfect for Halloween parties, school celebrations, bake sales, movie nights, or a spooky family dessert.
Prep Time: 15 minutes
Bake Time: 22–28 minutes
Cooling Time: 20 minutes
Total Time: Approximately 1 hour
Servings: 12 brownie cups
Why You’ll Love This Recipe
- Three desserts combined in one
- Rich and fudgy brownie exterior
- Surprise cookie center
- Easy to make with packaged ingredients
- Baked in convenient individual portions
- Colorful Halloween appearance
- Fun for children to help assemble
- Perfect for parties and dessert tables
- Easy to transport
- Customizable for other holidays
Ingredients
Brownie Batter
- 1 box chocolate brownie mix
- Eggs required on the brownie-mix package
- Vegetable oil required on the package
- Water required on the package
- 1 teaspoon vanilla extract, optional
- ½ cup miniature chocolate chips, optional
Cookie Centers
- 12 refrigerated Halloween-shaped sugar cookies
- 12 Halloween Oreo cookies or regular chocolate sandwich cookies
Decorations
- ¼ cup Halloween sprinkles
- Candy eyes, optional
- Orange, purple, green, or black decorating icing, optional
- Melted chocolate, optional
Equipment
- Standard 12-cup muffin pan
- Nonstick cooking spray
- Two mixing bowls
- Whisk or spatula
- Cookie scoop or large spoon
- Cooling rack
How to Make Spooky Halloween Brownies
Step 1: Preheat the Oven
Preheat your oven to the temperature listed on your brownie-mix package, usually 350°F for a metal pan or 325°F for a dark nonstick pan.
Lightly coat all 12 cavities of a standard muffin pan with nonstick cooking spray.
Pay special attention to the sides and bottoms because the fudgy brownies can stick.
Step 2: Prepare the Brownie Batter
Pour the dry brownie mix into a large mixing bowl.
Add the eggs, vegetable oil, and water according to the package directions. Add the vanilla extract if using.
Stir until the ingredients are evenly combined and no dry pockets remain.
Avoid mixing excessively because overmixing can introduce too much air and create cakier brownies.
Fold in miniature chocolate chips if you want an even richer chocolate flavor.
Step 3: Prepare the Halloween Cookies
Remove the refrigerated Halloween sugar cookies from the package.
If the cookies are particularly thick, flatten them slightly so there is enough space for the Oreo and brownie batter.
Keep the cookie designs facing downward when placing them in the muffin cups. Although the design may not remain perfectly visible after baking, the orange, green, white, or purple cookie colors will create a festive surprise inside.
Step 4: Add the Sugar Cookie Layer
Place one refrigerated Halloween sugar cookie in the bottom of each prepared muffin cup.
Press it very gently so it fits the bottom of the cavity, but do not spread it all the way up the sides.
The cookie dough will expand as it bakes.
Step 5: Add the Oreo Layer
Place one Halloween Oreo directly over each sugar cookie.
Press it down lightly without pushing it completely through the soft cookie dough.
Using Halloween Oreos with orange-colored creme makes the cut brownies look especially festive.
Step 6: Cover with Brownie Batter
Spoon brownie batter over each cookie stack.
Fill each muffin cup approximately ¾ full, making sure the batter flows around the Oreo and covers the top.
Do not fill the cavities to the rim because the brownie batter and cookie dough will expand.
Step 7: Add the Sprinkles
Scatter Halloween sprinkles over the brownie batter.
Use a combination of orange, black, purple, and green sprinkles for a colorful seasonal appearance.
Press the larger sprinkles down very gently so they remain attached while baking.
Step 8: Bake
Place the muffin pan in the preheated oven.
Bake for approximately 22–28 minutes, or until the tops are set and a toothpick inserted into the brownie portion comes out with a few moist crumbs.
Avoid inserting the toothpick directly through the Oreo because the cookie filling can make it difficult to judge whether the brownie batter is finished.
Step 9: Check for Doneness
The brownie cups should look set around the edges while remaining slightly soft in the center.
Do not wait for the toothpick to come out completely clean. That usually means the brownies are overbaked and may become dry after cooling.
Step 10: Cool in the Pan
Remove the muffin pan from the oven.
Allow the brownie cups to cool inside the pan for approximately 15–20 minutes.
Cooling gives the brownie structure time to firm up and makes the treats easier to remove.
Step 11: Remove the Brownies
Run a thin butter knife carefully around the edge of each brownie cup.
Lift the brownies from the muffin pan and transfer them to a cooling rack.
If they feel too soft to remove, allow them to cool for another five minutes.
Step 12: Decorate
Once the brownies have cooled, add extra sprinkles, candy eyes, decorating icing, or melted chocolate.
You can pipe small spiderwebs over the tops using white icing or attach pairs of candy eyes with a dot of melted chocolate.
Step 13: Serve
Serve the brownie cups whole or cut one in half to reveal the colorful sugar-cookie and Oreo center.
They can be enjoyed slightly warm, at room temperature, or chilled.
The Best Brownie Mix to Use
A chocolate-supreme or fudge brownie mix works particularly well because it creates a rich chocolate layer around the cookies.
Good options include:
- Fudge brownie mix
- Dark chocolate brownie mix
- Milk chocolate brownie mix
- Chocolate-chunk brownie mix
- Triple-chocolate brownie mix
- Gluten-free brownie mix
Prepare the batter according to the package directions because different brands may require different quantities of eggs, oil, and water.
For the fudgiest results, choose the package option labeled “fudgy” if it provides separate directions for fudgy and cake-like brownies.
Can I Use Homemade Brownie Batter?
Yes.
You can replace the boxed mix with your favorite homemade brownie recipe. You will need approximately enough batter for one standard 8×8-inch or 9×9-inch pan.
The batter should be thick enough to surround the cookie stacks without making them float.
A dense, fudgy recipe works better than a light, cake-like brownie batter.
The Best Halloween Cookies for the Center
The reference version uses refrigerated Pillsbury Halloween shape sugar cookies featuring designs such as pumpkins and ghosts.
You can also use:
- Pumpkin-shaped refrigerated cookies
- Ghost-shaped sugar cookies
- Orange sugar-cookie dough
- Chocolate-chip cookie dough
- Peanut-butter cookie dough
- Homemade chilled sugar-cookie dough
- Seasonal break-and-bake cookies
Do not use a large portion of dough in each cup. Too much cookie dough may cause the brownies to overflow or remain underbaked in the center.
Can I Use Regular Oreos?
Yes.
Halloween Oreos create the most colorful center, but regular Oreos taste just as delicious.
Other options include:
- Chocolate-creme Oreos
- Golden Oreos
- Peanut-butter sandwich cookies
- Mint Oreos
- Birthday-cake Oreos
- Chocolate sandwich cookies from another brand
Orange-creme sandwich cookies are ideal for the Halloween theme.
How to Keep the Brownies from Sticking
Brownie batter can cling firmly to an unprepared muffin pan.
For easy removal:
- Coat every cavity thoroughly with nonstick spray
- Use parchment muffin liners
- Allow the brownies to cool before removing them
- Loosen the edges with a thin knife
- Avoid forcing very warm brownies from the pan
Silicone muffin pans are also useful because the flexible cavities make it easier to release the cooled brownies.
Why Did My Brownies Overflow?
The muffin cups may have contained too much cookie dough or brownie batter.
The stacked sugar cookie and Oreo already occupy a significant amount of space. Add only enough brownie batter to cover the cookies and fill the cavity approximately three-quarters full.
Place the muffin pan on a sheet pan if you are concerned about spills.
Why Are the Centers Still Soft?
These treats contain multiple layers, so they may require slightly more baking time than plain brownie cups.
If the centers are extremely wet, return the pan to the oven for another three to five minutes.
Remember that fudgy brownies continue setting while they cool. A moist center is desirable, but liquid brownie batter indicates that they need additional baking.
How to Create Fudgy Brownie Cups
For the best fudgy texture:
- Follow the fudgy directions on the box
- Measure the liquid ingredients carefully
- Avoid overmixing the batter
- Do not overbake the brownies
- Cool them inside the pan
- Store them in an airtight container
Refrigerating the brownies creates an even denser, truffle-like consistency.
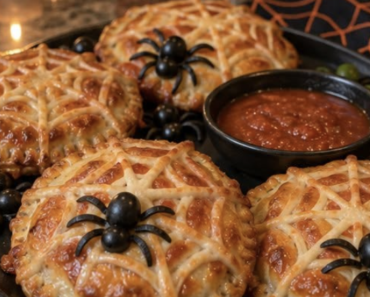
Spiderweb Halloween Brownies
Allow the brownie cups to cool completely.
Pipe a small spiral of white icing over each brownie. Drag a toothpick from the center toward the outer edge several times to create a spiderweb design.
Finish with a plastic spider decoration or a small edible candy spider.
Remove any nonedible decorations before serving.
Monster Brownie Cups
Spread a small amount of green or purple frosting over the cooled brownies.
Add candy eyes, sprinkles, and small pieces of chocolate candy to create monster faces.
Using different quantities and sizes of candy eyes makes every monster look unique.
Graveyard Brownie Cups
Top each brownie with chocolate frosting and crushed Oreo crumbs.
Insert a small cookie or rectangular piece of chocolate into the top to resemble a tombstone.
Write “RIP” on the cookie with decorating icing.
Pumpkin Patch Brownies
Use pumpkin-shaped refrigerated sugar cookies in the center.
Decorate the baked brownies with orange pumpkin candies, green sprinkles, and crushed chocolate cookies.
This version works especially well for fall gatherings as well as Halloween parties.
Halloween Candy Brownies
Replace the sprinkles with chopped Halloween candy.
Good options include:
- Peanut-butter cups
- Candy-coated chocolates
- Chocolate bars
- Caramel candies
- Toffee pieces
- Candy corn
Add candy corn only after baking because it may melt excessively in the oven.
Can I Bake This as One Large Brownie?
Yes.
Line a 9×13-inch pan with parchment paper.
Spread approximately half of the brownie batter in the pan. Arrange the sugar cookies and Oreos over the batter, then cover them with the remaining brownie mixture.
Add sprinkles and bake according to the brownie-mix directions, adding more time if necessary.
Cool completely before cutting into squares.
The individual muffin-pan version creates neater portions and gives each serving its own cookie center.
Mini Halloween Brownie Bites
Use a mini muffin pan and smaller pieces of cookie dough.
Place a miniature sandwich cookie or half of a regular Oreo over each small portion of dough.
Cover with brownie batter and bake for approximately 12–16 minutes.
Begin checking early because miniature brownies bake quickly.
What to Serve with Halloween Brownies
Serve these brownie cups with:
- Vanilla ice cream
- Chocolate ice cream
- Whipped cream
- Hot chocolate
- Cold milk
- Chocolate sauce
- Caramel sauce
- Fresh strawberries
- Halloween punch
- Candy-covered popcorn
For a Halloween dessert table, pair them with decorated cookies, popcorn balls, caramel apples, and spooky cupcakes.
Can Children Help Make Them?
Yes.
Children can help place the sugar cookies and Oreos into the muffin pan, add sprinkles, and decorate the cooled brownies.
An adult should handle the oven, hot pan, and removal of the brownies.
Set the decorations in small bowls so everyone can create a different monster, pumpkin, ghost, or spiderweb design.
Can I Prepare Them Ahead?
Yes.
Bake the brownie cups one or two days before your celebration.
Allow them to cool completely, then store them in an airtight container at room temperature.
Wait to add delicate icing decorations or candy eyes until the day you plan to serve them.
Storage
Place the cooled brownies in an airtight container.
Store them at room temperature for up to 3 days or refrigerate them for approximately 5 days.
Separate stacked layers with parchment paper to protect the decorations.
Bring refrigerated brownies to room temperature before serving if you prefer a softer texture.
How to Reheat Halloween Brownies
For a warm, gooey center, microwave one brownie for approximately 10–15 seconds.
Do not microwave brownies decorated with plastic toppers or decorations that are not heat-safe.
You can also warm undecorated brownies in a 300°F oven for approximately five minutes.
Can You Freeze Spooky Halloween Brownies?
Yes.
Freeze the brownies before adding icing or candy decorations.
Wrap each cooled brownie cup in plastic wrap and place them inside a freezer-safe container. Freeze for up to 2 months.
Thaw them at room temperature, then add the decorations before serving.
Frequently Asked Questions
What are Spooky Halloween Brownies?
They are individual brownie cups filled with Halloween sugar cookies and chocolate sandwich cookies, then decorated with seasonal sprinkles.
Do I bake the sugar cookies first?
No. Place the refrigerated cookie dough directly in the muffin cups. It bakes at the same time as the brownie batter.
Should I separate the Oreo cookies?
No. Use each Oreo whole so the creme remains visible in the center.
Can I use cupcake liners?
Yes. Parchment liners are especially helpful for removing the brownies cleanly.
How full should the muffin cups be?
Fill them approximately three-quarters full after adding the sugar cookie and Oreo.
How do I know when the brownies are finished?
The edges should be set, and a toothpick inserted into the brownie portion should have a few moist crumbs.
Can I omit the Oreo layer?
Yes. You can make the brownie cups with only the Halloween sugar-cookie center.
Can I omit the sugar-cookie dough?
Yes. Place one Oreo in each cavity and cover it with brownie batter.
Can I make them gluten-free?
Use gluten-free brownie mix, gluten-free cookie dough, and gluten-free chocolate sandwich cookies.
Can I use homemade sugar-cookie dough?
Yes. Chill the dough first and use approximately one tablespoon in each muffin cup.
How long will the brownies keep?
They will keep for about three days at room temperature or five days in the refrigerator.
Can I freeze them?
Yes. Freeze the undecorated brownie cups for up to two months.
Pro Tips
Thoroughly grease the muffin pan or use parchment liners so the brownies release cleanly.
Use only a small portion of sugar-cookie dough in each cavity. Add one whole Oreo, then cover the stack with enough brownie batter to fill the cup approximately three-quarters full.
Avoid overbaking. The brownies should remain slightly fudgy and will continue to set as they cool.
Cut one brownie in half before serving to display the colorful Halloween sugar-cookie and Oreo surprise center.
Final Thoughts
These Spooky Halloween Brownies turn simple packaged ingredients into an impressive seasonal dessert. Every individual brownie cup contains a soft Halloween sugar cookie, a crunchy Oreo, rich chocolate brownie batter, and colorful festive sprinkles.
They’re easy enough for a family baking activity but eye-catching enough for a Halloween dessert table, classroom party, or bake sale. Decorate them with spiderwebs, candy eyes, pumpkins, monsters, or graveyard toppings to create your own spooky collection.