
If you’re looking for a creamy, fruity, crunchy no-bake dessert that is fun to serve and easy to make, these Cheesecake Wafer Bags are the perfect treat.
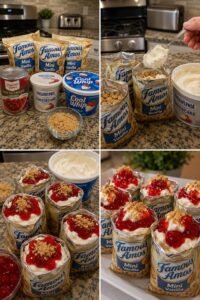
Made with single-serving mini vanilla wafer bags, no-bake cheesecake filling, Cool Whip, cherry pie filling or strawberry topping, and optional graham cracker crumbs, this recipe turns a simple snack bag into a cute handheld cheesecake dessert. It is sweet, creamy, crunchy, fruity, and perfect for parties.
These wafer bags have all the flavor of a no-bake cheesecake cup, but they are served right inside the bag. That means no bowls, no baking, no slicing, and very little cleanup. Just open the bags, gently crush the wafers, add creamy cheesecake filling, top with fruit, and serve with spoons.
This recipe is perfect for summer parties, birthday celebrations, cookouts, classroom treats, kids’ snacks, potlucks, baby showers, movie nights, family dessert nights, or anytime you need a quick no-bake dessert that looks fun and tastes delicious.
The combination of crunchy vanilla wafers, smooth cheesecake filling, fluffy Cool Whip, and sweet fruit topping makes every bite taste like a mini cheesecake parfait.
Why You’ll Love This Recipe
No baking required
Creamy and fruity
Fun walking dessert
Perfect for parties
Kid-friendly
Easy individual servings
Minimal cleanup
Great for summer
Simple ingredients
Cute presentation
Easy to customize
Perfect for dessert tables
Crunchy vanilla wafer base
Cheesecake flavor in every bite
Ready fast
Ingredients You’ll Need
Single-serving mini vanilla wafer bags
No-bake cheesecake filling
Cool Whip
Cherry pie filling or strawberry topping
Graham cracker crumbs, optional
Optional Add-Ins
Fresh strawberries
Blueberry pie filling
Apple pie filling
Caramel sauce
Chocolate drizzle
Mini chocolate chips
Crushed Oreos
Extra vanilla wafers
Whipped cream
Sprinkles
Lemon zest
Banana slices
Crushed shortbread cookies
White chocolate chips
Chopped nuts
How to Make Cheesecake Wafer Bags
Step 1: Prepare the Wafer Bags
Open each single-serving mini vanilla wafer bag from the top.
Be gentle so the bag stays in good shape because it will be used as the serving cup.
These little bags make the dessert easy to hold, easy to serve, and fun to eat with a spoon.
Step 2: Crush the Wafers Slightly
Gently crush the vanilla wafers inside each bag.
You do not want to crush them into fine crumbs.
Just lightly press the bag so some wafers break into smaller pieces.
This creates a crunchy base that mixes perfectly with the creamy cheesecake filling.
Step 3: Add the Cheesecake Filling
Spoon no-bake cheesecake filling into each wafer bag.
Add enough to cover the crushed wafers and create a creamy layer.
The cheesecake filling gives this dessert its rich, smooth, classic cheesecake flavor.
Do not overfill the bags because you still need room for Cool Whip and fruit topping.
Step 4: Add Cool Whip
Spoon a little Cool Whip over the cheesecake filling.
The Cool Whip makes the dessert light, fluffy, and extra creamy.
You can add a small amount for a simple topping or a bigger spoonful for a more whipped cheesecake-style dessert.
Step 5: Add the Fruit Topping
Add a spoonful of cherry pie filling or strawberry topping over the Cool Whip.
Cherry pie filling gives the dessert a classic cherry cheesecake flavor.
Strawberry topping makes it taste fresh, sweet, and fruity.
Both options work beautifully with the vanilla wafers and cheesecake filling.
Step 6: Add Graham Cracker Crumbs
If using graham cracker crumbs, sprinkle a little over the top.
This gives the dessert more of a classic cheesecake crust flavor.
It also makes the bags look finished and adds a soft crumbly texture.
Step 7: Add Extra Toppings
You can add extra wafers, sprinkles, fresh fruit, mini chocolate chips, or a drizzle of caramel or chocolate.
This step is optional, but it makes the dessert look even more fun for parties and dessert tables.
Step 8: Serve
Serve right from the bag with a spoon.
These Cheesecake Wafer Bags are best served shortly after assembling so the wafers still have a little crunch.
They are creamy, fruity, crunchy, and perfect for a fun no-bake treat.
Serving Ideas
These Cheesecake Wafer Bags are perfect for:
Birthday parties
Summer cookouts
Pool parties
Family dessert nights
Kids’ treats
Classroom snacks
Baby showers
Potlucks
Picnics
Sleepovers
Movie nights
BBQs
Holiday dessert tables
No-bake dessert bars
Easy party trays
What to Serve With Them
These dessert bags pair perfectly with:
Lemonade
Iced tea
Fruit punch
Strawberry milk
Vanilla milkshakes
Hot dogs
Burgers
Mini sandwiches
Walking taco bags
Pizza rolls
Fruit salad
Party chips
Cupcakes
Cookies
Ice cream cups
Frequently Asked Questions
Can I make these ahead of time?
You can prepare the cheesecake filling and toppings ahead of time, but it is best to assemble the bags close to serving time.
If they sit too long, the wafers may become very soft.
Can I use homemade cheesecake filling?
Yes. Homemade no-bake cheesecake filling works great.
A simple mixture of cream cheese, powdered sugar, vanilla, and whipped topping works perfectly.
Can I use canned cherry pie filling?
Yes. Canned cherry pie filling is easy and gives the bags a classic cheesecake flavor.
Can I use strawberry topping?
Yes. Strawberry topping is delicious and makes the dessert taste bright and fruity.
You can also use fresh chopped strawberries.
Can I use blueberry topping?
Absolutely. Blueberry topping works very well and gives the dessert a blueberry cheesecake flavor.
Can I use graham cracker bags instead?
Yes. Graham cracker snack bags can work if you want more classic cheesecake crust flavor.
Vanilla wafers give a sweeter, softer cookie taste.
Can kids help make this recipe?
Yes. Kids can help crush the wafer bags, spoon in cheesecake filling, add Cool Whip, and top with fruit.
It is a fun and easy recipe for kids to assemble.
Do these need to be refrigerated?
Yes. Since the recipe uses cheesecake filling and Cool Whip, keep the ingredients chilled until serving.
If the bags are assembled ahead of time, store them in the refrigerator.
Can I make these for a large party?
Yes. This recipe is perfect for a crowd because each bag is already a single serving.
Set up a topping station so guests can choose cherry, strawberry, blueberry, or chocolate toppings.
How do I keep the bags from getting soggy?
Assemble them shortly before serving.
Use a moderate amount of filling and avoid adding too much fruit syrup.
20 Detailed Tips for the Best Cheesecake Wafer Bags
⭐ Open the bags carefully so they stay easy to serve from.
⭐ Crush the wafers lightly, not completely.
⭐ Use chilled cheesecake filling for the best texture.
⭐ Do not overfill the bags.
⭐ Add Cool Whip right before serving.
⭐ Use cherry topping for classic cheesecake flavor.
⭐ Use strawberry topping for a fruity summer version.
⭐ Add graham cracker crumbs for a cheesecake crust finish.
⭐ Serve with small spoons.
⭐ Keep toppings chilled until ready to use.
⭐ Use a piping bag for cleaner cheesecake filling.
⭐ Add fresh fruit for a prettier look.
⭐ Make a topping bar for parties.
⭐ Add extra wafers on top for crunch.
⭐ Use small amounts of syrupy topping to avoid sogginess.
⭐ Assemble close to serving time.
⭐ Store leftovers in the refrigerator.
⭐ Add sprinkles for kids’ parties.
⭐ Use blueberry topping for a fun flavor change.
⭐ Make extra because these are always popular.
Fun Variations
Cherry Cheesecake Wafer Bags
Use no-bake cheesecake filling, Cool Whip, and cherry pie filling.
Top with graham cracker crumbs for a classic cherry cheesecake taste.
Strawberry Cheesecake Wafer Bags
Use strawberry topping or fresh chopped strawberries.
This version is sweet, fruity, and perfect for summer parties.
Blueberry Cheesecake Wafer Bags
Add blueberry pie filling over the cheesecake layer.
This version is creamy, colorful, and great for dessert tables.
Chocolate Cheesecake Wafer Bags
Add chocolate drizzle and mini chocolate chips over the Cool Whip.
You can also use chocolate cookie crumbs on top.
Banana Cheesecake Wafer Bags
Add banana slices with the cheesecake filling.
Top with Cool Whip and crushed vanilla wafers for a banana pudding cheesecake flavor.
Caramel Apple Cheesecake Wafer Bags
Use apple pie filling and a drizzle of caramel sauce.
This version is cozy, sweet, and perfect for fall.
Storage & Reheating
These Cheesecake Wafer Bags do not need reheating because they are served cold.
Store leftovers upright in the refrigerator for up to 2 days.
For the best texture, enjoy them the same day they are assembled.
The wafers will soften as they sit, which still tastes good, but the dessert will lose some crunch.
If preparing for a party, store the cheesecake filling, Cool Whip, fruit topping, and wafer bags separately, then assemble right before serving.
Make-Ahead Tips
You can prepare the cheesecake filling ahead of time and keep it covered in the refrigerator.
You can also portion the fruit toppings into small bowls and crush graham crackers ahead of time.
Do not open and fill the wafer bags too early.
For the best results, assemble the bags shortly before serving so the wafers stay lightly crunchy and the toppings look fresh.
Why This Recipe Works
This recipe works because it combines creamy cheesecake filling with crunchy vanilla wafers and sweet fruit topping.
The vanilla wafers act like the crust, the cheesecake filling brings rich creaminess, Cool Whip adds a fluffy layer, and the cherry or strawberry topping gives the dessert bright fruity flavor. Graham cracker crumbs add that classic cheesecake finish and make the bags taste even more like a no-bake cheesecake cup.
The result is a fun, easy, creamy dessert that feels special but takes very little effort.
These Cheesecake Wafer Bags are creamy, crunchy, fruity, and perfect for parties, kids’ treats, summer snacks, or an easy no-bake dessert everyone will love.


